

An open map?
Source engine, which is funnily a Quake engine on steroids (a bit of exaggeration but still), inherited the same limitations of its parents in terms of visibility calculations: BSP and PVS. This fact makes Source, as was Quake engine before, more suitable to rooms and hallways separated by portals where the BSP shines in all its glory.
Inheritably, Source does not like large open maps where the PVS is of considerable size and the over-rendering is a real issue.
If you work with Source engine, then you already know the importance of optimization in a large, detailed map. Optimization becomes even more imperative when the said map is open.
What’s an open map? Good question. The word “open” is an umbrella term to denote any map that does not have traditional hallways and corridors that connect indoors to outdoors. The map is mostly large, outdoors with an unbroken skyline; in other words, the same stuff that source engine nightmares are made of in terms of PVS and BSP.
In a traditional “hallway’d” map with twisted corridors leading to open areas followed by other hallways, and even if you “forgot” to place hints and areaportals, the geometry itself allows the engine to cut visleaves and limit visibility; granted the visleaves’ cuts will be subpar and messy and the PVS will be in excess, but still, the visibility and fps will be relatively under control. A twisted hallway is a remedy to long sight lines after all.
In an open map, and without hallways and enough geometry to help the engine, the PVS risks to be huge and the whole map could be rendered at once from any point (over-rendering). We are talking here about a severe fps killer and a potential slideshow on a medium to low range computer. Source does not like over-rendering; I repeat, Source does not like over-rendering.
I believe a screenshot should be welcome at this stage to illustrate an open map. I’ve chosen a nice medium-size map from CSGO to showcase the issue: de_stmarc.

The shot is taken in Hammer obviously, and you can immediately see that the skybox is one big unbroken body from one edge of the map to the opposite one. This is the classic definition of open map.
Let’s see this map in 2D view from the side.

I have highlighted the skybox in blue so you could see the continuous sky body all over the map. Please note that an open map can have varying skybox shapes but I’ve chosen the simple and classic one to showcase my point where it is easier to see and visualize the concept of open map.
In contrast, a “traditional” map will have several skyboxes, often not connected directly but rather through a system of indoor rooms or hallways, varying in size and shape.
I will have my map de_forlorn as example here.

I have also highlighted the skybox in blue and you can easily notice several skyboxes for CT spawn, T spawn, and Mid/bombsites. These skyboxes are not directly connected to each other but the areas related to them are linked on the lower levels through various indoor locations, some vast (like garage, tunnels…) and some small (like lab hallway…).
If you are not that comfortable with source optimization or feel that certain terms are alien to you, then please read my previous optimization papers and articles before proceeding further in this article (Previous papers can be found here Source Engine Optimization roadmap).
The necessary tools
I’m not revealing a secret when I tell you that the same tools used to optimize any map in Source are exactly the same ones used for optimizing an open map. If you were expecting some magical additional tools, I’m sorry to bust your bubble.
Since the tools are the same (nodraw, func_detail, props, hints, areaportals, occluders…), it is more about how to use them in open maps that makes all the difference.
So, how to properly optimize an open map? Well, you could always pay me to do so for you (joking…not…maybe…I dunno!!)
If the above option is off the table, then read on the rest of this article ![]() .
.
Horizontal hints
While in a traditional map one might get away without using horizontal hints, it is virtually impossible to skip them (pun intended) in an open map unless you want to witness single digit fps burning your eyes on the screen. They are of utmost importance to negate the "tall visleaves across the map" issue.
In a traditional map, even if you bypass adding horizontal hints, the damage in fps will mostly be local since the skyboxes are not connected and areas are mostly autonomous in terms of PVS. In case of my map “Forlorn” and referring to the 2D diagram above, if I remove horizontal hints from CT spawn, then only this area will suffer from tall visleaves and over-rendering. Obviously, this is not cool in terms of optimization, but at least the effect will be somehow restricted to this area only.
In the case of “Stmarc”, you can certainly see that not including horizontal hints will have tall visleaves seen from across the map as the skybox is one unit. The PVS will grow exponentially and the over-rendering will take its toll on the engine.
Let’s move on to some screenshots and diagrams, shall we.
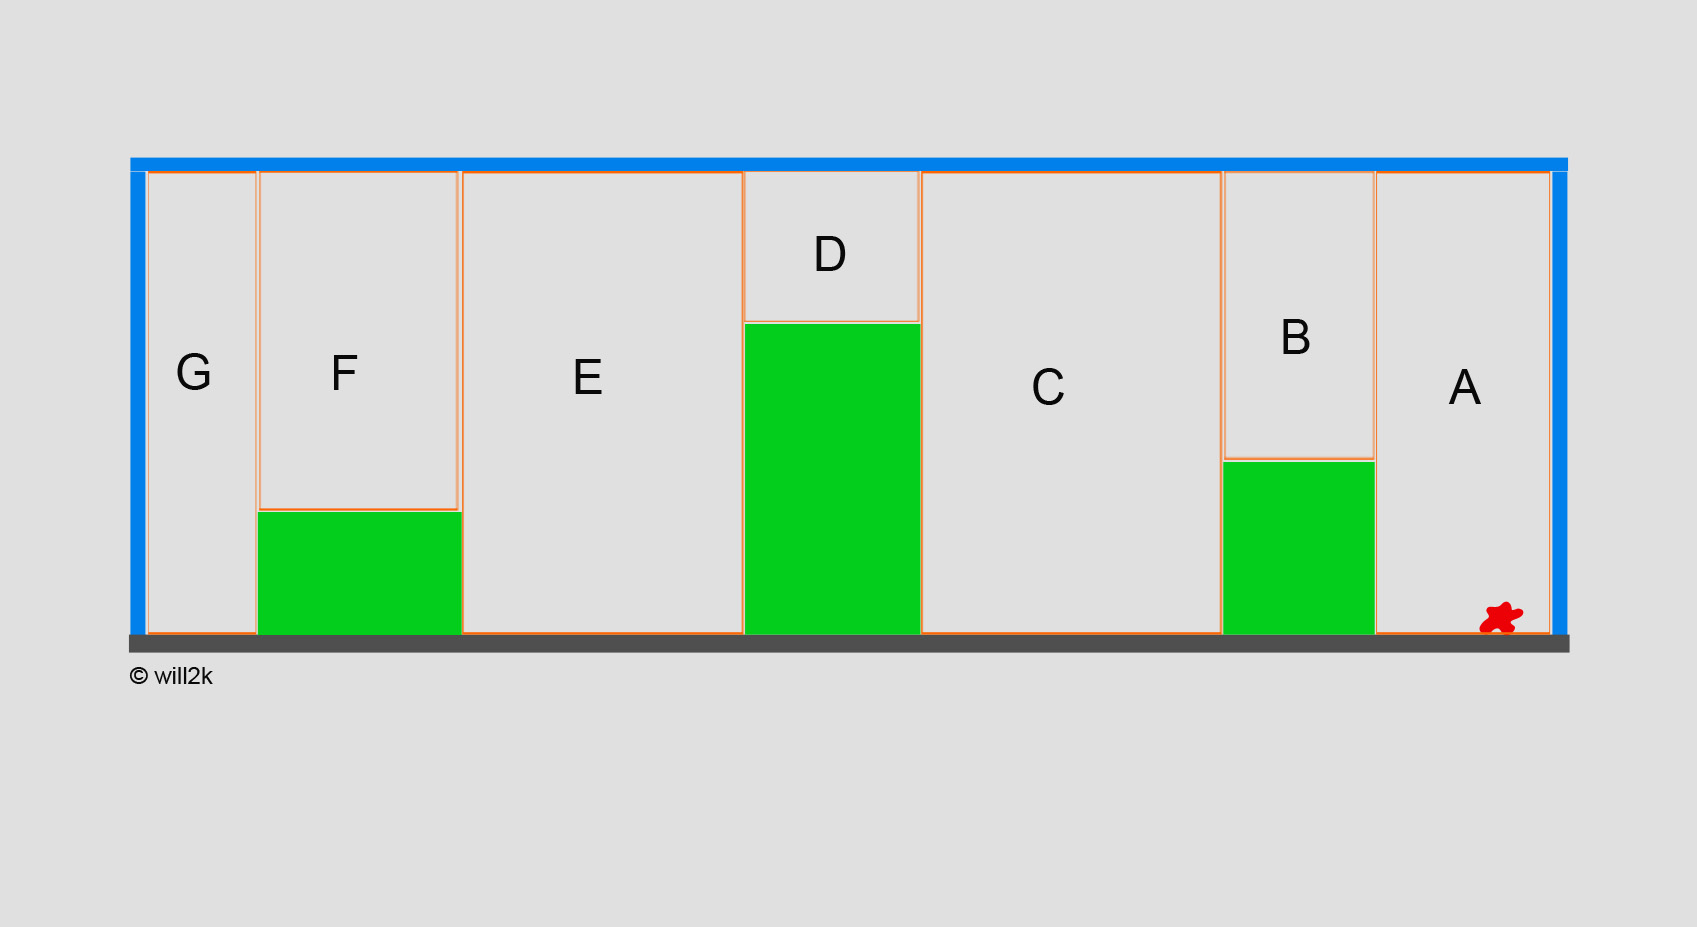
This is our glorious open map in side view. The blue lines denote the skybox, the dark grey one is the ground, and the green rectangles represent solid regular world brushes such as building bases for example. The red starfish little-man-with-arms-wide-open is the player. The orange hollow rectangles denote the various visleaves that the engine would probably create in the map (most go from ground level to skybox level and this is what I refer to as “tall visleaf”).
If you know your optimization, then you certainly remember that BSP relies on “visibility from a region” approach (for a refresher, please consult my papers Demystifying Source Engine Visleaves and Source Engine PVS - A Closer Look. This simply translates to the following: the player is in visleaf A and visleaf A has direct line of sight to visleaves B, C, D, E, F, and G. The PVS for A in this case would be stored as BCDEFG. Once the engine recognizes that the player is in A, and regardless of the exact position in A, it will proceed to render the whole PVS content. Everything in visleaves BCDEFG will be rendered even though the player is at the extreme end of A and has no line of sight to most of this content.
You can immediately notice the extent of damage you will inflict on your open map if you neglect adding horizontal hints: excess PVS with additional useless content to be rendered at all times.
Now that we established the importance of these horizontal hints in open maps, the question remains: where shall I put these hints?
In the diagram above, the most logical places would be on top of the 3 green rectangles.
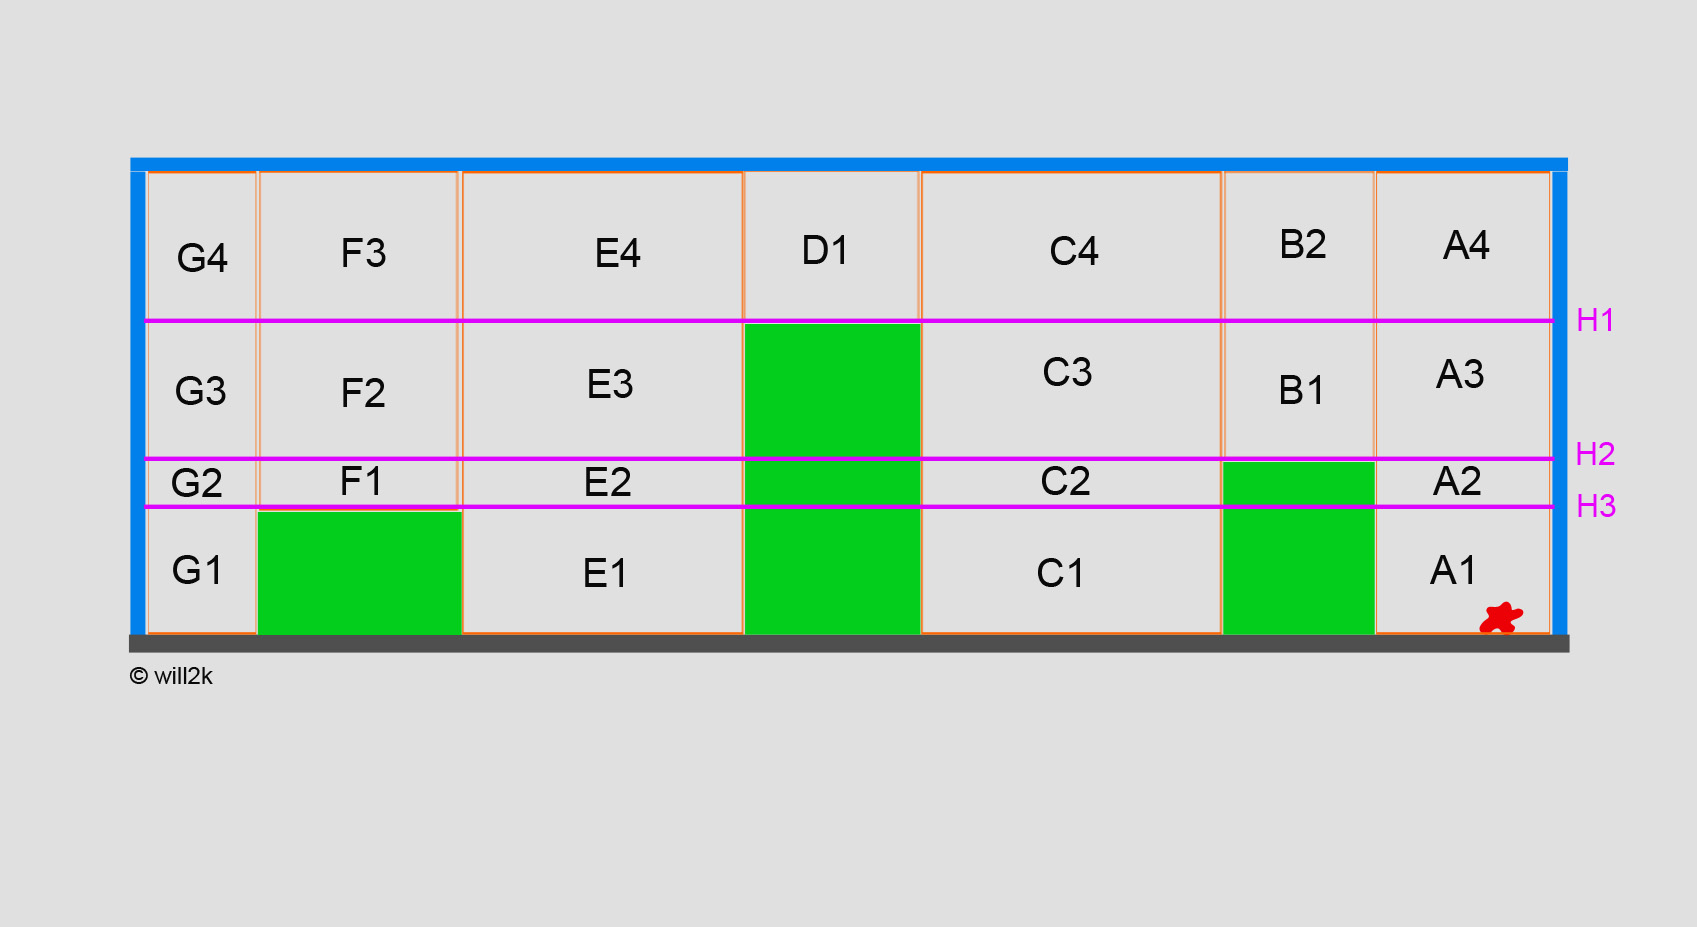
We added 3 horizontal hints (H1, H2, H3) on top of the 3 regular brushes in our map (the hint face neatly resting on the top of the regular brush while other faces are textured with “skip”). This will create more visleaves as can be clearly seen in the above diagram, and vvis will take more time to calculate visibility due to the increased number of leaves and portals but this is done for the greater good of humanity your map’s fps.
Now the player is in visleaf A1 and the PVS is reduced to (sit tight in your chair) A2, A3, A4, B1, B2, C3, C4, D1, E4, F3. On top of the nice result of a greatly reduced PVS (and therefore content to render), keep in mind that leaves A4, B2, C4, D1, E4, and F3 are mostly empty since they are way up touching the skybox.
Some folks will start complaining and whining: what the hell dude, I don’t have 3 green rectangles in my map; where would I put my hints?? My answer would be: deal with it!!
Joking aside, open maps will greatly differ in size, shape, geometry, and layout. What you need to do is choose 1 to 5 common height locations in your map where you would implement these hints. Medium maps with mostly uniform building heights can get away with 1 horizontal hint, while complex, large maps with various building heights can do with 4-5 hints.
If your map has a hill made of displacements that separates 2 parts of the map, then it is also a candidate for horizontal hints. You just need to insert a nodraw regular world brush inside the displacement to be used as support for the horizontal hint (the same technique can be used if you have a big non-enterable hollow building made mostly of func_detail/props/displacements).
Vertical/corner hints
These might not come into play as much as their horizontal siblings, however they could see a growing potential use depending on the map’s layout, geometry tightness versus openness.
I cannot go through all combinations of open maps obviously to show you how to lay vertical and corner hints; what I will do is choose one diagram representing a typical open map scenario with some scattered houses, streets, and surrounding fields. Once you see how I proceed with these hints, it will become a lot easier for you to implement them in your own map regardless of the differing geometry and layout.

Here’s our typical map viewed from top with grey lines being map borders, green rectangles being houses (solid world brushes), and our tiny red player at the rightmost part of the map. The map has a main street that goes in the middle between houses but the player is not restricted to this path only.
The diagram below shows how I would proceed with my hints for such setup.

This is basically what you get when you give a 5-year-old some crayons.
Seriously though, I just gave each hint a different color so you could discern them on the spot, otherwise it would be hard to tell where each one starts and ends.
Most of these hints go from one side of the map to the other while going from ground level to skybox top; don’t be afraid of having big hints that cross your entire map.
Notice that we have both straight vertical hints (shown from above in the diagram obviously) and corner hints; what I did is that I compartmentalized the map so wherever the player is, chances are they will have the least amount of leaves to render in the PVS (this is just a basic hint system and more fine tuning and additions could be done but you get the gist of it).
To get more details on hint placement, please refer to my paper Hints about Hints - Practical guide on hint brushes placement
Areaportals
If your map has enterable buildings, then it is imperative to separate indoors from outdoors using areaportals; this is top priority.
Make sure to slap an areaportal on each door, doorway, cellar door, window, roof opening, chimney, etc. that leads inside the house in question.
What about outdoor areaportals? Good call. In an open map without much regular world brushes to maneuver, it could get very tricky to set up an outdoor areaportal system to separate areas. However, you should always strive to have one, even if it is one or two areaportals across the map. The reason is very simple: the view frustum culling effect, which, coupled with hints, will yield the best results in cutting visibility around the map.
Continuing with our previous diagram, a simple outdoor areaportal system setup could be as follows (top view).

This setup will make sure that the map is split into 4 areas and whenever you are in one of them as player, the view frustum culling effect will kick in to cull as much detail as possible from the other areas.
Let me show you the setup from a side view to make it easier to visualize.

This is the same areaportal that was closest to the player in the top down view diagram but this time viewed from the side. Unlike hints where it’s fine to have one big hint going across the map, for areaportals, it is best to have several smaller ones that tightly follow the contour of the geometry eventually forming one big areaportal system.
Another possibility for outdoor areaportal system is to have a combination of vertical and horizontal (yes horizontal) areaportals.
If your map is a village for example with a highly detailed central square where most of the action takes place, a potential system could be made of several vertical areaportals that sit in every entrance to the square from adjacent streets, and a horizontal areaportal that “seals” the area and works as a “roof”.
For a practical guide on areaportals placement, please check out my article Practical guide on areaportals placement
Props fade distance
This is a really, really important tool when optimizing large open maps. In case you got distracted while I was making the announcement, I’ll go again: props fading is definitely vital when tackling open maps optimization.
What you need to do is to set an aggressive fade distance for all trivial props that do not contribute to gameplay. Players will look closely at how detailed your map is when they check it out solo on the first run; however, when the action starts and the round is underway, adrenaline, focus, and tunnel vision kick in, and all the details become a blur.
During an intense firefight, players will not notice small props and details up close, let alone at a distance. We need to use this to our advantage to fade props thus releasing engine overhead; a faded prop is not rendered anymore and engine resources will be freed and allocated elsewhere.
Your map geometry will dictate the proper fade distances, but as a rough guideline, small props could have a fade distance anywhere from 800 to 1200 units (flower pot on a window sill, small bucket at the back door, a bottle on the sidewalk…), while medium props could do with 1400-1800 range (a shrub, a power box on the wall, an antenna on the roof, wood plank, gutter pipe, fire hydrant…).
Be very careful though not to prematurely fade critical props used for cover or game tactics (car in the middle of the street, sandbags, stack of crates, dumpster on the sidewalk…).
Cheap assets
Many people forget about this technique which is more than needed when it comes to open maps that tend to have larger average PVS than traditional maps.
I showcased in a previous article of mine the fps cost of cheap and expensive assets (Source FPS Cost of Cheap and Expensive Assets).
Get in the habit of using the low-poly model version as well as the cheap texture version in the distant non-playable areas and the high unreachable areas where players won’t have much of close contact with the environment. Potential candidates could include a distant field, the unreachable opposite bank of a river, a garden behind hedges/walls, high rooftops, the 3D sky…).
Fog/Far-z clip plane
This technique, when correctly used, can provide a big boost to your frame rate as parts of the world beyond the opaque fog won’t be rendered at all.
For this technique to work properly, your map should have a foggy/rainy/stormy/dusty/hazy/night setting (use as applicable) where a fully opaque fog won’t appear out of place. Obviously, if your map takes place in a sunny and clear day, this technique won’t work much and it will look inappropriate.
Using this is simple: For example, if your map is set in a rainy and foggy day, you just need to set the fog end distance while having its density set to 1. You will then set the far-z clip plane to something slightly higher than the maximum fog distance (if the fog end distance is 8000 units for example, the far-z could be set to 8200).
3D skybox
This is another good technique to reduce engine overhead and the cost of rendering.
It is true that the 3D sky is used to expand the limits of your level and decorate its surrounding, however, since it is built at 1/16 scale (and expanded in-game), it is also a nice way to decrease rendering costs. Use this to your own advantage and relocate assets in the non-playable areas with limited player interaction to the 3D sky.
One thing to keep in mind though, the 3D sky’s visleaf is rendered at all times on top of the PVS in the playable area. Do not go overboard and make an extra complex, highly expensive 3D sky or you would be defeating the purpose of this optimization technique.
Occluders
You thought I forgot about occluders? Not a chance as these are the big guns when it comes to large open maps with little world brushes to use for other optimization techniques.
Let’s clear one thing first; if your map is made mostly of brushwork and displacements with little to no props, then there is absolutely no need to resort to occluders as they’d be totally useless in this case. Only when the map is loaded with models and props in an open setup with little regular world brushes that occluders come to play in force.
To place occluders, you would search for areas where these occluders could make the most impact (low fps, high traffic, props abundance) since they run in real time and are expensive, otherwise their cost would outweigh their benefit in terms of frame rate variation.
Remember that occluders rely on the player’s position and field of view relative to the occluder to calculate what gets culled. You need to place them in a way to maximize the number of props to be culled behind them when the player stands in front of these occluders.
Let’s see some examples.

We go back to our famous top down diagram; the occluder is dark blue placed on the left wall of the large house while the little black stars represent various props and models. The 2 diagonal black lines denote the player’s FOV relative to the occluder. Anything behind the occluder and within the view frustum will be culled.
That’s nice; we are able to cull 4 props but is it enough? It is not optimal as we can still do better. What if we move the occluder to the right wall of the house?

Much better if you ask me. 5 additional props were added to the culling process meaning less overhead and fewer resources to render for the engine. That is why I said earlier it is all about maximizing the impact of the occluder by placing it in a way relative to the player’s position that maximizes the number of culled models.
Here’s another example (still top down view).

The player has moved to the middle of the central street, and beyond that L-shaped house is an open field with a lot of props scattered around. One way to implement occluders is as showcased in the above diagram. Notice how I arranged 2 perpendicular occluders along the walls for the maximum occlusion effect as all of these props in the field are not rendered from that player location.
Another way to arrange occluders in this case would be diagonally across the L-shaped house (split into 2 or 3 occluders if needed to accommodate the nearby geometry; they can be floating without the need to seal an area).
If you’re feeling brave enough (you should be after reaching this far in this article), you could also add an extra occluder along the wall of the house to the left of the L-shaped house to further enhance the view frustum occlusion effect and cover more props in the field.
The most common places to add occluders in open maps include a displacement hill that separates parts of the map, a hedge that stands between a street and a field full of props, a floating wall between a house garden and the street, the walls of a large house, the walls of a tall building, a ceiling when it separates multiple levels…
To read more about occluders placement and cost, please consult my article Practical guide on occluders placement
In conclusion
The foundation of optimization in Source engine will be the same whether it is a traditional map or an open one. You will heavily rely on func_detail, nodraw, displacement, props… to achieve your goals but it is the way you use these tools in an open map that makes all the difference.
One might get away with being a bit sloppy with optimization in a traditional map, however, make no mistake that an open map won’t be any forgiving if you decide to skip a beat in your optimization system.
Talking about different open maps and formulating varying optimization systems for them could fill articles; I hope this article has shed enough light on the open maps optimization approach to let you easily design a system for your own map.


![[CS:GO] Shore](https://www.mapcore.org/uploads/monthly_2023_04/2955084102_preview_20230404120655_1.jpg.77b7071d4e9db1625414c7ad26720f8f.jpg)

Recommended Comments
Join the conversation
You can post now and register later. If you have an account, sign in now to post with your account.
Note: Your post will require moderator approval before it will be visible.