Hello! I've been mapping for a little over a month now... and I've chosen the worst possible engine to start my mapping career 
I won't go into detail on how to make everything pretty in this guide. That's where you have to experiment on your own.
The purpose of this tutorial is mainly to give you the correct tools and settings to creating a fully functional skybox texture for CS:GO.
Programs used in this tutorial:
- Terragen 3
- Photoshop (Optional)
- VTFEdit
- Notepad++ (Optional)
 Terragen
You can download Terragen here:
http://planetside.co.uk/products/download-tg3
Take note that it's not possible to render a 1024x1024 image and have it on max detail if you're using the free version.
But it's possible to render a 512x512 skybox with 60% Detail.
Open up Terragen. We will begin with removing the surface. It is not needed for our skybox since you'll not be able to see it in game anyway.
If you include it, it's just gonna make the rendering process take longer.
Click on 
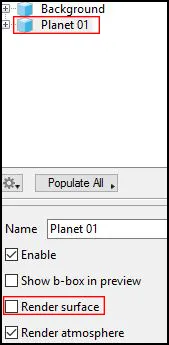
Click on "Planet 01" and uncheck "Render surface".
(Save often because Terragen has a tendency to crash sometimes).[/i]
Click on 
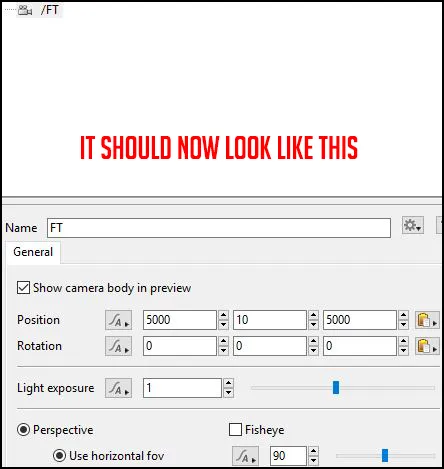
Click on "/Render Camera" and rename it to "FT"
- Set Position: 5000 / 10 / 5000 (It can be good to remember that the number in the middle will represent at what height your camera is set)
- Set Rotation: 0 / 0 / 0
- Use Perspective and type in 90 in the horizontal fov
Click on 
(You can zoom in with your scroll wheel and hold [Alt+Leftclick] to pan in the Node Network).
- Click your camera named FT so it's highlighted.
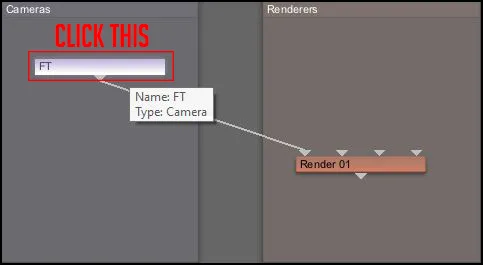
- Press [Ctrl+C] on your keyboard.
- Press [Ctrl+V] on your keyboard.
- Drag the new camera into your Cameras box.
- Do this 4 more times, so you have 6 cameras in total.
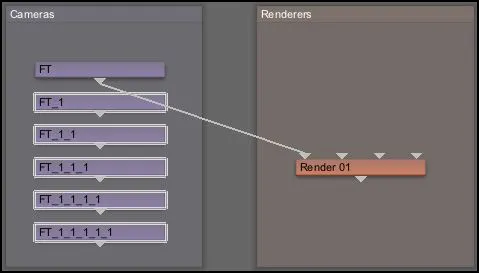
Click on
- Click on "FT_1", rename it to "LF" and change the rotation to "0 / 90 / 0"
- Click on "FT_1_1", rename it to "BK" and change the rotation to "0 / 180 / 0"
- Click on "FT_1_1_1", rename it to "RT" and change the rotation to "0 / -90 / 0"
- Click on "FT_1_1_1_1", rename it to "UP" and change the rotation to "90 / -90 / 0"
- Click on "FT_1_1_1_1_1", rename it to "DN" and change the rotation to "-90 / -90 / 0"
Double check that your cameras are set up like this: (This picture is not taken from Terragen).[/i]

Click on 
- Click on "/Render 01" and rename it to "Full Render"
- Set Image width to 1024 (512 if you're using the free edition)
- Set Image height to 1024 (512 if you're using the free edition)
- Set Detail to 1 (0.6 if you're using the free edition)
- Set Anti-aliasing to 4 (Don't need much more for atmosphere and clouds, I think it's mostly for terrain and objects)
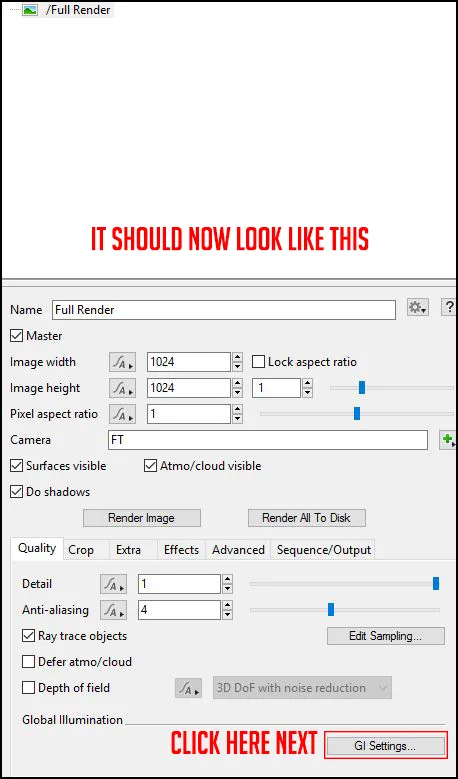
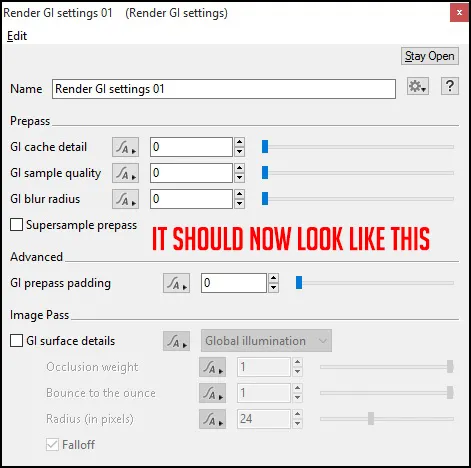
This is very important to avoid any problems later on:
- Click on GI Settings
- Set GI cache detail to 0
- Set GI sample quality to 0
- Set GI blur radius to 0
- Turn off GI surface details
Click on
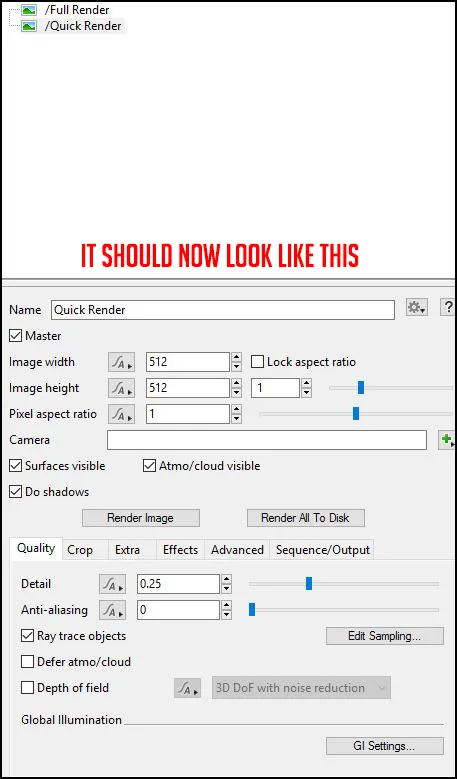
- Copy & Paste the "Full Render" node in the "Renderers" box with [Ctrl+C] & [Ctrl+V].
Click on
- Rename your new renderer to "Quick Render".
- Set Image width and height to 512 (Or even smaller).
- Set Detail to 0.25.
- Set Anti-aliasing to 0.
Click on
- Connect your camera called "FT" to the "Quick Render" node.
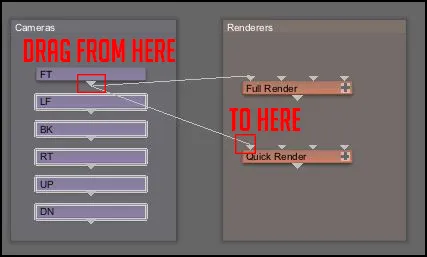

You should now go to "File -> Save As..." and save your project and name it something like: "Skybox Default Settings"
Put it somewhere so you always can open up that one everytime you want to create a new skybox
After this, make sure you do not save it over. Press "File -> Save As..." again and name it to whatever you like.
Click on
Click on "/Quick Render"
Click on "Render Image" or press [Ctrl+R]
Do this everytime you've changed some settings and want a fast preview of how it looks.
Now to the fun part! :dance:
To change your atmosphere, you click on 
- Click on "/Atmosphere 01"
Here you can change all kinds of different things for your atmosphere...
Keep in mind that raising any quality settings may increase your rendering time immensely and/or turn the skybox non-functional.
Some settings may also increase your rendering times like "Cloud density" and "Edge sharpness". The bigger and more complex your clouds are, more time will be spent computing the render. But just 1 layer of clouds won't make anyone drop the jaw. Good tweaking and layering in moderation is best to aim for.
- Click "Add Cloud Layer" and choose something that might suit you. By clicking on your new cloud layer you can tweak its settings.
- Click on
 to tweak your lighting settings.
 - If you want to add water, click on

It should all be fairly obvious how things work from now on. You may need to spend some time tweaking the settings and figure out things on your own or watch Terragen tutorials 
When you feel satisfied with your skybox, move on and click
- Click on "/Full Render"
You can see which image will be rendered where it says Camera
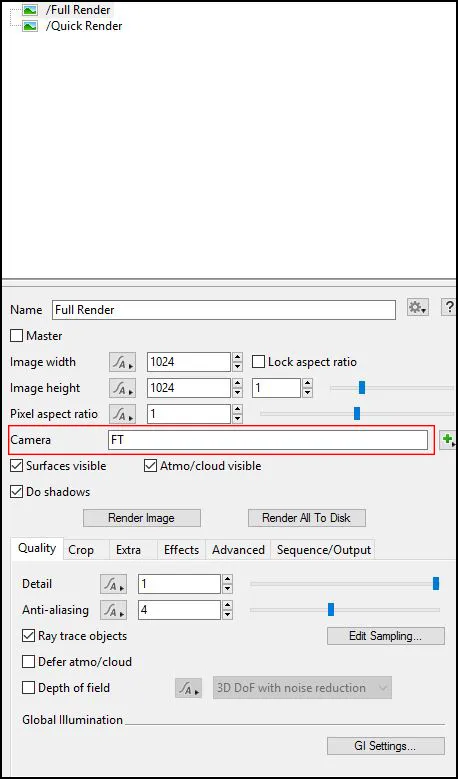
- Click on "Render Image" or press [Ctrl+R]. (This can take a while depending on your settings).
- When it's done, click "Save...", name it "yourskynameft" if it was the FT camera and save it as .BMP
- To render your next image, type in the name of your next camera in the camera section (see picture above) and then render your next image.
Repeat this process for all the 6 images and name them correctly.
 Photoshop[/b]
Now we're gonna use Photoshop to make sure our sky is seamless and looks good.
If the textures you rendered have a size of 1024x1024, make a new document with a width of 4096 pixels and a height of 3072 pixels
or just download this background and drag it into Photoshop:
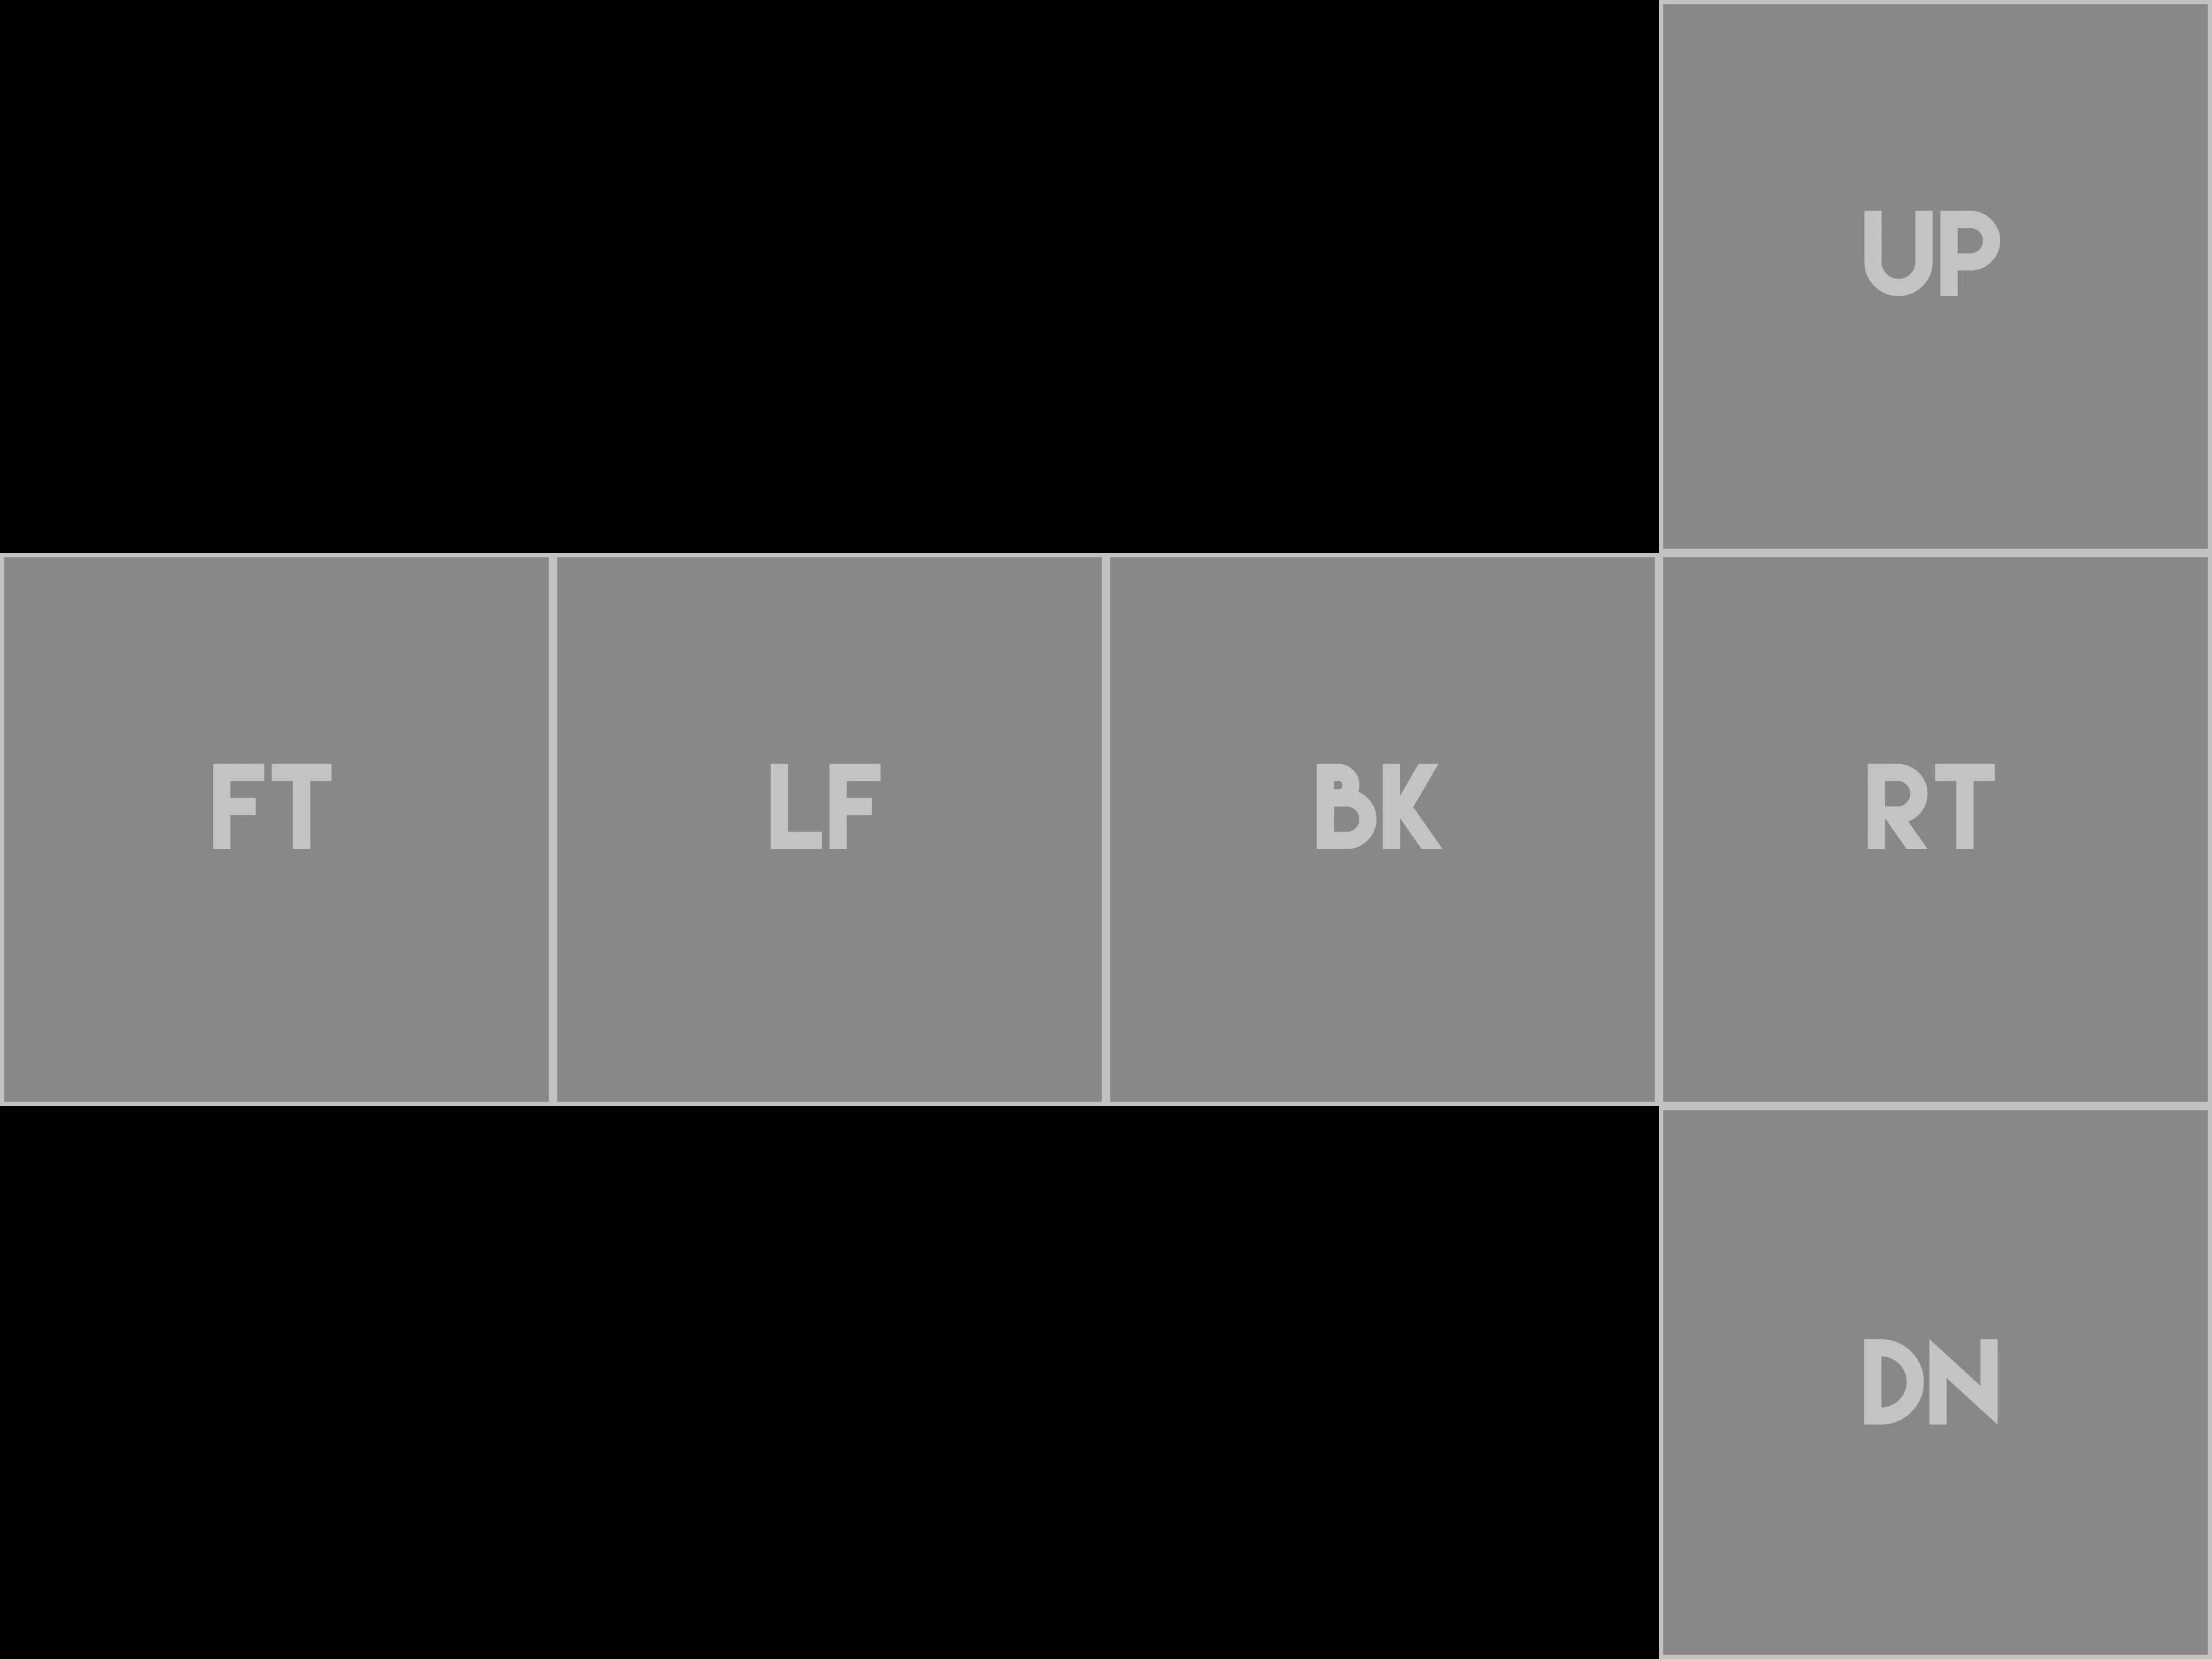
If the textures you rendered have a size of 512x512, make a new document with a width of 2048 pixels and a height of 1536 pixels
or just download this background and drag it into Photoshop:
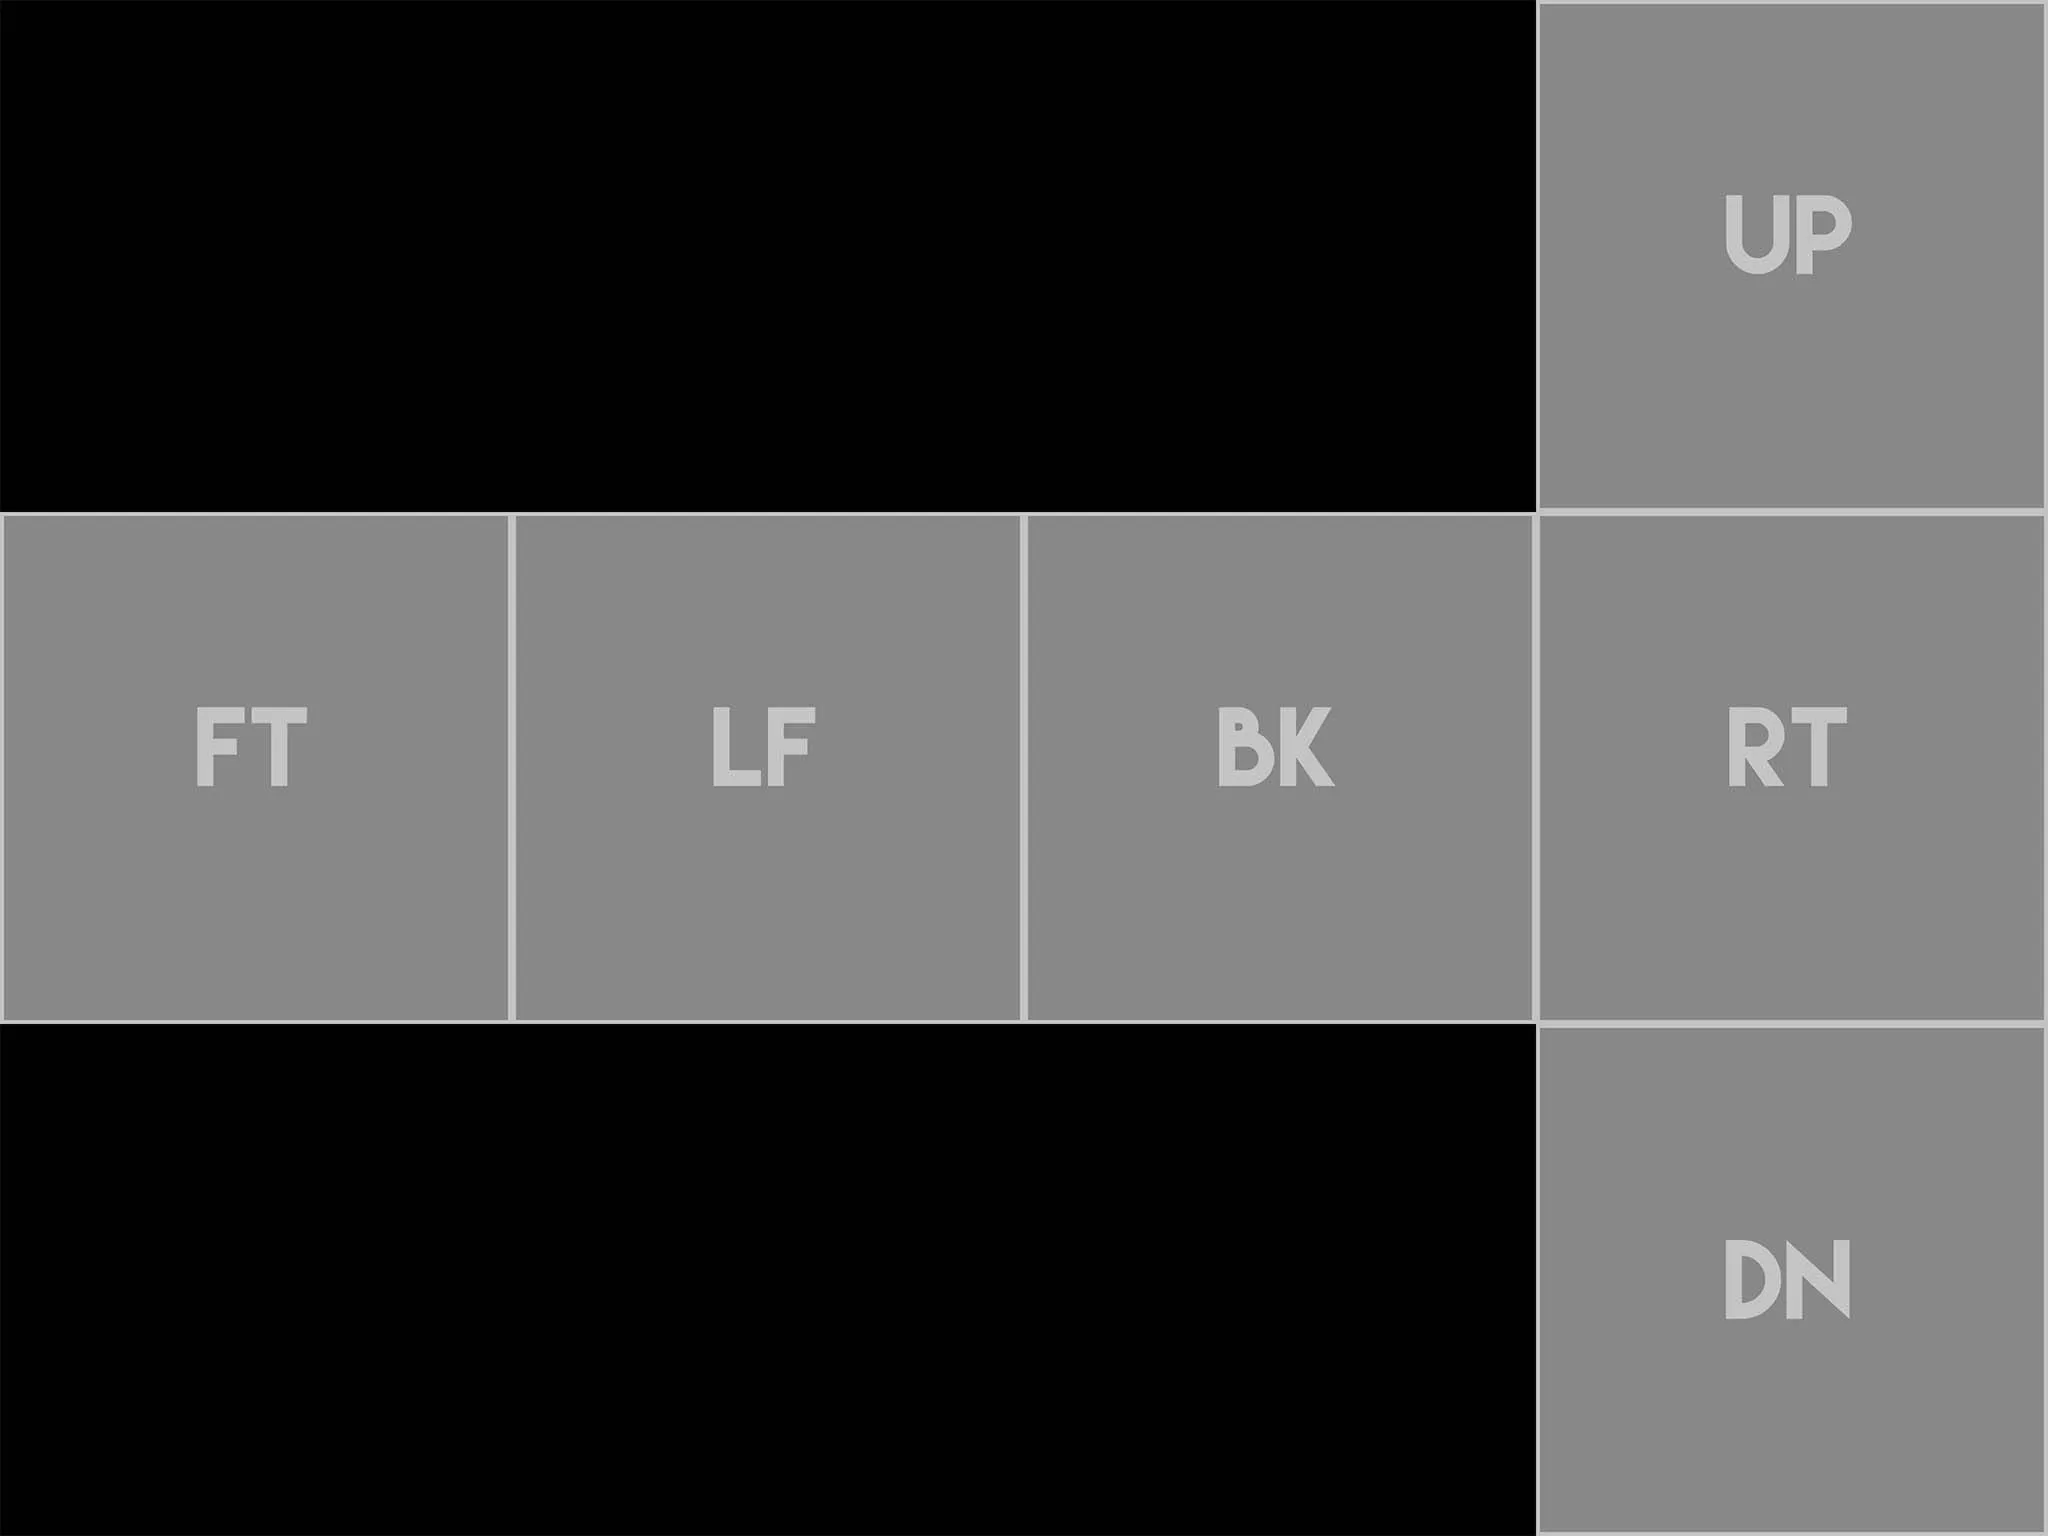
- Go into "Edit -> Preferences -> Guides, Grid & Slices"
- Set "Gridline Every" to 256 Pixels
- Set "Style" to Dots
- Set "Subdivisions" to 1
- Click OK
- Go into "View" and make sure "Snap" is enabled and that "Snap To" have "Grid" included
- Now drag all of your .BMP's to photoshop:
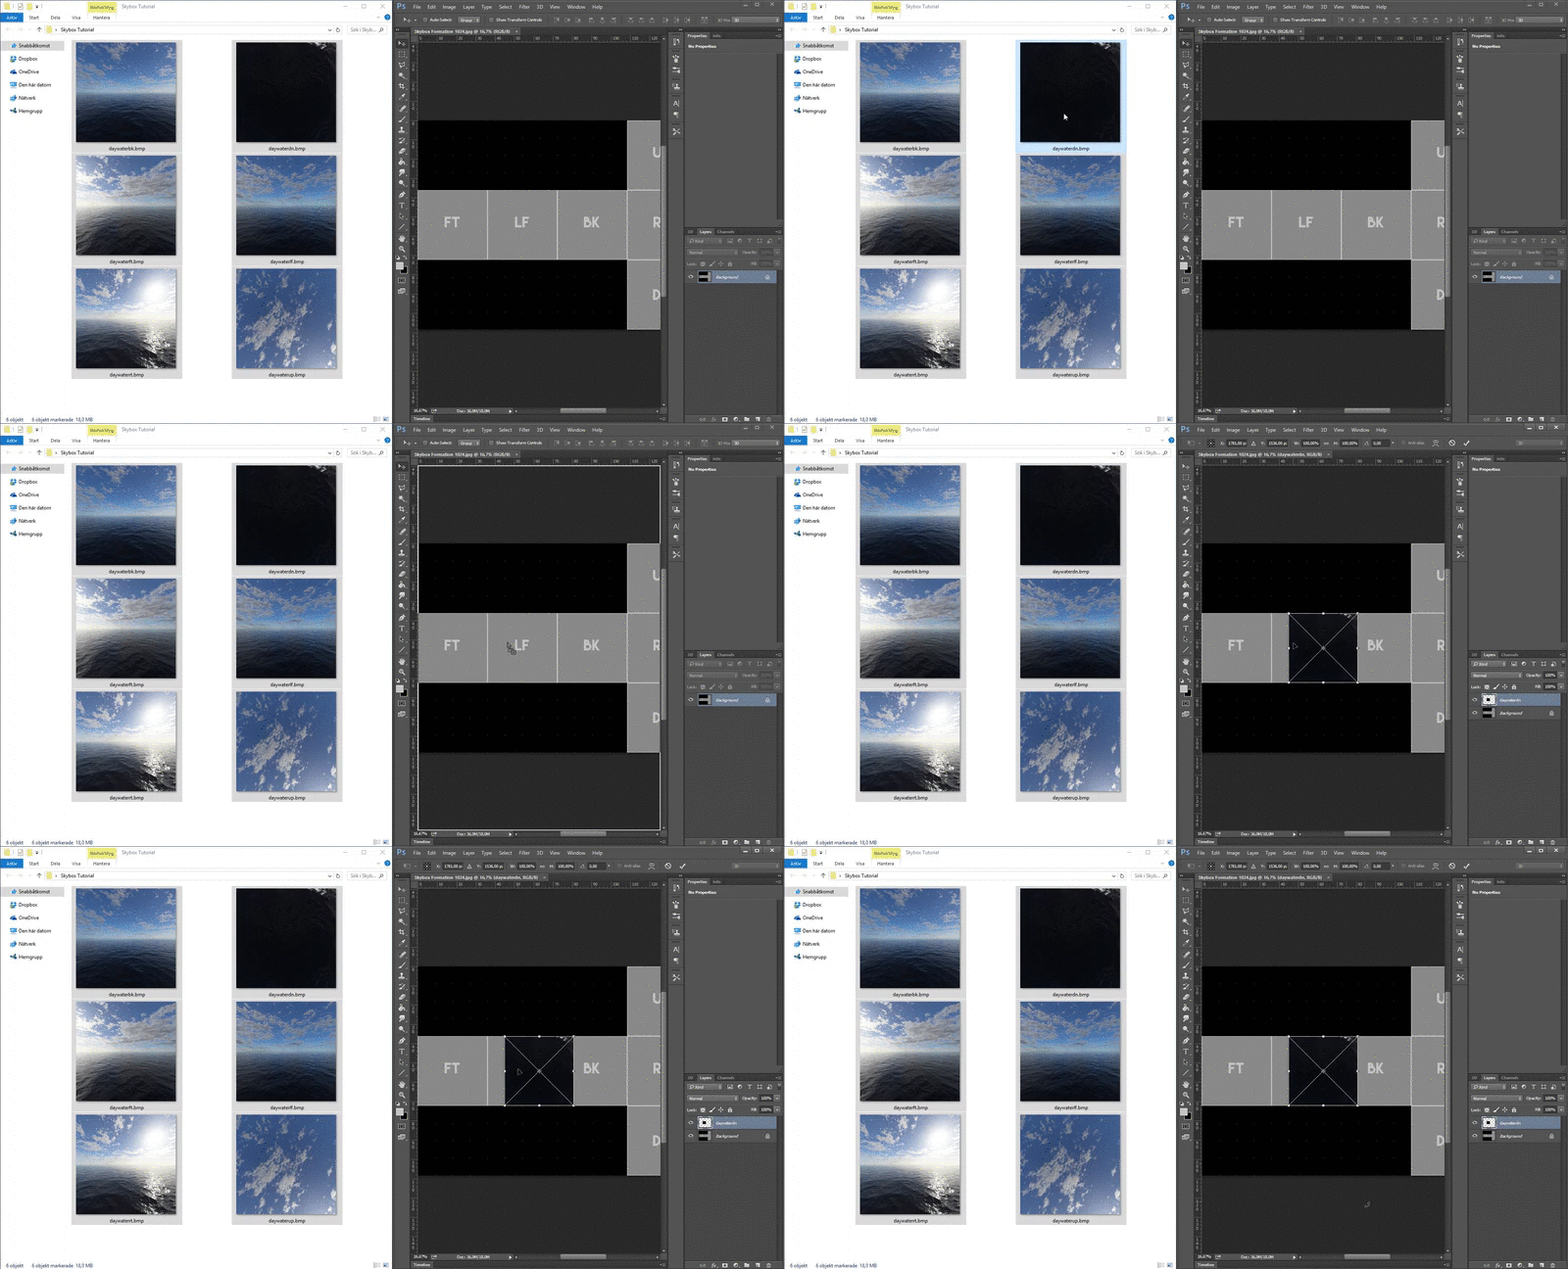
- Take notice of what the name of the layer is:
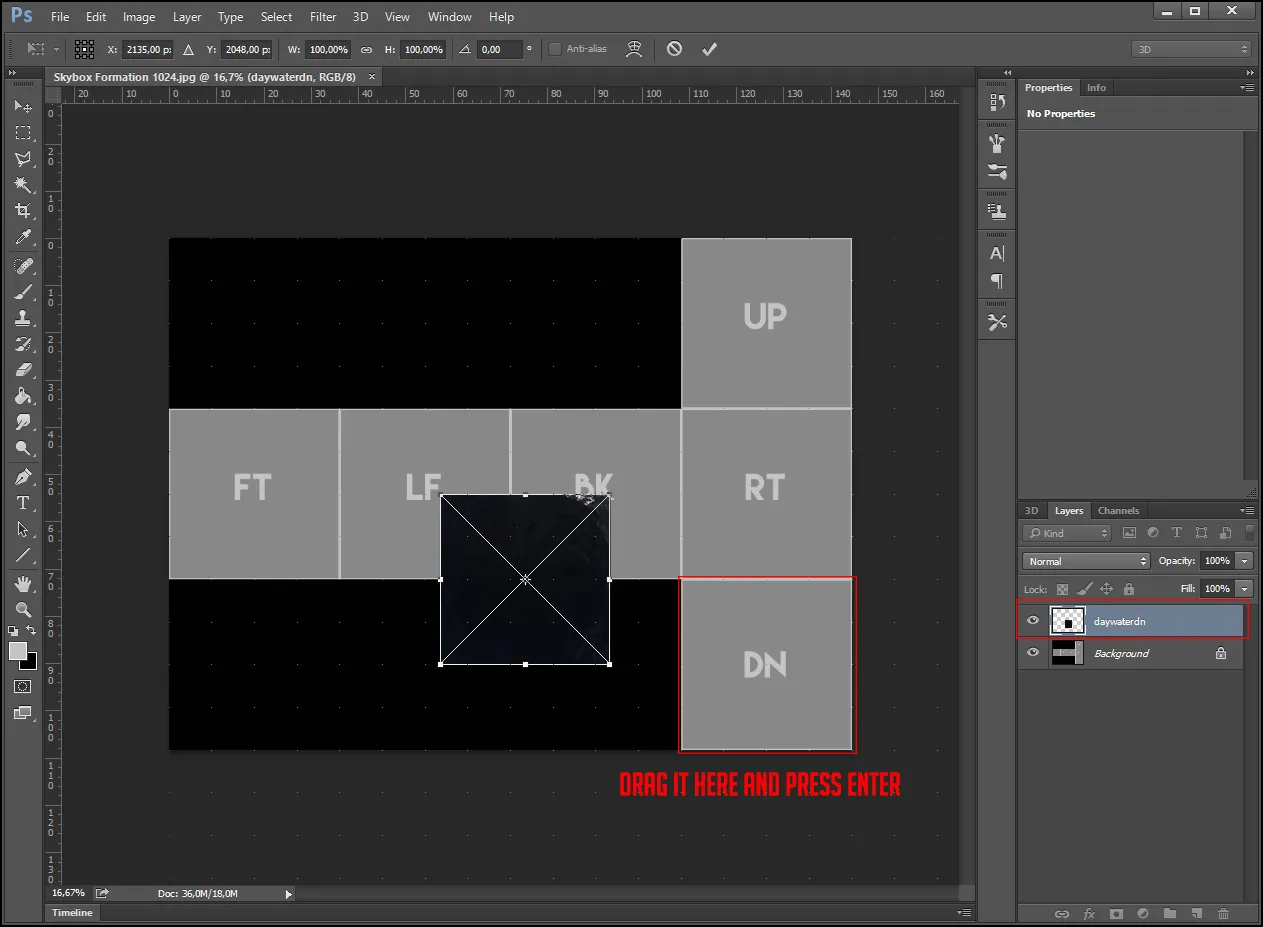
- Drag it to the correct location and press [Enter].
The next layer will pop up. Repeat this until you've placed them all at their correct locations:
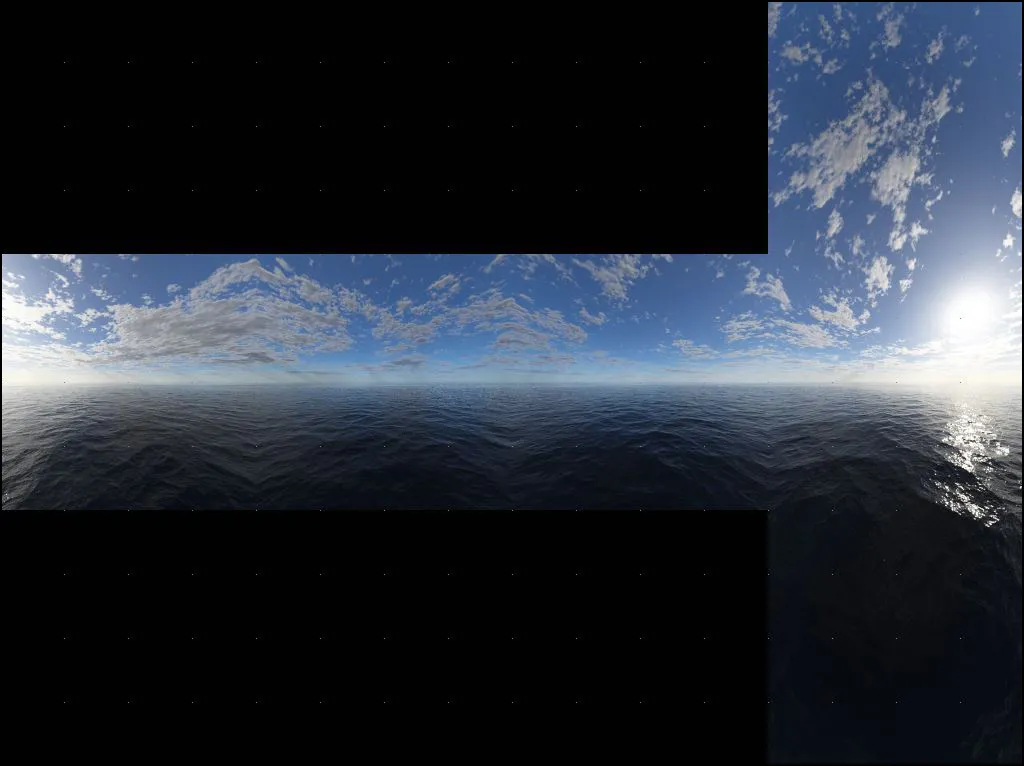
- If it looks good with no visible seams or weird lighting, you can safely assume this is gonna work in game.
- It it doesn't look good, you probably have some setting enabled in Terragen which causes problems.
Since I think mine looks ok, I can now exit out of Photoshop and move on to VTFEdit.
(Didn't spend any effort on this skybox. Just added a cloud and water layer and didn't tweak any settings).
 VTFEdit[/b]
- Open up VTFEdit and click "Tools" and choose "Convert Folder"
- Change the "Input Folder" to where you have your .BMP's (You should have your .BMP's in a map somewhere)
- Change the "Output Folder" to "Steam\steamapps\common\Counter-Strike Global Offensive\csgo\materials\skybox"
- Click "To VTF" and type in "*.bmp" in the box beside it
- Make sure "Create VMT Files" are checked
- Click "Convert"
After a little while you should have all your VTF's and VMT files in your "materials\skybox" folder.
Go to that folder and open up every .VMT file with Notepad++ or Notepad
Delete everything and replace it with:
Where it says xx, you have to type in which side it is. Look at the name of the .VMT you're currently editing.
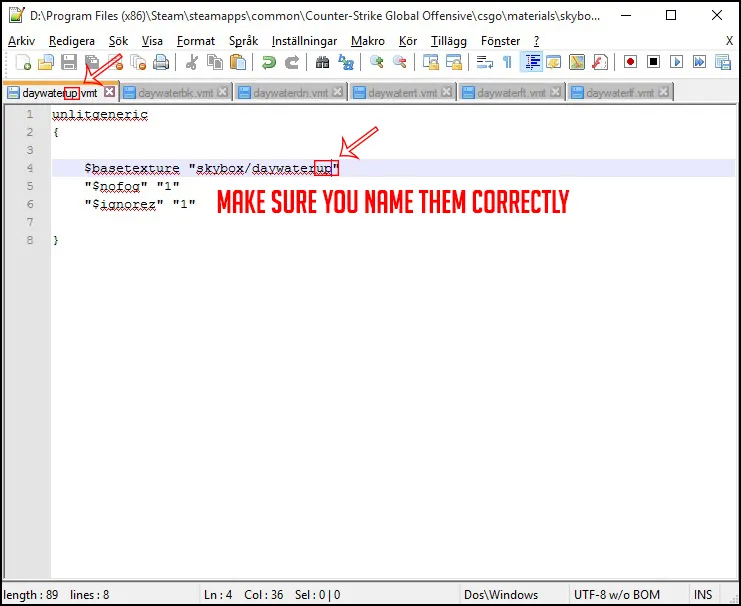
When you're done, save them all...
Now open up one .VTF file at a time and check these boxes:
- Clamp S
- Clamp T
- No Mipmap
- No Level Of Detail
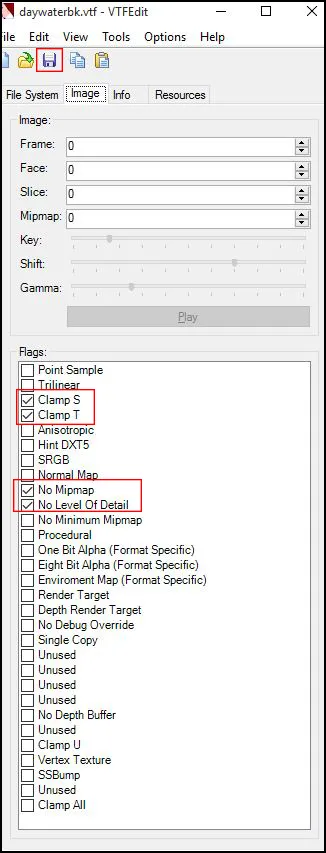
When you're done, click the save button...
- Open up Hammer World Editor
- Go into "Map -> Map Properties"
- Change Skybox Texture Name to "yourskyname"
Compile your map and you're done
If you want other people to see your skybox in game, you have to pack everything correctly by using e.g. VIDE.

 Have fun everyone!
 Still managed to make it work though. One thing could make your tutorial even better: