1. Forums
  2. Discord
  3. About Mapcore
  4. Patreon Supporters
  • Login
  • Register
  • Search
This Thread
  • Everywhere
  • This Thread
  • This Forum
  • Articles
  • Pages
  • Forum
  • More Options
  1. Mapcore
  2. Discussions
  3. Level Design

[Tutorial] Make your own skybox for CS:GO

  • Psyrius
  • September 10, 2015 at 10:49 PM
  • Psyrius
    • September 10, 2015 at 10:49 PM
    • #1


    Hello! I've been mapping for a little over a month now... and I've chosen the worst possible engine to start my mapping career :|

    I won't go into detail on how to make everything pretty in this guide. That's where you have to experiment on your own.
    The purpose of this tutorial is mainly to give you the correct tools and settings to creating a fully functional skybox texture for CS:GO.

    Programs used in this tutorial:


    • Terragen 3
    • Photoshop (Optional)
    • VTFEdit
    • Notepad++ (Optional)


    Terragen

    You can download Terragen here:
    http://planetside.co.uk/products/download-tg3

    Take note that it's not possible to render a 1024x1024 image and have it on max detail if you're using the free version.
    But it's possible to render a 512x512 skybox with 60% Detail.


    Open up Terragen. We will begin with removing the surface. It is not needed for our skybox since you'll not be able to see it in game anyway.
    If you include it, it's just gonna make the rendering process take longer.

    Click on
    Click on "Planet 01" and uncheck "Render surface".
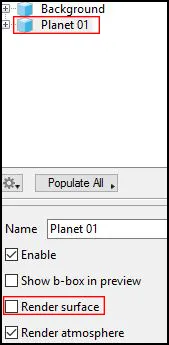
    (Save often because Terragen has a tendency to crash sometimes).[/i]


    Click on
    Click on "/Render Camera" and rename it to "FT"

    • Set Position: 5000 / 10 / 5000 (It can be good to remember that the number in the middle will represent at what height your camera is set)
    • Set Rotation: 0 / 0 / 0
    • Use Perspective and type in 90 in the horizontal fov
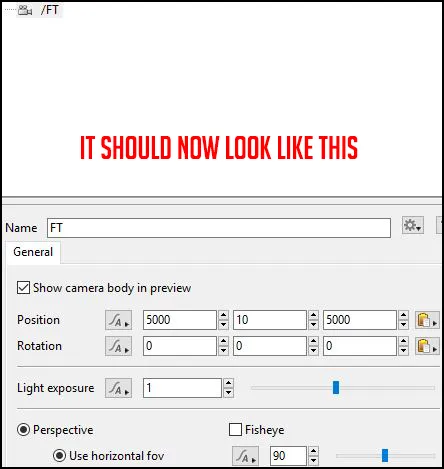

    Click on

    (You can zoom in with your scroll wheel and hold [Alt+Leftclick] to pan in the Node Network).

    • Click your camera named FT so it's highlighted.
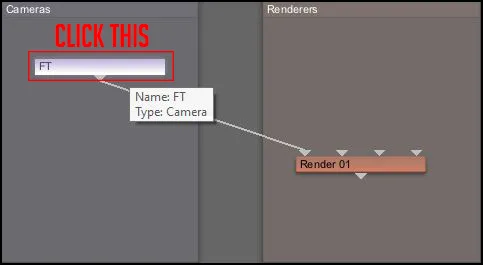
    • Press [Ctrl+C] on your keyboard.
    • Press [Ctrl+V] on your keyboard.
    • Drag the new camera into your Cameras box.
    • Do this 4 more times, so you have 6 cameras in total.
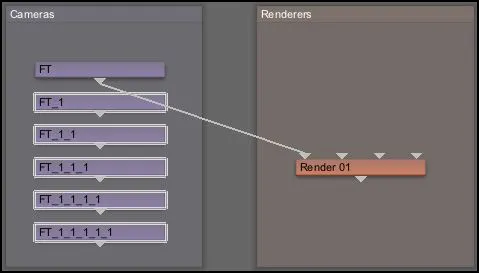

    Click on

    • Click on "FT_1", rename it to "LF" and change the rotation to "0 / 90 / 0"
    • Click on "FT_1_1", rename it to "BK" and change the rotation to "0 / 180 / 0"
    • Click on "FT_1_1_1", rename it to "RT" and change the rotation to "0 / -90 / 0"
    • Click on "FT_1_1_1_1", rename it to "UP" and change the rotation to "90 / -90 / 0"
    • Click on "FT_1_1_1_1_1", rename it to "DN" and change the rotation to "-90 / -90 / 0"

    Double check that your cameras are set up like this: (This picture is not taken from Terragen).[/i]

    [/i]


    Click on

    • Click on "/Render 01" and rename it to "Full Render"
    • Set Image width to 1024 (512 if you're using the free edition)
    • Set Image height to 1024 (512 if you're using the free edition)
    • Set Detail to 1 (0.6 if you're using the free edition)
    • Set Anti-aliasing to 4 (Don't need much more for atmosphere and clouds, I think it's mostly for terrain and objects)
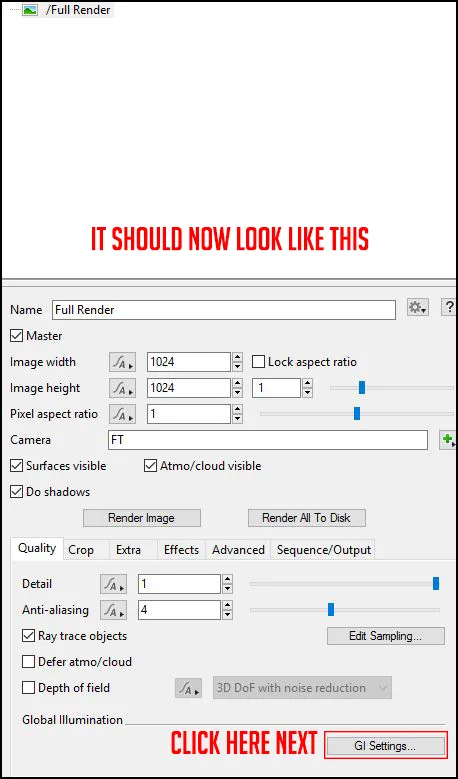
    This is very important to avoid any problems later on:

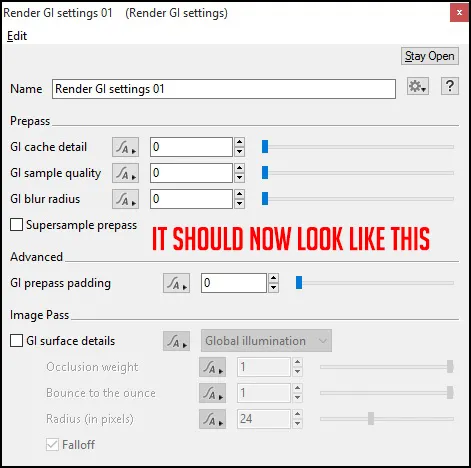
    • Click on GI Settings
    • Set GI cache detail to 0
    • Set GI sample quality to 0
    • Set GI blur radius to 0
    • Turn off GI surface details


    Click on

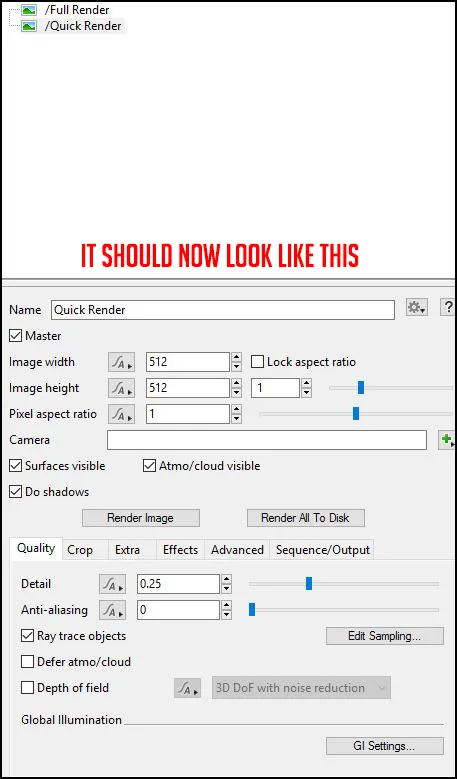
    • Copy & Paste the "Full Render" node in the "Renderers" box with [Ctrl+C] & [Ctrl+V].


    Click on

    • Rename your new renderer to "Quick Render".
    • Set Image width and height to 512 (Or even smaller).
    • Set Detail to 0.25.
    • Set Anti-aliasing to 0.


    Click on

    • Connect your camera called "FT" to the "Quick Render" node.
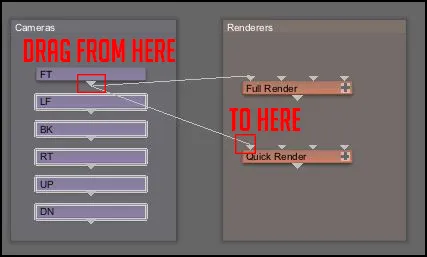

    You should now go to "File -> Save As..." and save your project and name it something like: "Skybox Default Settings"
    Put it somewhere so you always can open up that one everytime you want to create a new skybox
    After this, make sure you do not save it over. Press "File -> Save As..." again and name it to whatever you like.


    Click on
    Click on "/Quick Render"
    Click on "Render Image" or press [Ctrl+R]

    Do this everytime you've changed some settings and want a fast preview of how it looks.


    Now to the fun part! :dance:

    To change your atmosphere, you click on

    • Click on "/Atmosphere 01"

    Here you can change all kinds of different things for your atmosphere...

    Keep in mind that raising any quality settings may increase your rendering time immensely and/or turn the skybox non-functional.

    Some settings may also increase your rendering times like "Cloud density" and "Edge sharpness". The bigger and more complex your clouds are, more time will be spent computing the render. But just 1 layer of clouds won't make anyone drop the jaw. Good tweaking and layering in moderation is best to aim for.

    • Click "Add Cloud Layer" and choose something that might suit you. By clicking on your new cloud layer you can tweak its settings.
    • Click on to tweak your lighting settings.
    • If you want to add water, click on

    It should all be fairly obvious how things work from now on. You may need to spend some time tweaking the settings and figure out things on your own or watch Terragen tutorials


    When you feel satisfied with your skybox, move on and click

    • Click on "/Full Render"

    You can see which image will be rendered where it says Camera
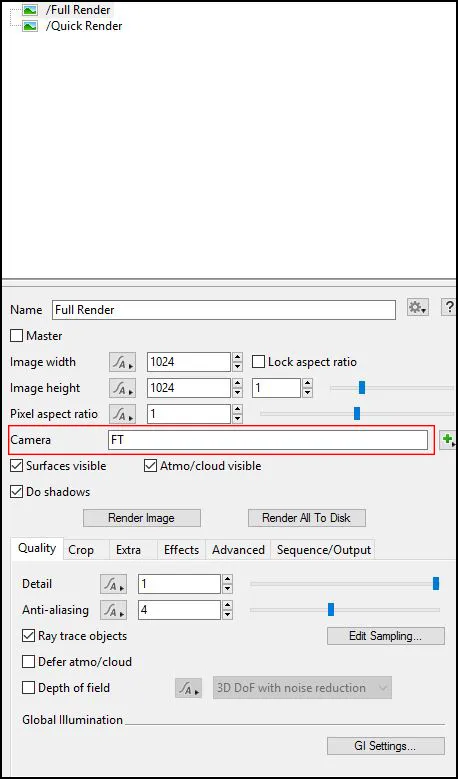
    • Click on "Render Image" or press [Ctrl+R]. (This can take a while depending on your settings).
    • When it's done, click "Save...", name it "yourskynameft" if it was the FT camera and save it as .BMP
    • To render your next image, type in the name of your next camera in the camera section (see picture above) and then render your next image.

    Repeat this process for all the 6 images and name them correctly.


    Photoshop[/b]

    Now we're gonna use Photoshop to make sure our sky is seamless and looks good.

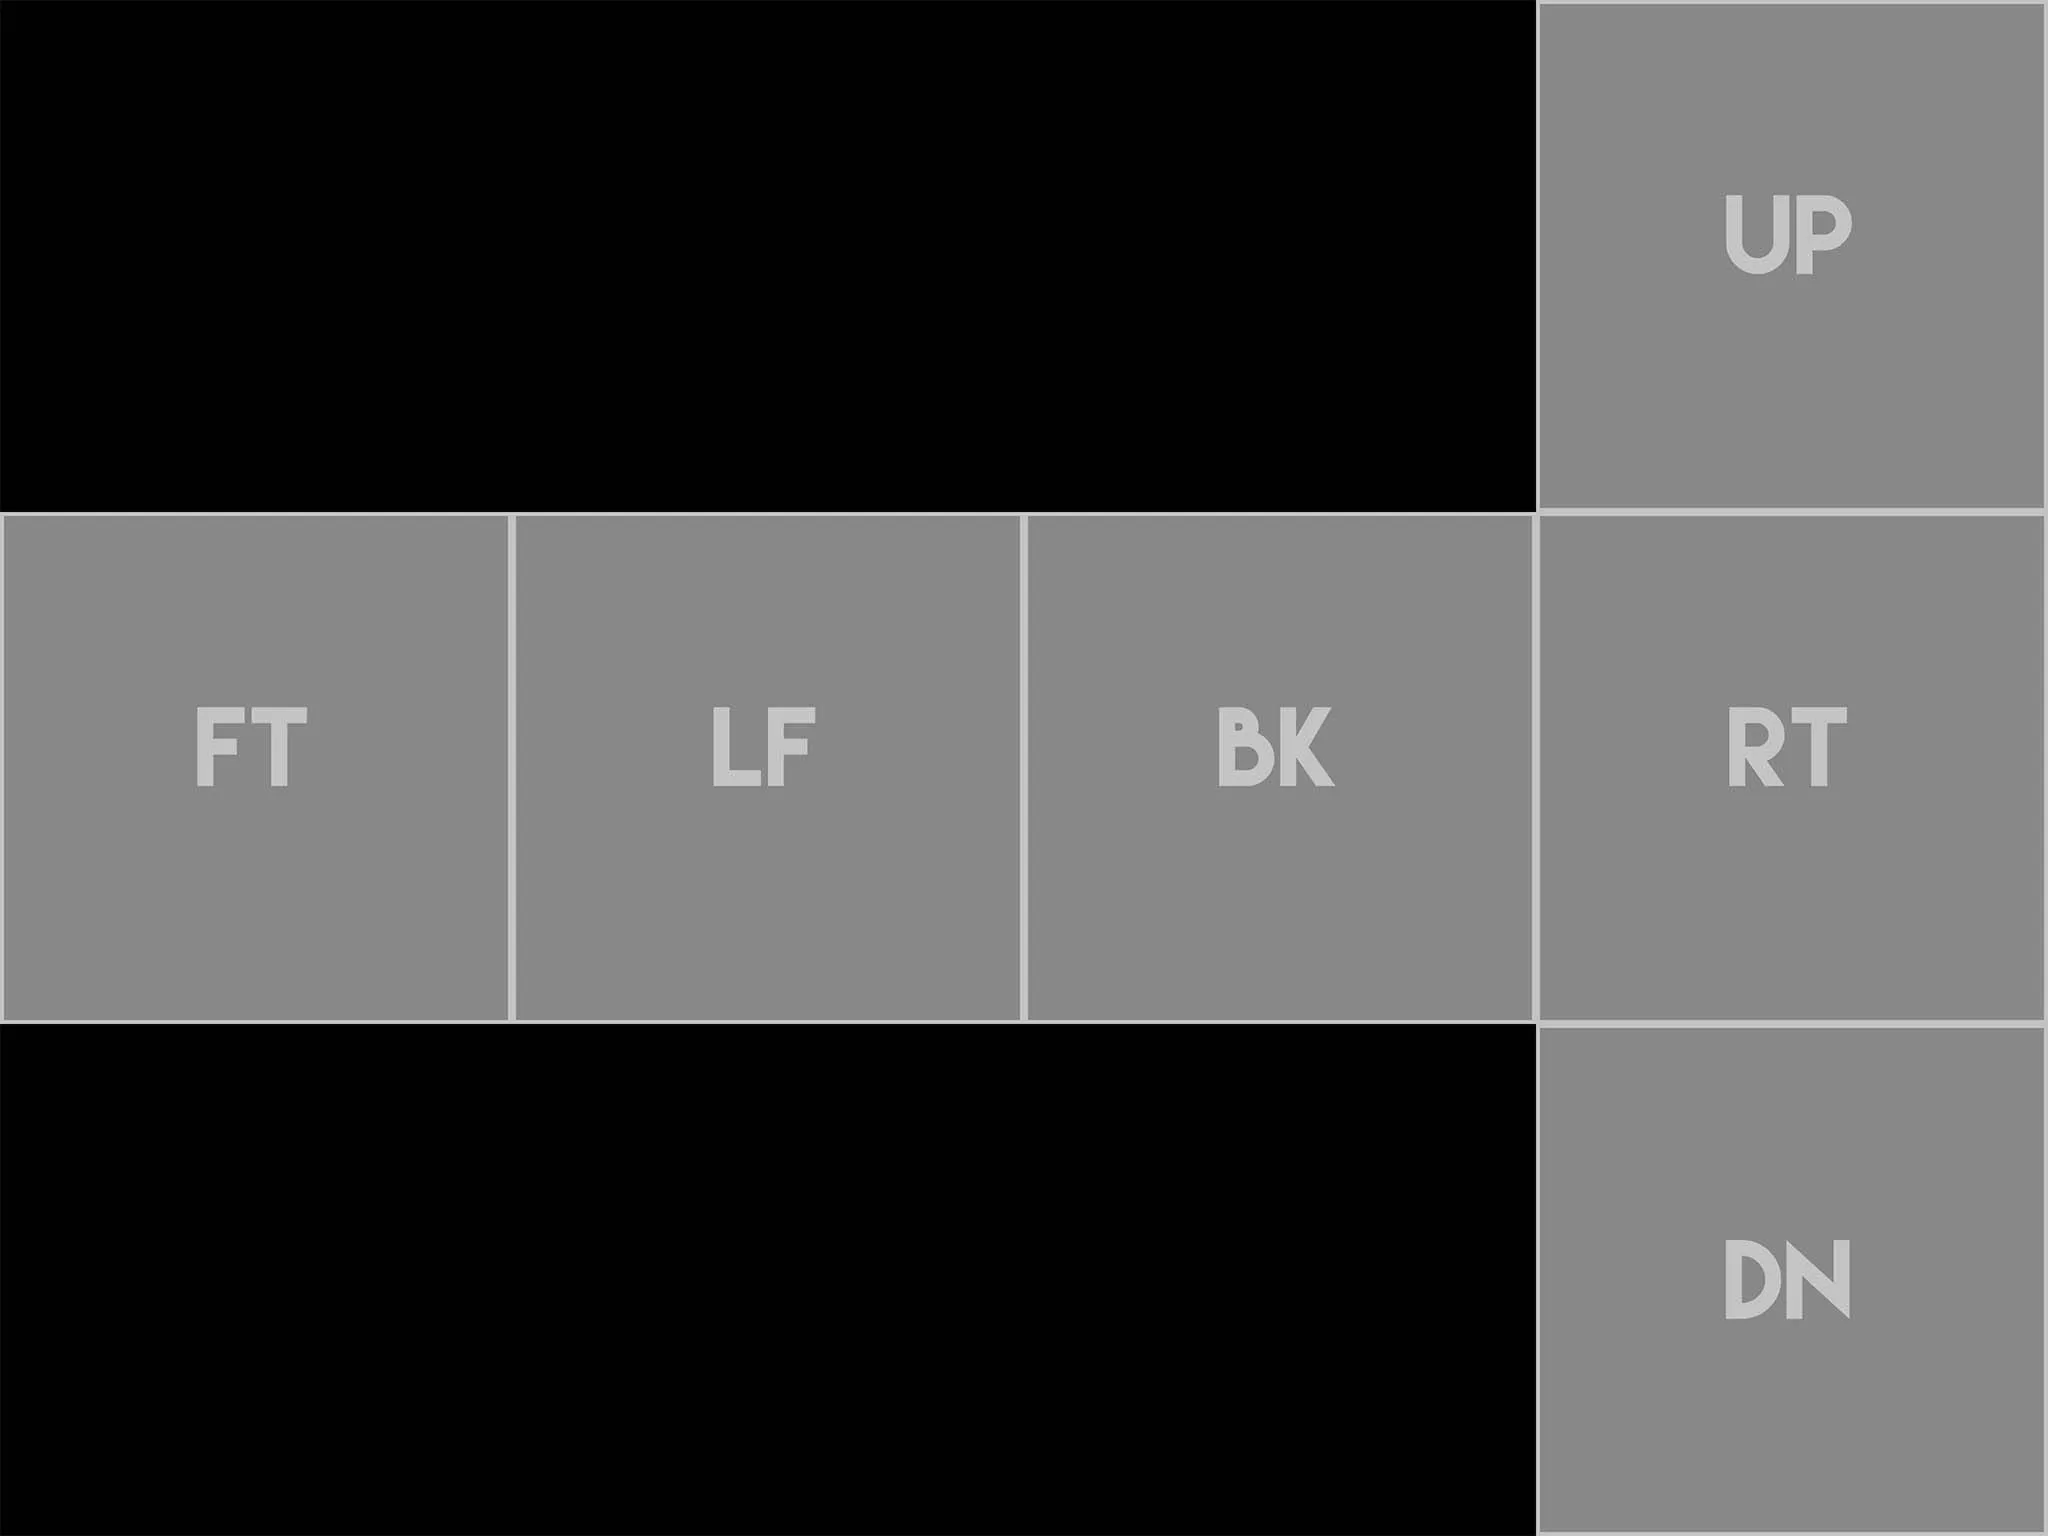
    If the textures you rendered have a size of 1024x1024, make a new document with a width of 4096 pixels and a height of 3072 pixels
    or just download this background and drag it into Photoshop:
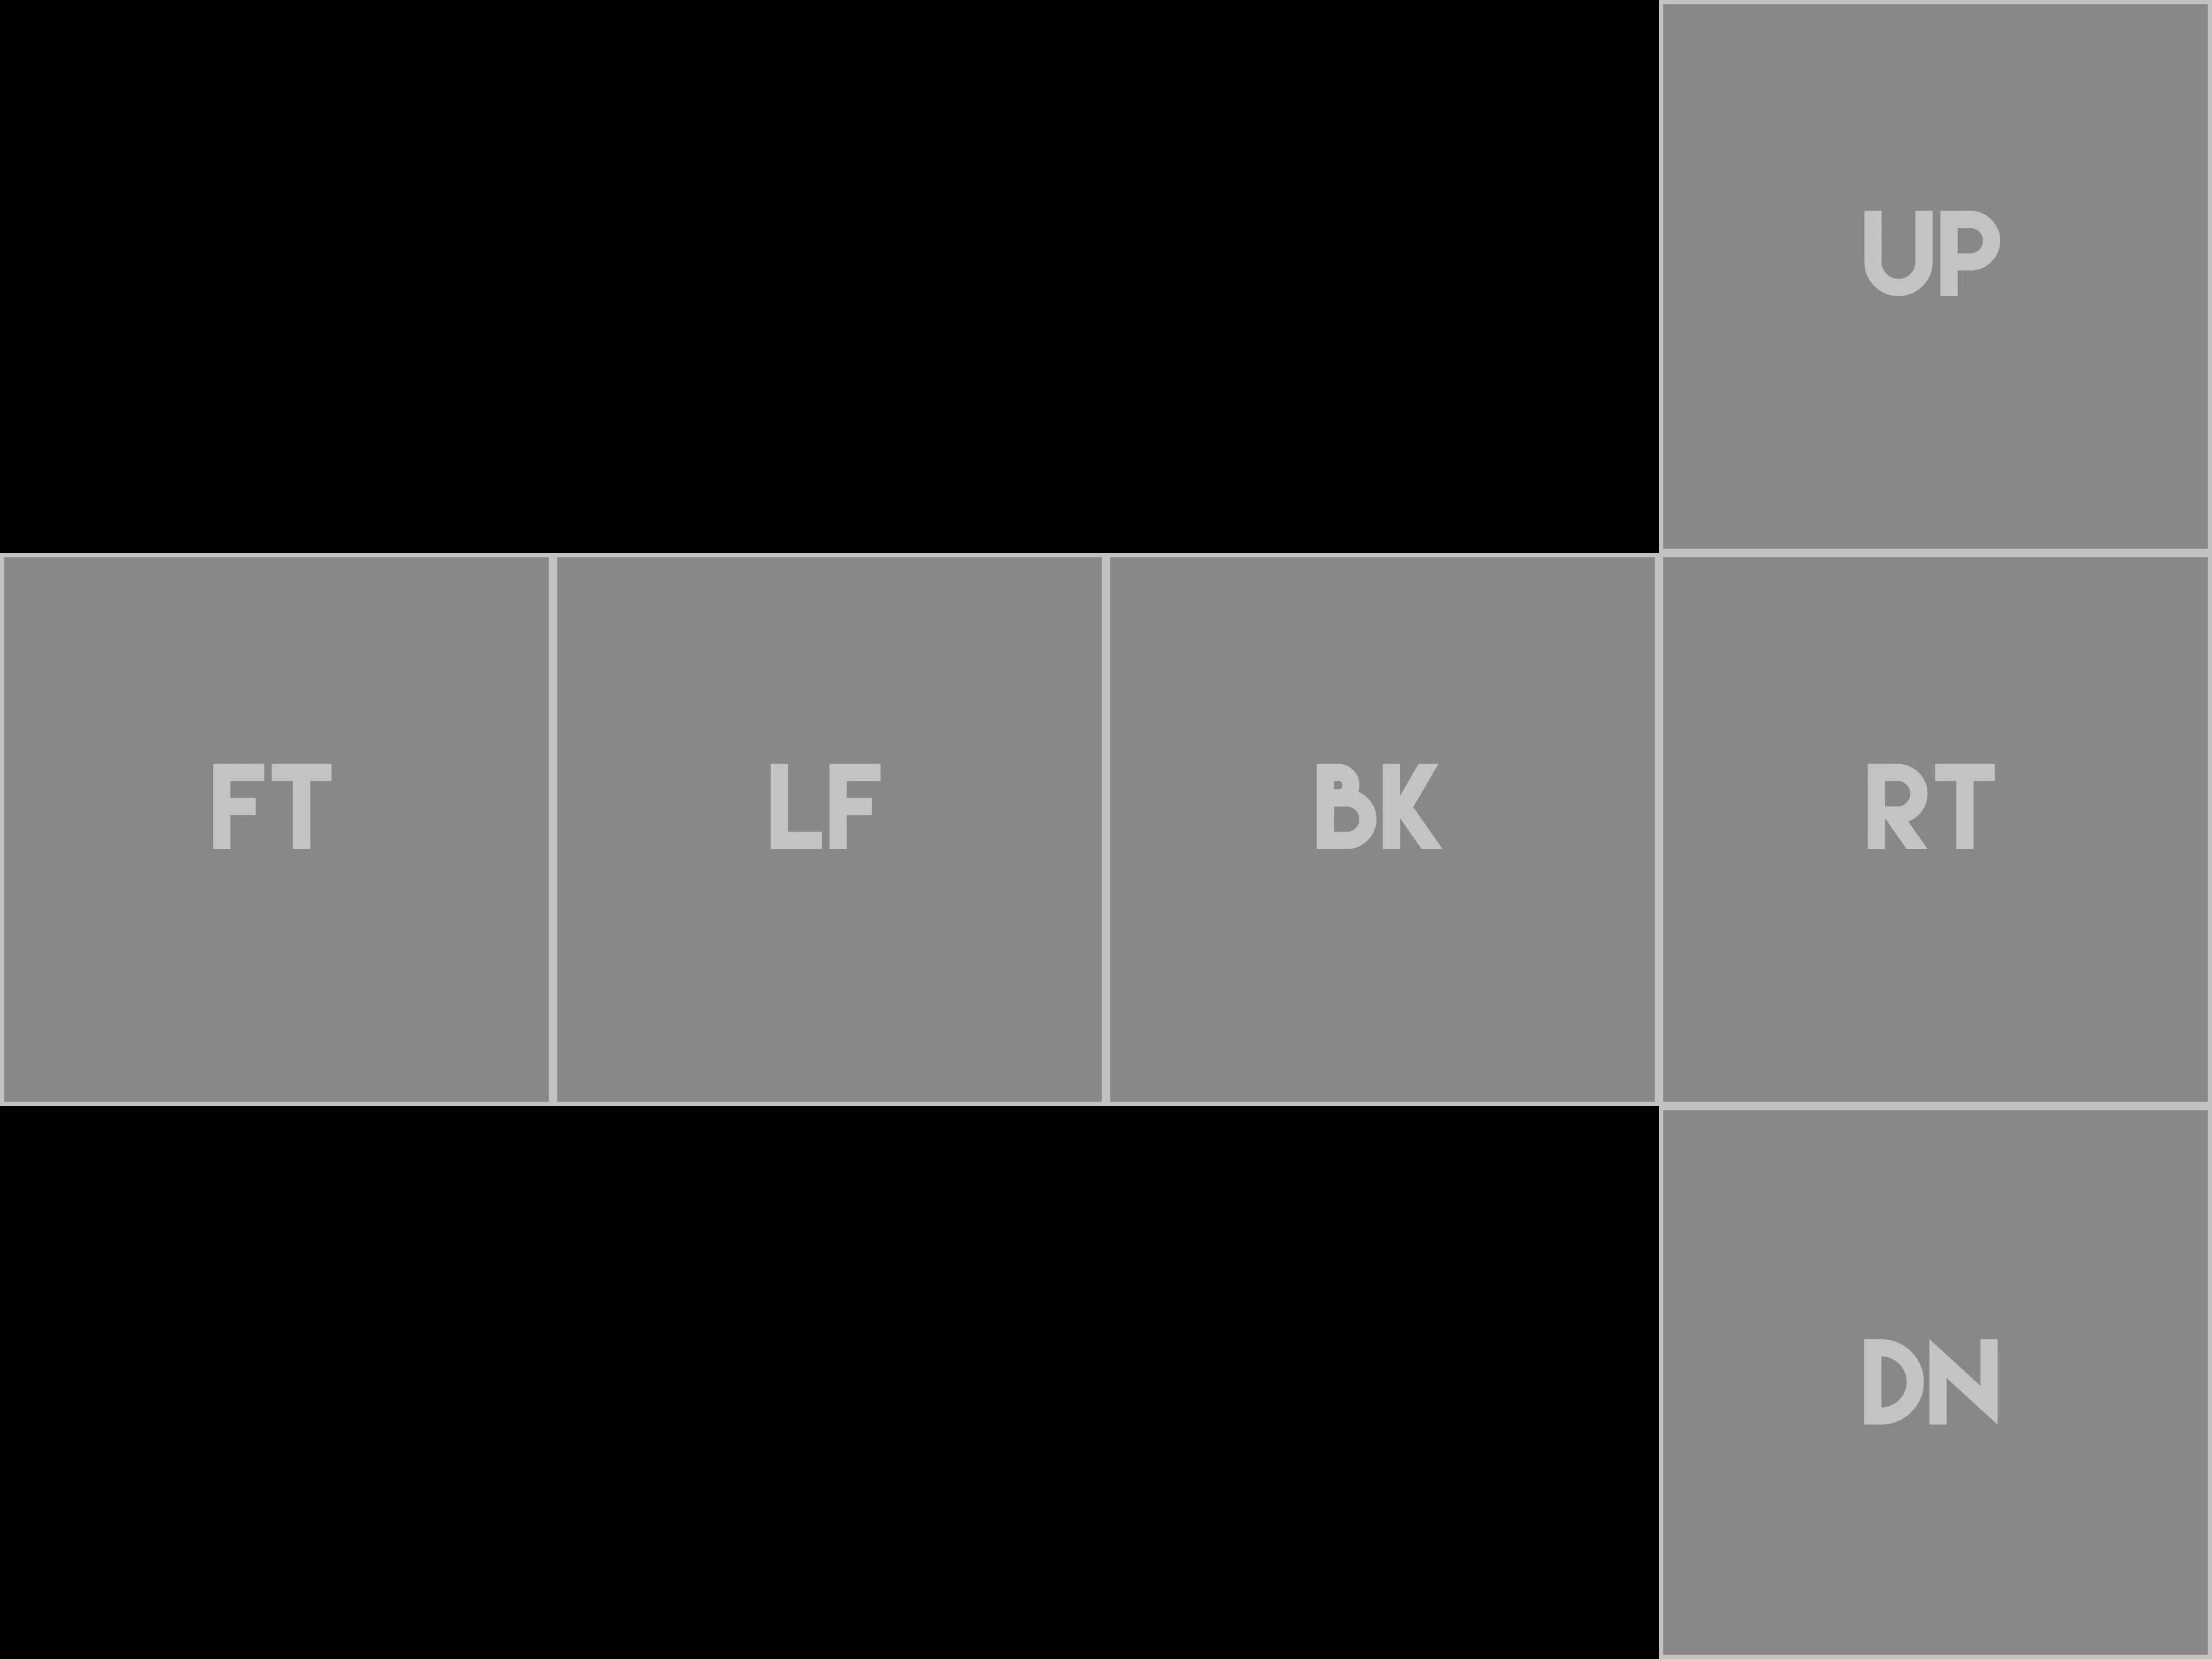
    Quote


    If the textures you rendered have a size of 512x512, make a new document with a width of 2048 pixels and a height of 1536 pixels
    or just download this background and drag it into Photoshop:
    Quote


    • Go into "Edit -> Preferences -> Guides, Grid & Slices"
    • Set "Gridline Every" to 256 Pixels
    • Set "Style" to Dots
    • Set "Subdivisions" to 1
    • Click OK
    • Go into "View" and make sure "Snap" is enabled and that "Snap To" have "Grid" included
    • Now drag all of your .BMP's to photoshop:
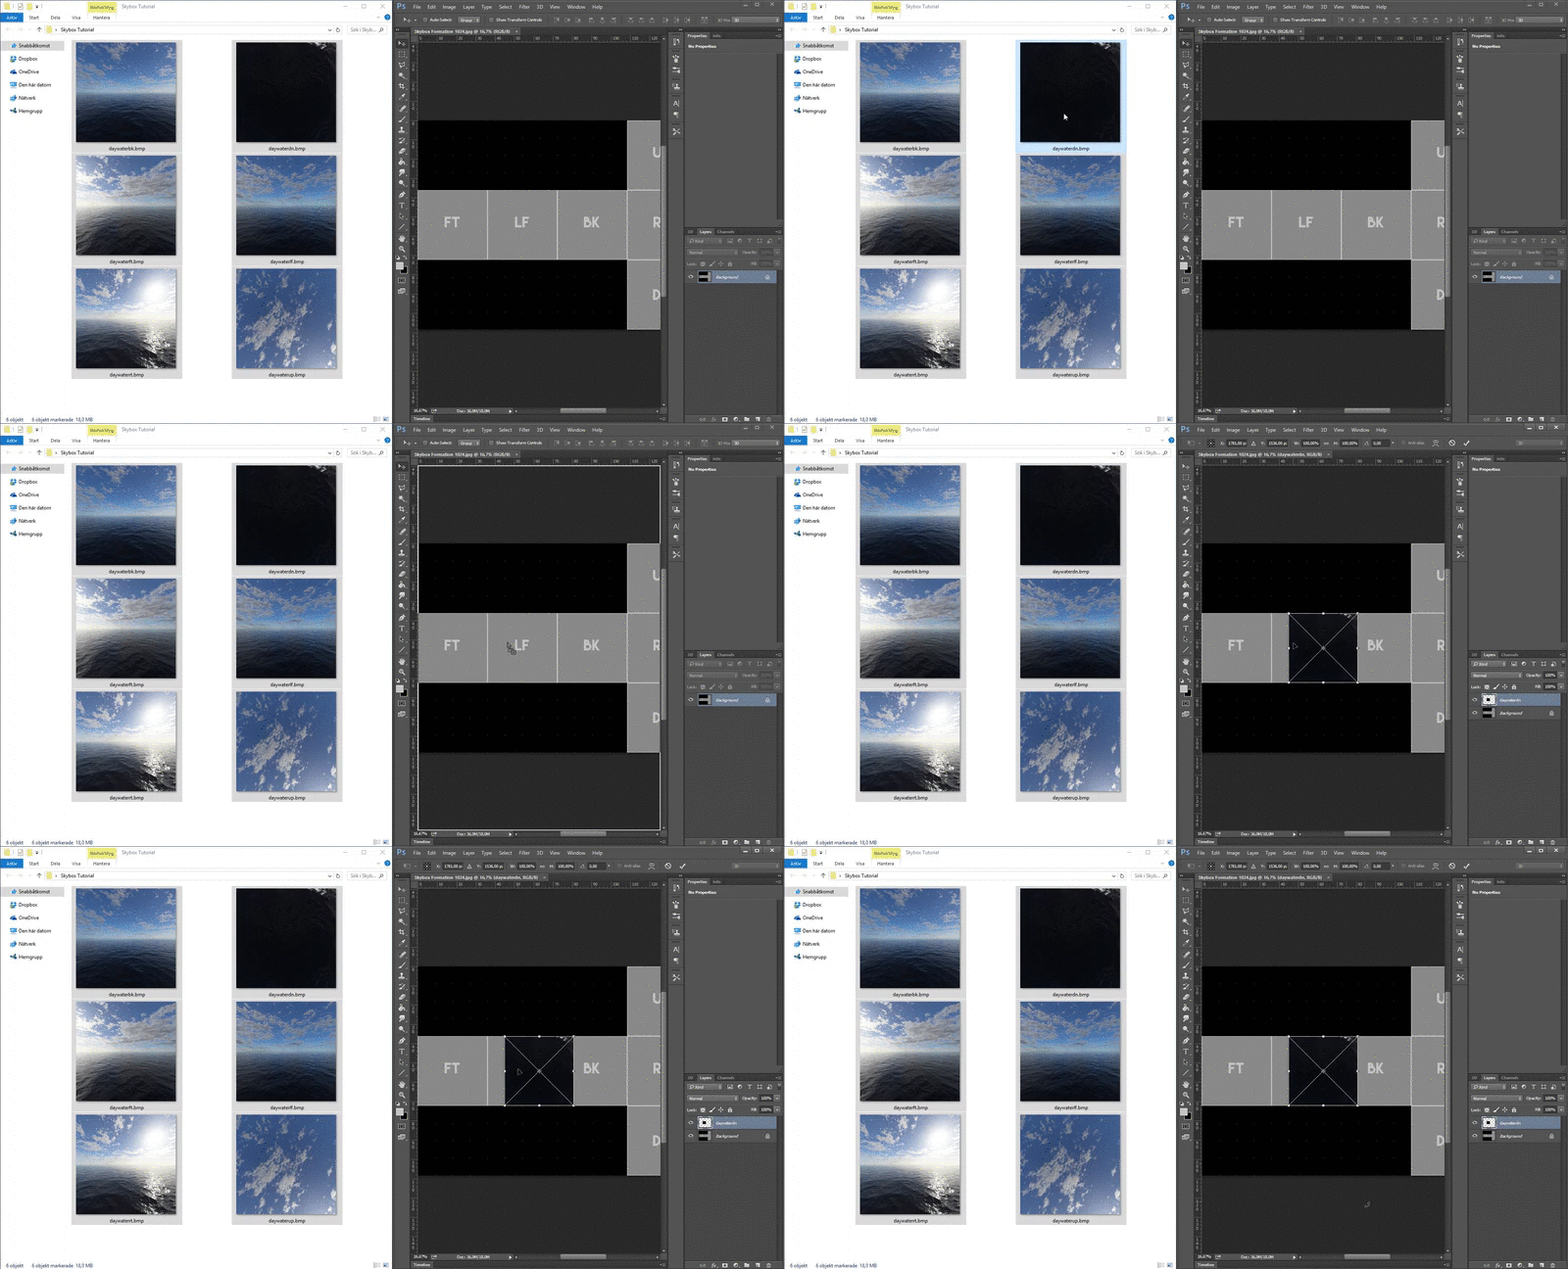

    • Take notice of what the name of the layer is:
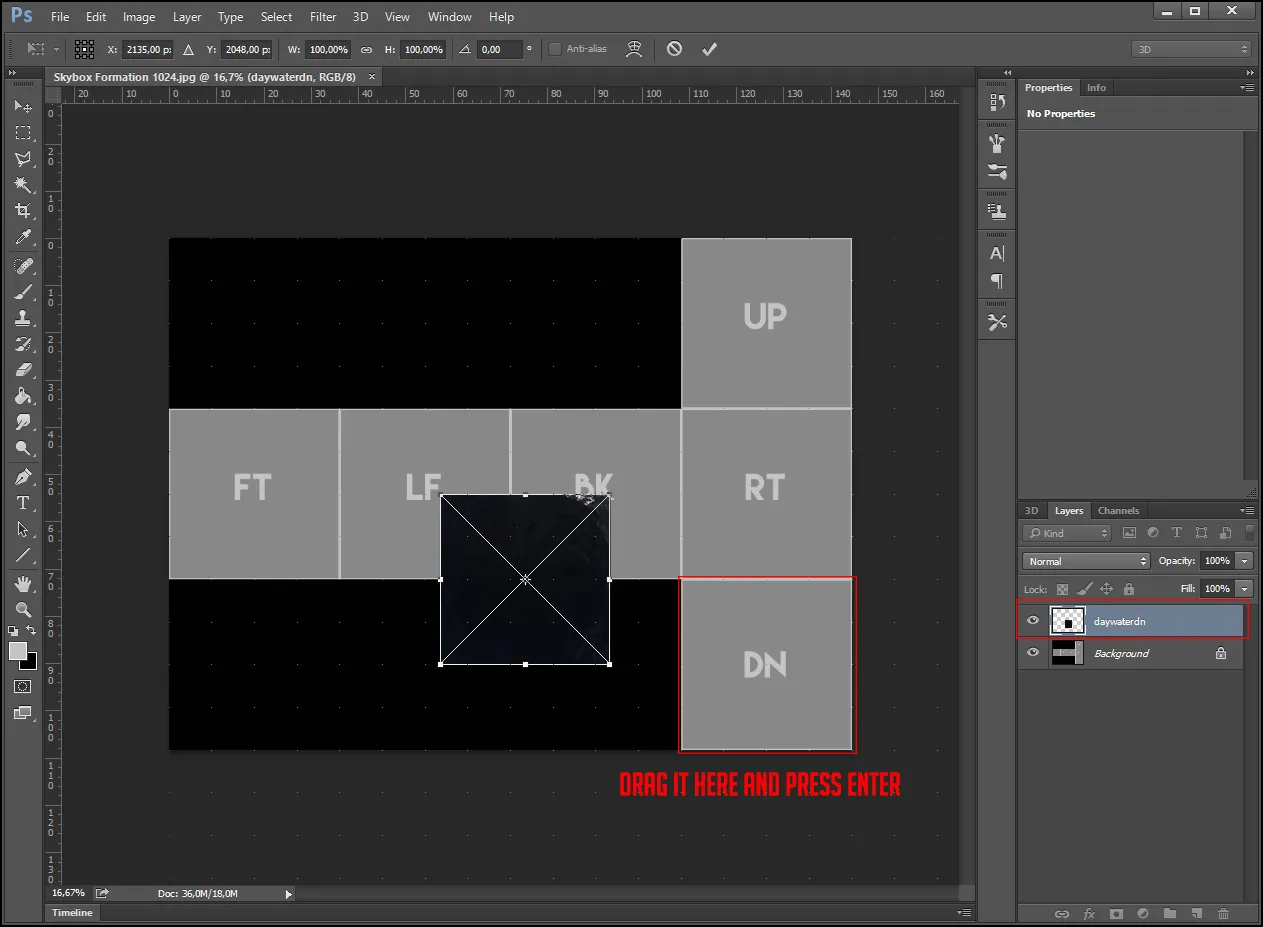
    • Drag it to the correct location and press [Enter].

    The next layer will pop up. Repeat this until you've placed them all at their correct locations:
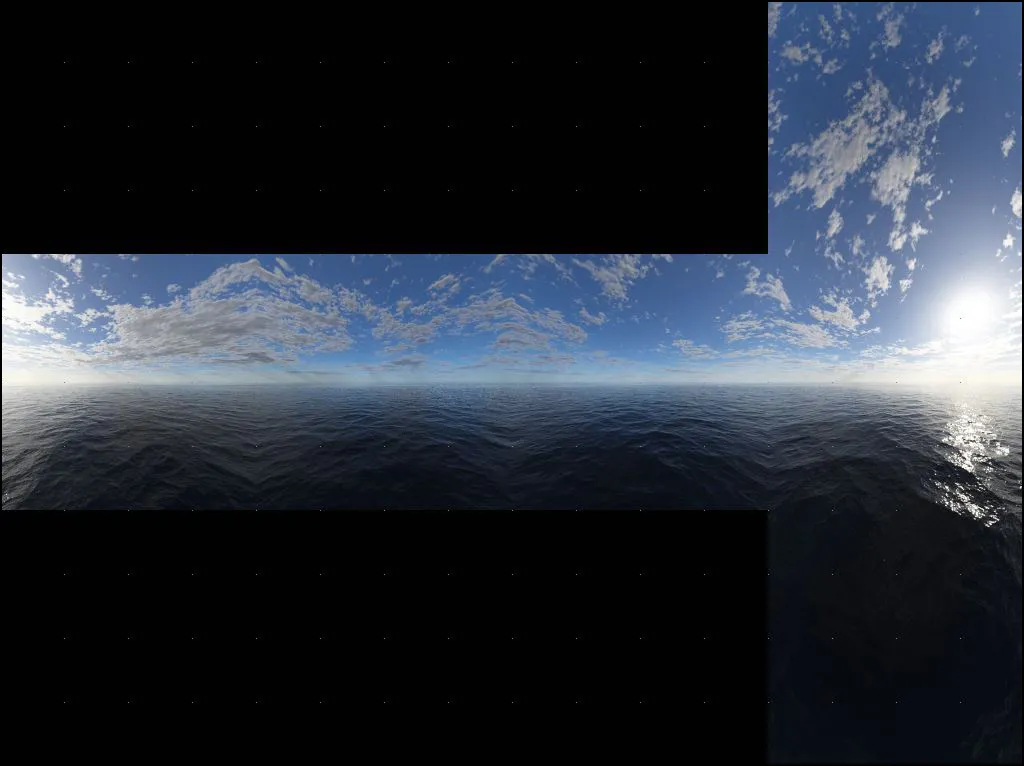
    • If it looks good with no visible seams or weird lighting, you can safely assume this is gonna work in game.
    • It it doesn't look good, you probably have some setting enabled in Terragen which causes problems.

    Since I think mine looks ok, I can now exit out of Photoshop and move on to VTFEdit.

    (Didn't spend any effort on this skybox. Just added a cloud and water layer and didn't tweak any settings).


    VTFEdit[/b]

    • Open up VTFEdit and click "Tools" and choose "Convert Folder"
    • Change the "Input Folder" to where you have your .BMP's (You should have your .BMP's in a map somewhere)
    • Change the "Output Folder" to "Steam\steamapps\common\Counter-Strike Global Offensive\csgo\materials\skybox"
    • Click "To VTF" and type in "*.bmp" in the box beside it
    • Make sure "Create VMT Files" are checked
    • Click "Convert"

    After a little while you should have all your VTF's and VMT files in your "materials\skybox" folder.

    Go to that folder and open up every .VMT file with Notepad++ or Notepad
    Delete everything and replace it with:


    Where it says xx, you have to type in which side it is. Look at the name of the .VMT you're currently editing.
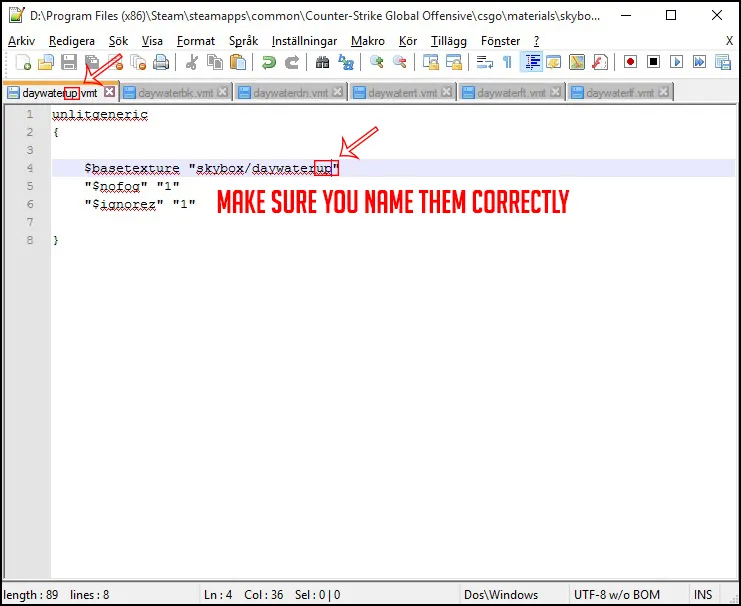
    When you're done, save them all...

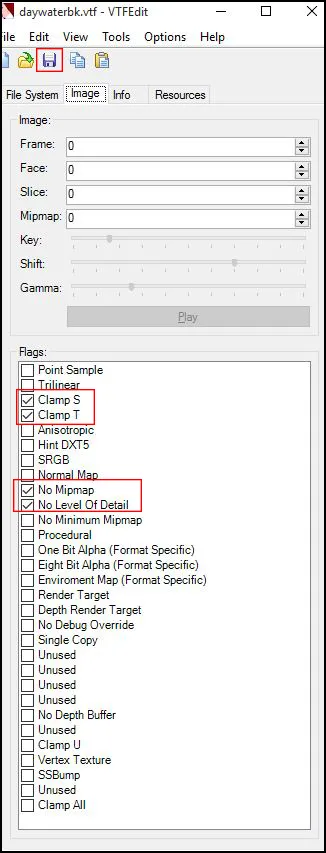
    Now open up one .VTF file at a time and check these boxes:

    • Clamp S
    • Clamp T
    • No Mipmap
    • No Level Of Detail

    When you're done, click the save button...

    • Open up Hammer World Editor
    • Go into "Map -> Map Properties"
    • Change Skybox Texture Name to "yourskyname"

    Compile your map and you're done

    If you want other people to see your skybox in game, you have to pack everything correctly by using e.g. VIDE.

  • AirStep
    • September 11, 2015 at 2:27 AM
    • #2

    This is brilliant, thank you so much for taking the time to do this!

  • Psyrius
    • September 11, 2015 at 7:42 AM
    • #3
    Quote from Clouded Mind

    This is brilliant, thank you so much for taking the time to do this!

    No problem! My first goal was to include a HDR tutorial as well. But I didn't find anything that worked. Spent so many hours trying. So I hope I will lengthen someone elses life with this tutorial, so you won't have to spend endless hours of trying without success like I did first ^^

  • Psyrius
    • September 11, 2015 at 11:46 AM
    • #4

    [Blocked Image: http://i.imgur.com/1Z8j0xD.jpg]

    Dusk setting. Pretty easy to make :) Have fun everyone!

  • Squad
    • September 11, 2015 at 2:41 PM
    • #5

    Nice skybox!

    Thanks for sharing! Might give this a try some time :)

  • Lizard
    • September 12, 2015 at 10:36 AM
    • #6

    This is great !

  • El_Exodus
    • February 11, 2016 at 1:17 PM
    • #7

    Should've used this tutorial before creating my skybox :D Still managed to make it work though. One thing could make your tutorial even better:

    If you render the skybox at max resolution(free version) it's at 900x900px. Enough to upscale the renders to 1024x1024px afterwards for more details. I did this myself and it's looking good ingame imo.

    I might try to create more skyboxes after finding this tutorial again :)


    Edit: One more thing: If you want to use env_sun in Hammer, disable the sun disk and maybe "Glow in atmosphere" in Terragen.

  • Furiosa
    • February 13, 2016 at 3:38 PM
    • #8

    My first post and thanks for making this tutorial, gonna learn it.

    Anyway, i can't download Terragen on that link, its show "404 - Category Not Found".


    Edit: I found it, http://planetside.co.uk/products/download-terragen-3

  • kinggambit
    • February 26, 2016 at 4:04 AM
    • #9

    Just what I needed! Thanks! Does anyone know if there's a free alternative to Terragen? I'm testing out TG's trial and it seems great! Definitely will purchase in the future.

  • Dosentti
    • September 24, 2016 at 5:16 PM
    • #10
    Quote from kinggambit

    On 2/26/2016 at 6:04 AM, kinggambit said: Just what I needed! Thanks! Does anyone know if there's a free alternative to Terragen? I'm testing out TG's trial and it seems great! Definitely will purchase in the future.

    I actually don't know completely free alternative, sorry. But I just wanted to let you know that they just published new policy for student subscriptions. They give terragen 4 for free for students so in case you are one, you can get it for free.

    http://terragen4.com/terragen-4-now…ducational-use/

  • The Horse Strangler
    • September 28, 2016 at 1:59 PM
    • #11

    I would highly advise using skydomes instead of editing/authoring skyboxes. Not only is it easier overall, but it also allows you to iterate changes to the sky in the event you need to do so. Being able to quickly paint in additional cloud highlights, sun glare, horizon fog, etc is great for rapid iteration. While it is not impossible with a traditional skybox layout/workflow, adding additional atmospheric layers can become tedious very fast, especially as you might find yourself re-exporting multiple textures, versus one.

  • biXen
    • September 28, 2016 at 3:12 PM
    • #12
    Quote from MrTwoVideoCards

    1 hour ago, MrTwoVideoCards said: I would highly advise using skydomes instead of editing/authoring skyboxes. Not only is it easier overall, but it also allows you to iterate changes to the sky in the event you need to do so. Being able to quickly paint in additional cloud highlights, sun glare, horizon fog, etc is great for rapid iteration. While it is not impossible with a traditional skybox layout/workflow, adding additional atmospheric layers can become tedious very fast, especially as you might find yourself re-exporting multiple textures, versus one.

    How would you go about doing that? Is it possible to export from a 3D application and still keep the lighting properties?

  • Dosentti
    • September 28, 2016 at 10:19 PM
    • #13
    Quote from MrTwoVideoCards

    8 hours ago, MrTwoVideoCards said: I would highly advise using skydomes instead of editing/authoring skyboxes. Not only is it easier overall, but it also allows you to iterate changes to the sky in the event you need to do so. Being able to quickly paint in additional cloud highlights, sun glare, horizon fog, etc is great for rapid iteration. While it is not impossible with a traditional skybox layout/workflow, adding additional atmospheric layers can become tedious very fast, especially as you might find yourself re-exporting multiple textures, versus one.

    Hmm.. It's always great to hear how to do stuff more efficiently etc, but in this case I bet I'm not the only one who could use tutorial. If you know one, please share link. Thanks. :)

  • The Horse Strangler
    • September 29, 2016 at 3:07 PM
    • #14
    Quote from Dosentti

    16 hours ago, Dosentti said: Hmm.. It's always great to hear how to do stuff more efficiently etc, but in this case I bet I'm not the only one who could use tutorial. If you know one, please share link. Thanks. :)

    There's a ton of stuff for authoring skydomes in UE3/UE4. It's more or less the same workflow.

    Quote from Bevielis

    22 hours ago, Bevielis said: ...Here's how it looks in Nuke:....

    I was pretty surprised to see nuke using a skydome.

  • biXen
    • September 30, 2016 at 12:48 AM
    • #15

    I am familiar with using skydomes in applications like Maya or Nuke, but seeing as the skydome also provides lighting I am not sure exactly how that would work in this game if it was imported. Is it a BSP object? Guess I should check out the existing maps more.

  • Dosentti
    • September 30, 2016 at 10:06 AM
    • #16
    Quote from MrTwoVideoCards

    18 hours ago, MrTwoVideoCards said: There's a ton of stuff for authoring skydomes in UE3/UE4. It's more or less the same workflow.

    Well.. if someone doesn't know how to make a custom skybox and he finds this great tutorial that Psyrius has written and his other option is to browse "ton of stuff" about different game engine I would advice going with this tutorial. It might be that skydomes are better/easier way to tweak the sky (and I'll definitely myself try it!) but on the other hand trying to find a proper tutorial is often so hard that it'll be easier to go with this one. That's why I would have wanted you to link a proper tutorial so that people wouldn't have to waste time. Also.. if you know how to do it, it would be even better if you made your own tutorial that applies completely to csgo.

  • The Horse Strangler
    • October 3, 2016 at 5:48 AM
    • #17

    Here's a nice video that talks about a couple of different methods.

    External Content www.youtube.com
    Content embedded from external sources will not be displayed without your consent.
    Through the activation of external content, you agree that personal data may be transferred to third party platforms. We have provided more information on this in our privacy policy.
    QUICK EDIT:

    This is also a super great one for 3dsmax users, and well, probably overall. LINK


    Quote from Dosentti

    On 9/30/2016 at 2:06 AM, Dosentti said: ...it would be even better if you made your own tutorial that applies completely to csgo...

    The only thing unique is that you pretty much compile a smd, it's the same process as getting a custom model in the game more or less. Not trying to be patronizing or anything but a quick google search of "how to make a skydome" yields tons of results. I think there's a solid amount of information out there in much more detail than I can provide, and I highly suggest researching it further as each sky setup can be a little different here and there in terms of structure (clouds as separate mesh, fog layers, etc). Making skydomes is kind of a universal thing that more or less has the same workflow for every engine. The only difference between each is generally how you put together the shader or material, and/or export the model.

Participate now!

Don’t have an account yet? Register yourself now and be a part of our community!

Register Yourself Login
Discord

The Mapcore Discord is our lively IRC channel of the 2000s reborn. Chat about level design, gaming, and more.

Latest Posts

  1. Why is data science needed

    shilpa
    July 17, 2026 at 12:39 PM
  2. Any of the old guard still around? D:

    Warby
    July 12, 2026 at 8:23 PM
  3. About our archived forums

    Thrik
    June 30, 2026 at 2:12 PM
  4. Mapcore Discord

    mason_fan123
    June 24, 2026 at 8:52 PM
  5. [CS2] Valley

    Serialmapper
    June 22, 2026 at 11:56 AM
  6. Free Music / SFX Resource - Over 2500 Tracks

    Eric Matyas
    June 18, 2026 at 12:32 PM
  7. Pango [WIP]

    Elowen
    June 11, 2026 at 10:13 AM
  8. [CS2] Dvina

    Jeremy Rivera
    June 11, 2026 at 10:03 AM
  9. Bridges 2.0 by NEXSIDE, MAP SHOWCASE. ( Steam Workshop )

    MrTrane18
    June 1, 2026 at 7:46 PM
  10. Classic Maps Reborn For CS2

    SillySpaceCat
    May 31, 2026 at 10:33 PM

Users Viewing This Thread

  • 1 Guest
  1. Privacy Policy
  2. Contact
Powered by WoltLab Suite™