1. Forums
  2. Discord
  3. About Mapcore
  4. Patreon Supporters
  • Login
  • Register
  • Search
Everywhere
  • Everywhere
  • Articles
  • Pages
  • Forum
  • More Options
  1. Mapcore
  2. Members
  3. Psyrius

Posts by Psyrius

  • Need feedback on my new map idea

    • Psyrius
    • October 6, 2015 at 10:52 PM

    I've been trying to come up with a new idea for my competitive CS:GO map and I've finally came up with an idea that I like.

    In Sweden we have these "Skyddsrum" (Protection room in English). There's approximately 65000 of them spread out all over Sweden. It's like shelters that offers protection for the civilization in case of war. Some are very big, some are small. Some are built to withstand nuclear attacks. Well, maybe not a direct hit, but you get the idea. They were mostly built during the cold war. During peace, some of these shelters are used for various activities.

    Here is some examples:

    https://en.wikipedia.org/wiki/Bahnhof "WikiLeaks is currently hosted in a Bahnhof data center inside the ultra-secure bunker Pionen, which is buried inside the White Mountains in Stockholm.

    Party place:

    Quote

    [Blocked Image: http://media.fashiontobusiness.se/2015/01/event-fashion-stockholm.png][Blocked Image: http://www.skyddsrummet.se/galleri1/images/Arrangemang_196.jpg]

    [Blocked Image: https://cdn3.cdnme.se/cdn/6-2/1151320/images/2009/07_52481331_52640391_52643161.jpg]

    So my idea is that there's something going on in this particular shelter that the terrorists doesn't like. Maybe drug or weapon making?

    I really want my map to be something special and not just make a simple clover style layout. So I have a basic idea for the layout that I want 3 layers which is further explained down below.

    I guess this is abit more clear to me than it will be for you, but I've tried my best to explain :) Please tell me what you think.

    [Blocked Image: http://i.imgur.com/yVNJs2m.jpg]

  • [CS:GO] de_deluxe [WIP]

    • Psyrius
    • October 4, 2015 at 5:24 PM

    I've gotten to a point where I just feel that an urban map is really hard to pull of (with good gameplay) if you want to make an defuse map. I realized that most succesful urban maps are made for hostage rescue. Maybe there's a reason? There might be a big chance I'm just gonna scrap this as well and rethink of what theme I want to do. But I don't see the things I've done a waste. I've learned alot, which I can bring to my next project. Tell me what you think guys :)

  • [CS:GO] de_deluxe [WIP]

    • Psyrius
    • October 3, 2015 at 9:20 AM

    After the playtest I decided it's better if I just start over again. Rethinking on how to build up the map. I want to have a consistent and believable theme - so I've started to detail abit with optimization in mind just for practise. I think it will make it easier for me.

    It's easy to block in a map, but I think it's a pain to detail it if you make roads, rooms, outside areas too big/small.

    The layout for this new version isn't done. But 1 path is done. Through and around this building. Now I can focus on sketching a layout that works and after that block in the map while still staying true to the theme.


    Screenshots:

    http://imgur.com/a/WmiOu

  • Complex

    • Psyrius
    • October 1, 2015 at 3:04 PM

    Looking forward to playtest :)

  • [CS:GO] de_stars

    • Psyrius
    • September 12, 2015 at 9:43 AM

    Love the posters :) But I agree with Puddy that the legendary Juan Deag needs his own poster :D

  • [Tutorial] Make your own skybox for CS:GO

    • Psyrius
    • September 11, 2015 at 11:46 AM

    [Blocked Image: http://i.imgur.com/1Z8j0xD.jpg]

    Dusk setting. Pretty easy to make :) Have fun everyone!

  • [Tutorial] Make your own skybox for CS:GO

    • Psyrius
    • September 11, 2015 at 7:42 AM
    Quote from Clouded Mind

    This is brilliant, thank you so much for taking the time to do this!

    No problem! My first goal was to include a HDR tutorial as well. But I didn't find anything that worked. Spent so many hours trying. So I hope I will lengthen someone elses life with this tutorial, so you won't have to spend endless hours of trying without success like I did first ^^

  • [Tutorial] Make your own skybox for CS:GO

    • Psyrius
    • September 10, 2015 at 10:49 PM


    Hello! I've been mapping for a little over a month now... and I've chosen the worst possible engine to start my mapping career :|

    I won't go into detail on how to make everything pretty in this guide. That's where you have to experiment on your own.
    The purpose of this tutorial is mainly to give you the correct tools and settings to creating a fully functional skybox texture for CS:GO.

    Programs used in this tutorial:


    • Terragen 3
    • Photoshop (Optional)
    • VTFEdit
    • Notepad++ (Optional)


    Terragen

    You can download Terragen here:
    http://planetside.co.uk/products/download-tg3

    Take note that it's not possible to render a 1024x1024 image and have it on max detail if you're using the free version.
    But it's possible to render a 512x512 skybox with 60% Detail.


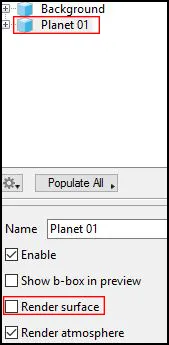
    Open up Terragen. We will begin with removing the surface. It is not needed for our skybox since you'll not be able to see it in game anyway.
    If you include it, it's just gonna make the rendering process take longer.

    Click on
    Click on "Planet 01" and uncheck "Render surface".

    (Save often because Terragen has a tendency to crash sometimes).[/i]


    Click on
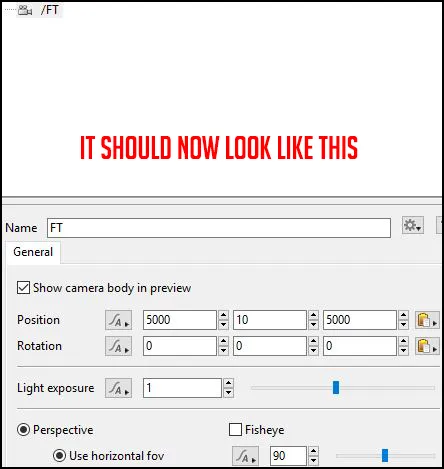
    Click on "/Render Camera" and rename it to "FT"

    • Set Position: 5000 / 10 / 5000 (It can be good to remember that the number in the middle will represent at what height your camera is set)
    • Set Rotation: 0 / 0 / 0
    • Use Perspective and type in 90 in the horizontal fov


    Click on

    (You can zoom in with your scroll wheel and hold [Alt+Leftclick] to pan in the Node Network).

    • Click your camera named FT so it's highlighted.

    • Press [Ctrl+C] on your keyboard.
    • Press [Ctrl+V] on your keyboard.
    • Drag the new camera into your Cameras box.
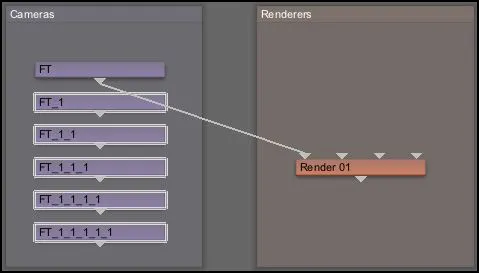
    • Do this 4 more times, so you have 6 cameras in total.


    Click on

    • Click on "FT_1", rename it to "LF" and change the rotation to "0 / 90 / 0"
    • Click on "FT_1_1", rename it to "BK" and change the rotation to "0 / 180 / 0"
    • Click on "FT_1_1_1", rename it to "RT" and change the rotation to "0 / -90 / 0"
    • Click on "FT_1_1_1_1", rename it to "UP" and change the rotation to "90 / -90 / 0"
    • Click on "FT_1_1_1_1_1", rename it to "DN" and change the rotation to "-90 / -90 / 0"

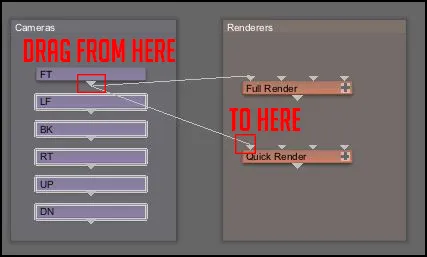
    Double check that your cameras are set up like this: (This picture is not taken from Terragen).[/i]

    [/i]


    Click on

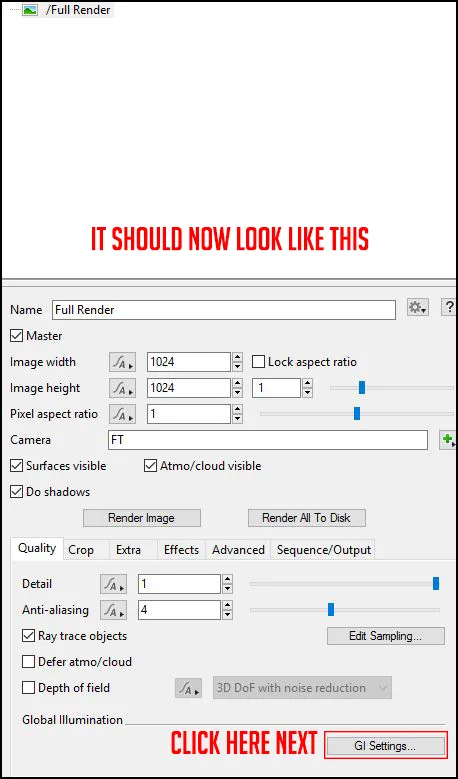
    • Click on "/Render 01" and rename it to "Full Render"
    • Set Image width to 1024 (512 if you're using the free edition)
    • Set Image height to 1024 (512 if you're using the free edition)
    • Set Detail to 1 (0.6 if you're using the free edition)
    • Set Anti-aliasing to 4 (Don't need much more for atmosphere and clouds, I think it's mostly for terrain and objects)

    This is very important to avoid any problems later on:

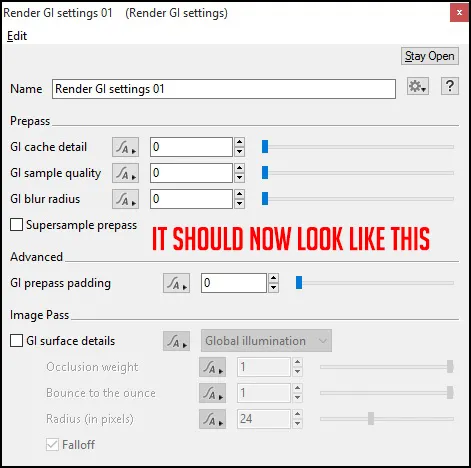
    • Click on GI Settings
    • Set GI cache detail to 0
    • Set GI sample quality to 0
    • Set GI blur radius to 0
    • Turn off GI surface details


    Click on

    • Copy & Paste the "Full Render" node in the "Renderers" box with [Ctrl+C] & [Ctrl+V].


    Click on

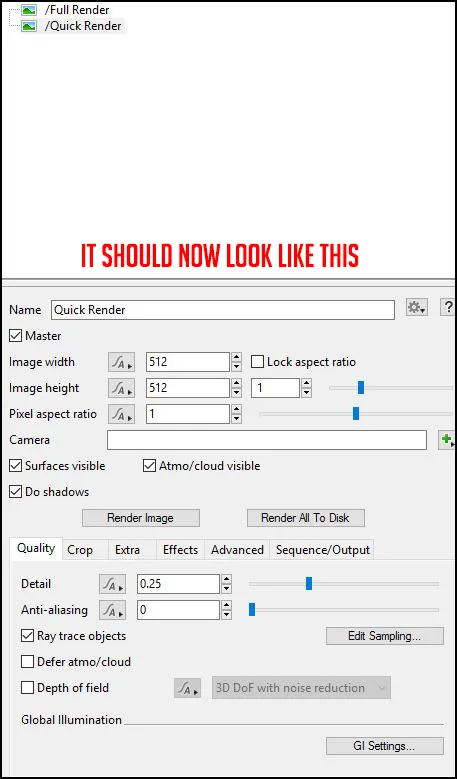
    • Rename your new renderer to "Quick Render".
    • Set Image width and height to 512 (Or even smaller).
    • Set Detail to 0.25.
    • Set Anti-aliasing to 0.


    Click on

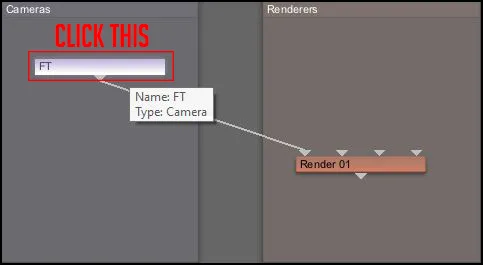
    • Connect your camera called "FT" to the "Quick Render" node.


    You should now go to "File -> Save As..." and save your project and name it something like: "Skybox Default Settings"
    Put it somewhere so you always can open up that one everytime you want to create a new skybox
    After this, make sure you do not save it over. Press "File -> Save As..." again and name it to whatever you like.


    Click on
    Click on "/Quick Render"
    Click on "Render Image" or press [Ctrl+R]

    Do this everytime you've changed some settings and want a fast preview of how it looks.


    Now to the fun part! :dance:

    To change your atmosphere, you click on

    • Click on "/Atmosphere 01"

    Here you can change all kinds of different things for your atmosphere...

    Keep in mind that raising any quality settings may increase your rendering time immensely and/or turn the skybox non-functional.

    Some settings may also increase your rendering times like "Cloud density" and "Edge sharpness". The bigger and more complex your clouds are, more time will be spent computing the render. But just 1 layer of clouds won't make anyone drop the jaw. Good tweaking and layering in moderation is best to aim for.

    • Click "Add Cloud Layer" and choose something that might suit you. By clicking on your new cloud layer you can tweak its settings.
    • Click on to tweak your lighting settings.
    • If you want to add water, click on

    It should all be fairly obvious how things work from now on. You may need to spend some time tweaking the settings and figure out things on your own or watch Terragen tutorials


    When you feel satisfied with your skybox, move on and click

    • Click on "/Full Render"

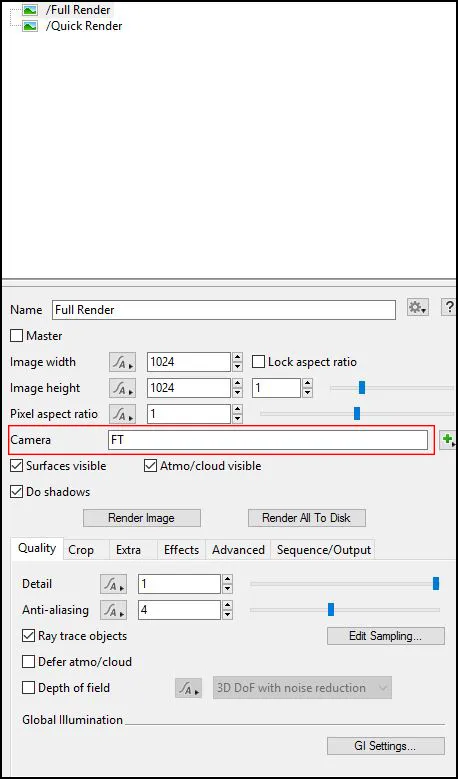
    You can see which image will be rendered where it says Camera

    • Click on "Render Image" or press [Ctrl+R]. (This can take a while depending on your settings).
    • When it's done, click "Save...", name it "yourskynameft" if it was the FT camera and save it as .BMP
    • To render your next image, type in the name of your next camera in the camera section (see picture above) and then render your next image.

    Repeat this process for all the 6 images and name them correctly.


    Photoshop[/b]

    Now we're gonna use Photoshop to make sure our sky is seamless and looks good.

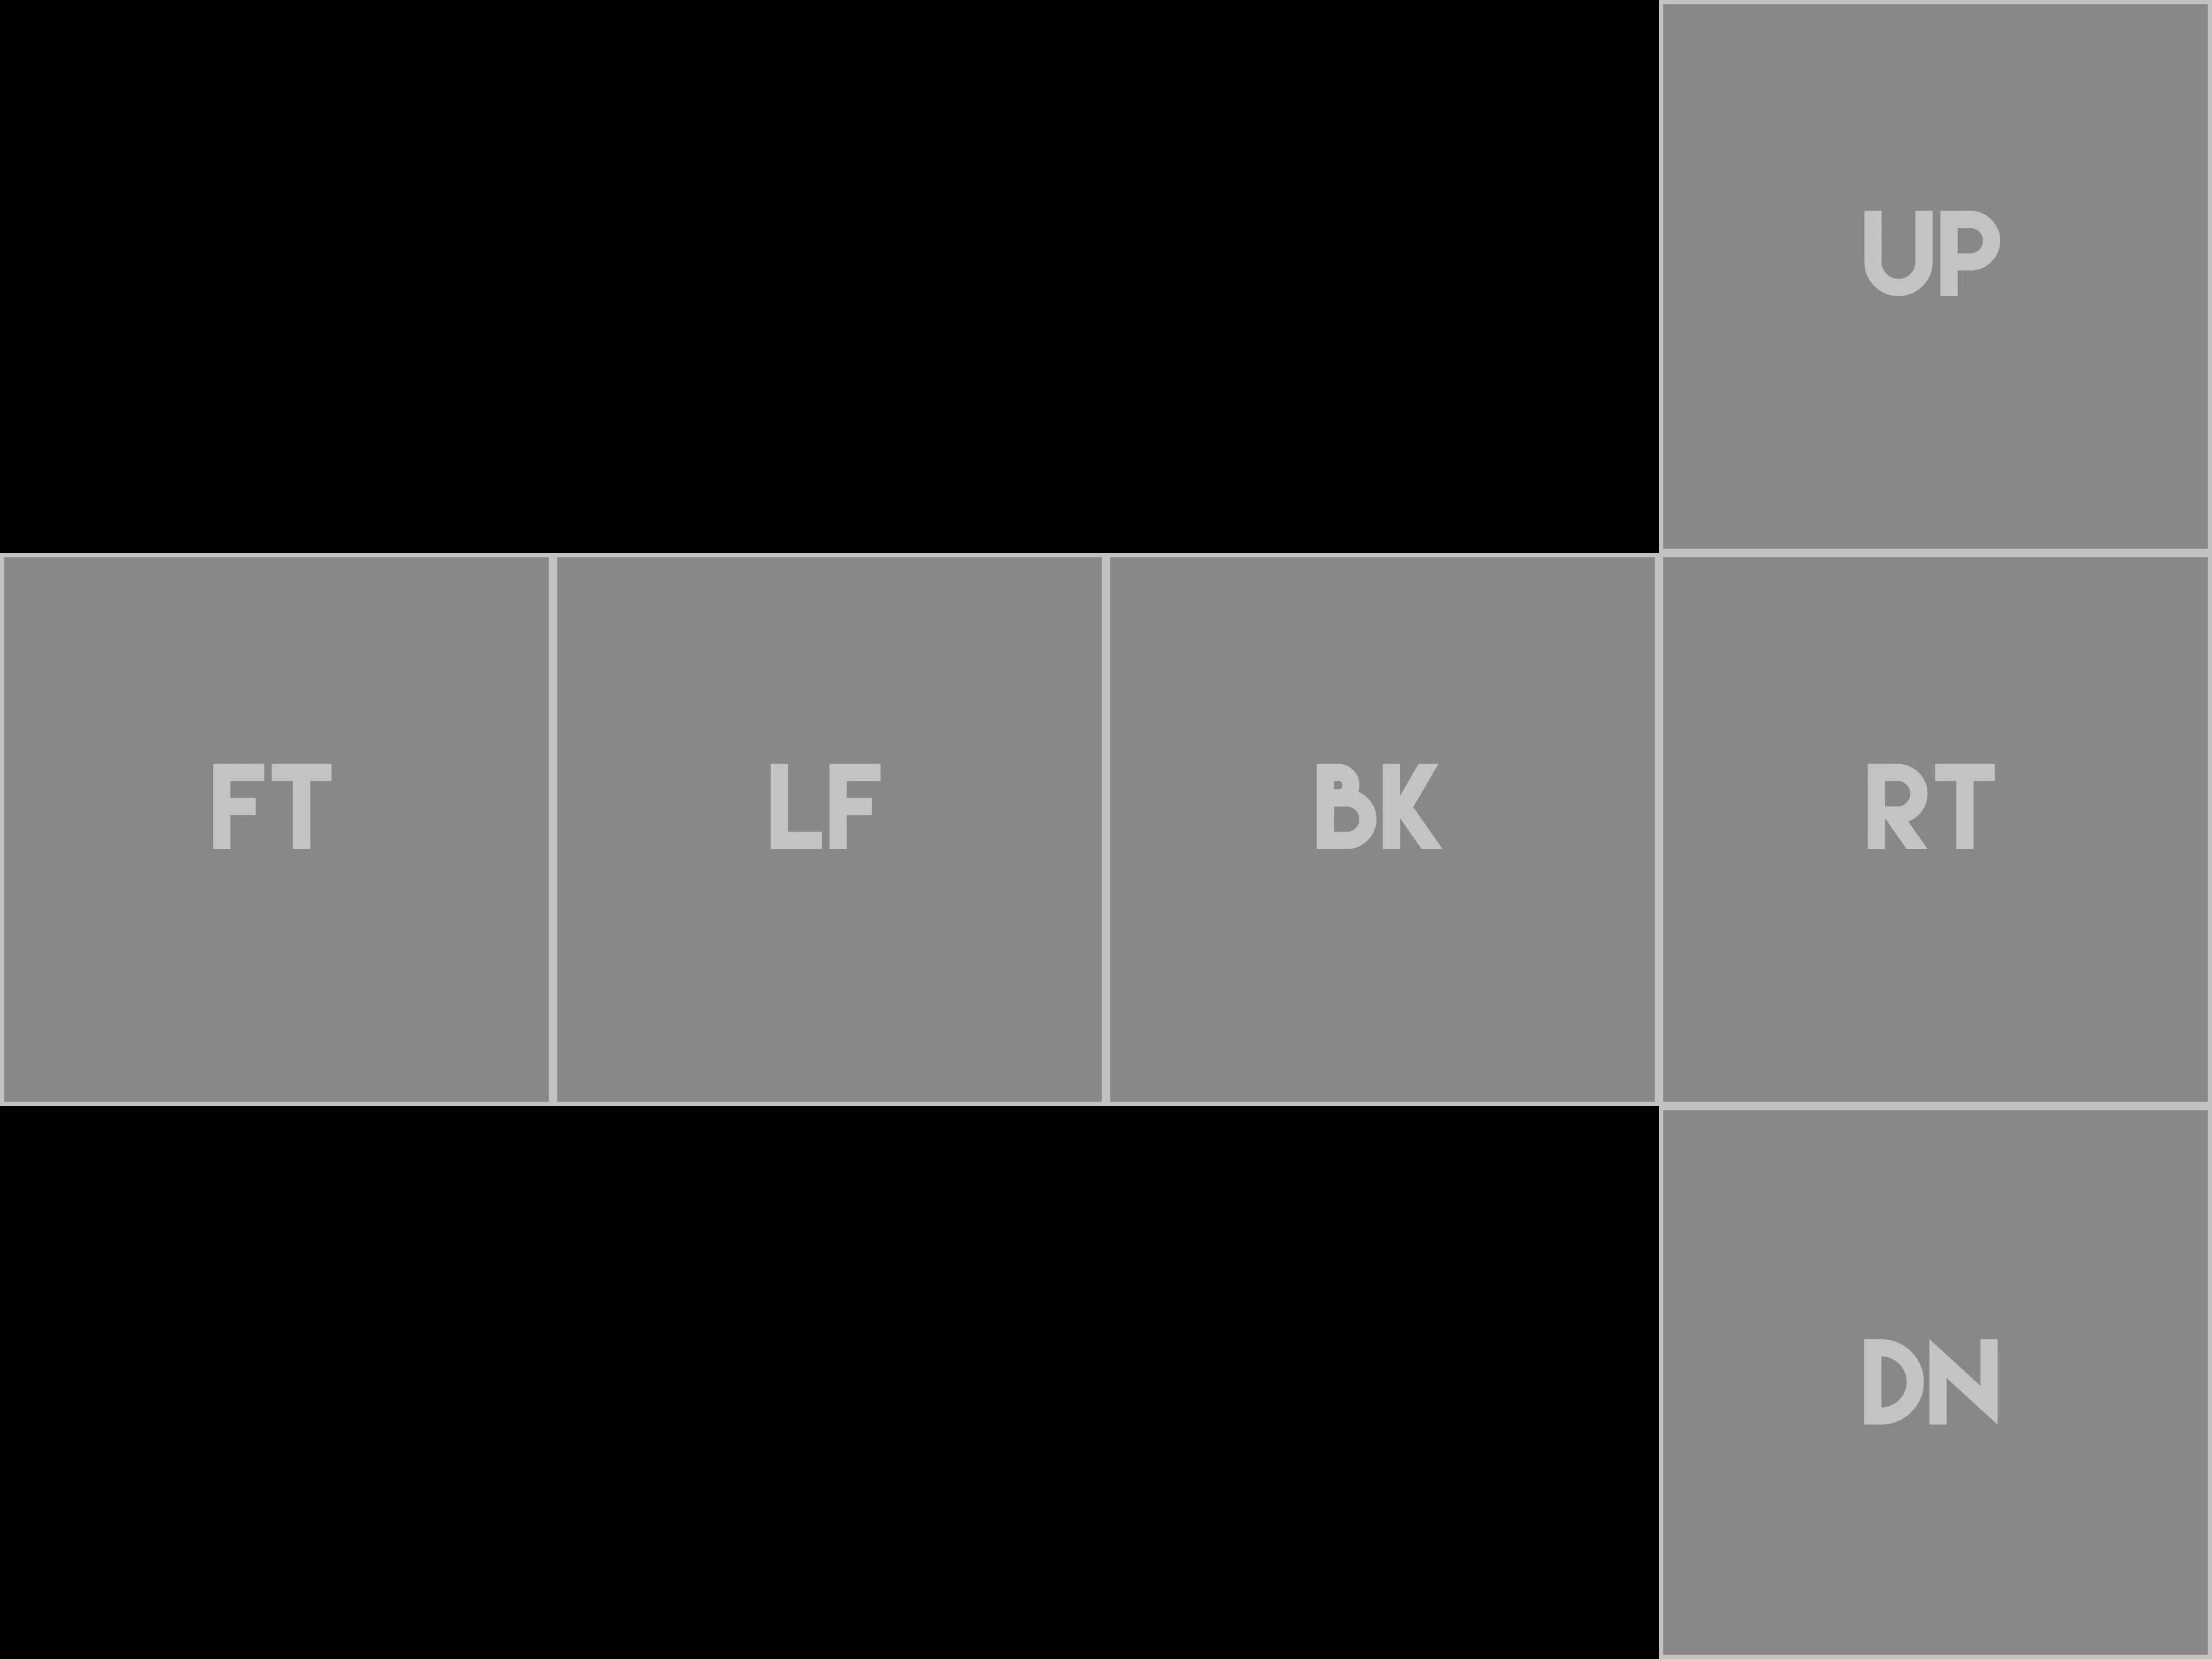
    If the textures you rendered have a size of 1024x1024, make a new document with a width of 4096 pixels and a height of 3072 pixels
    or just download this background and drag it into Photoshop:

    Quote


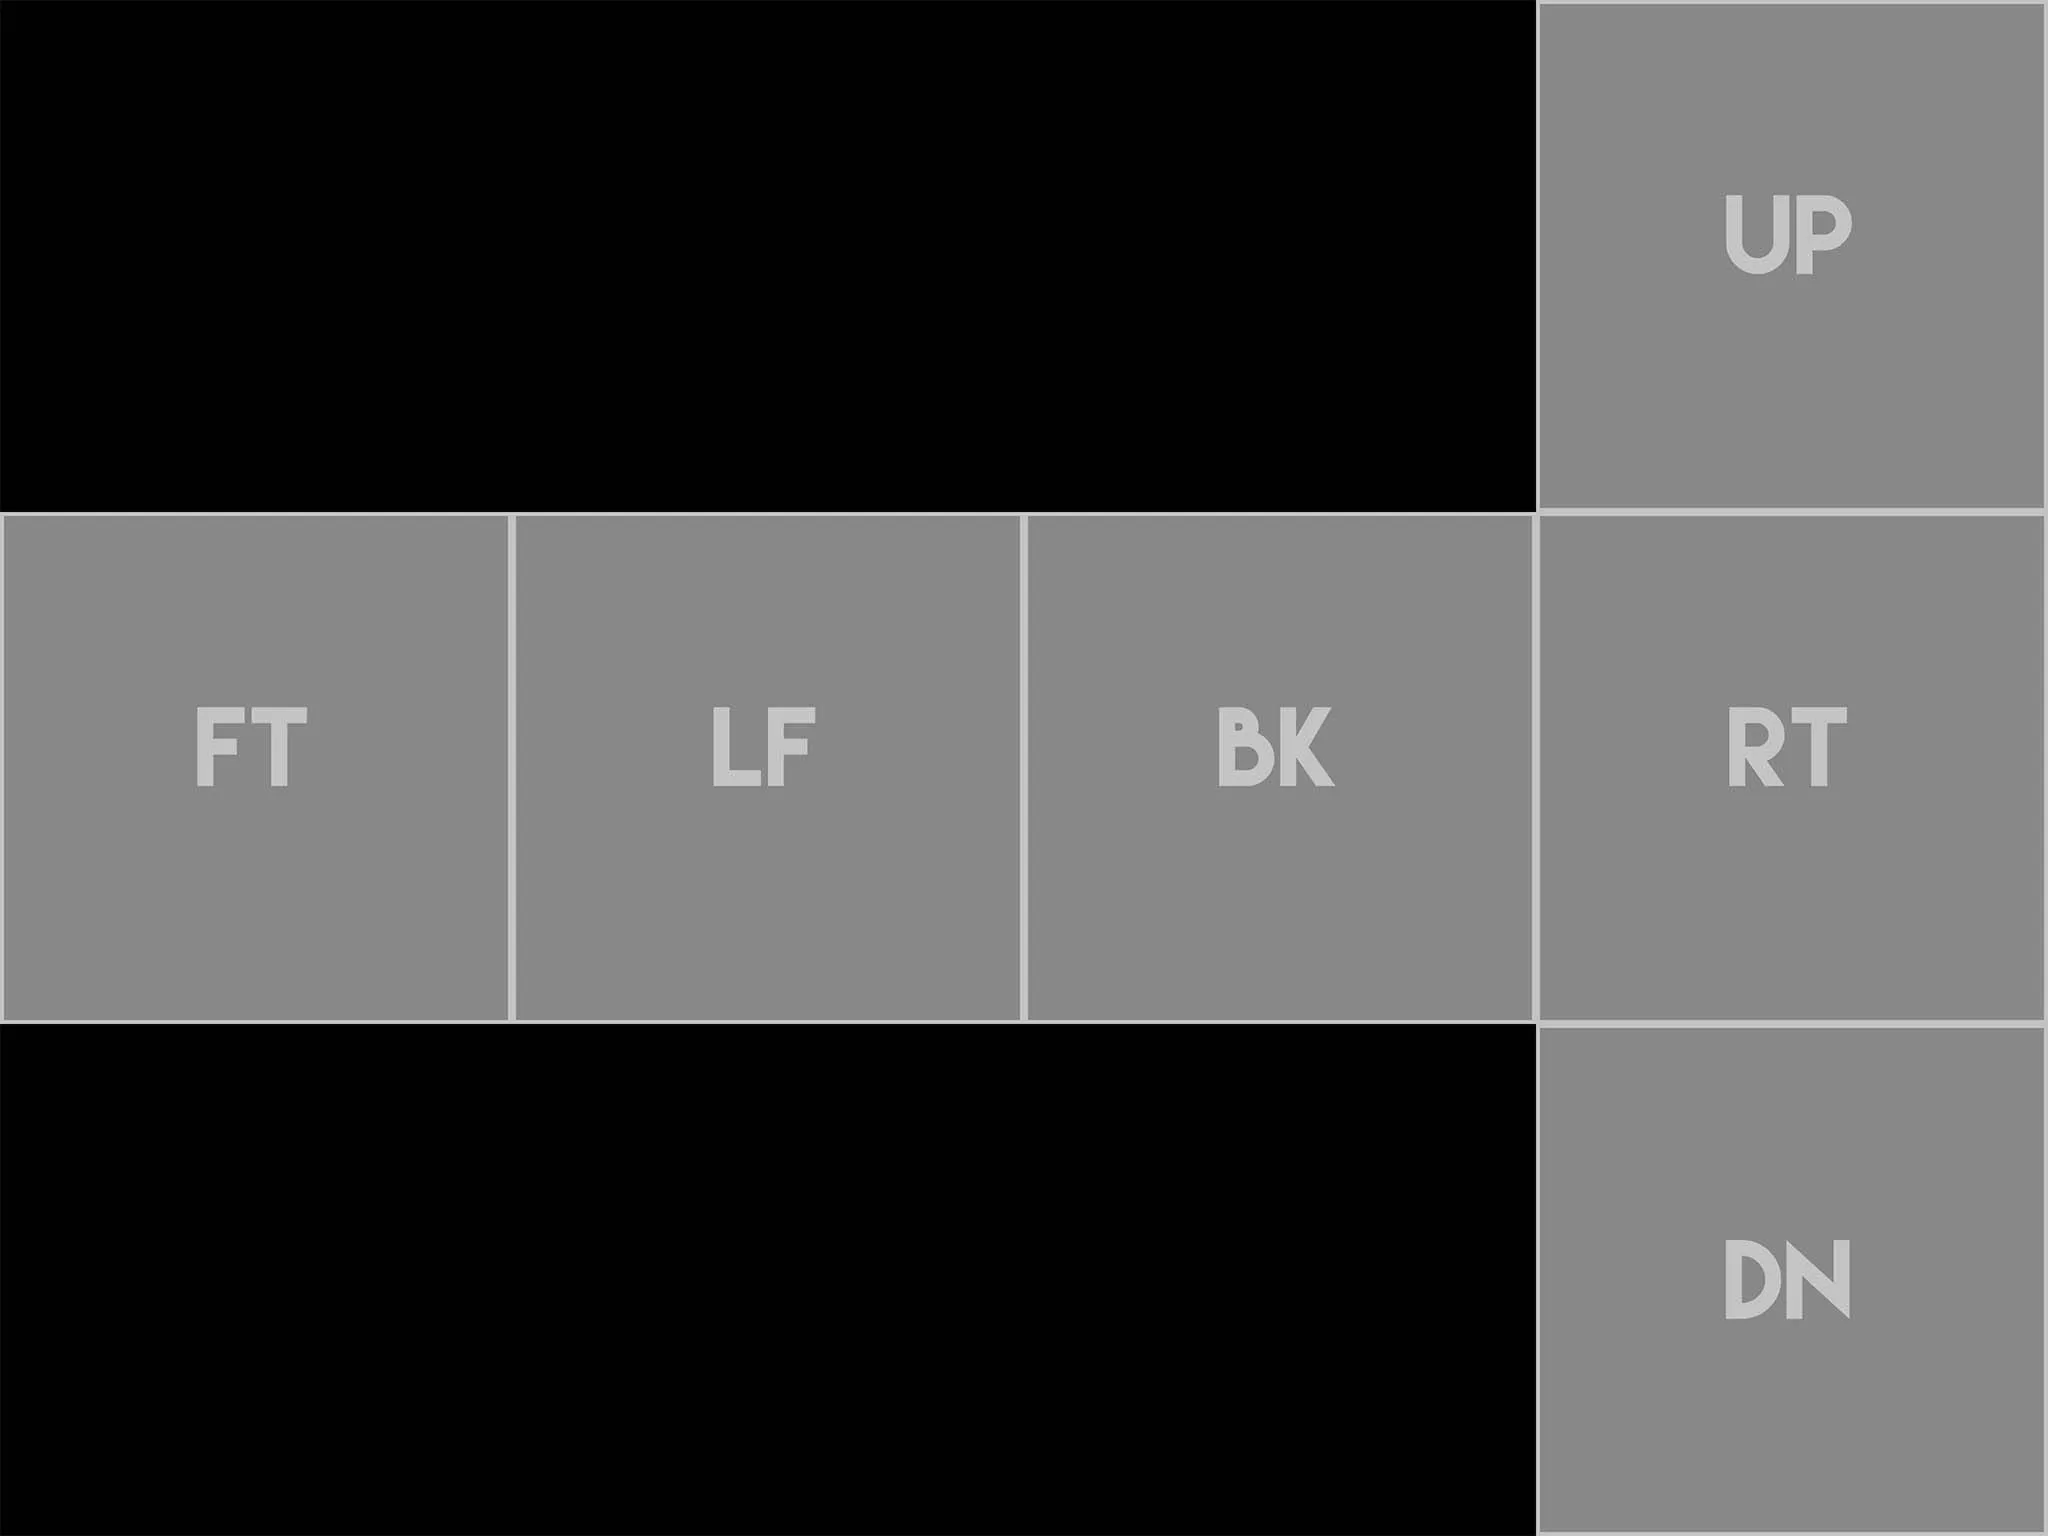
    If the textures you rendered have a size of 512x512, make a new document with a width of 2048 pixels and a height of 1536 pixels
    or just download this background and drag it into Photoshop:

    Quote


    • Go into "Edit -> Preferences -> Guides, Grid & Slices"
    • Set "Gridline Every" to 256 Pixels
    • Set "Style" to Dots
    • Set "Subdivisions" to 1
    • Click OK
    • Go into "View" and make sure "Snap" is enabled and that "Snap To" have "Grid" included
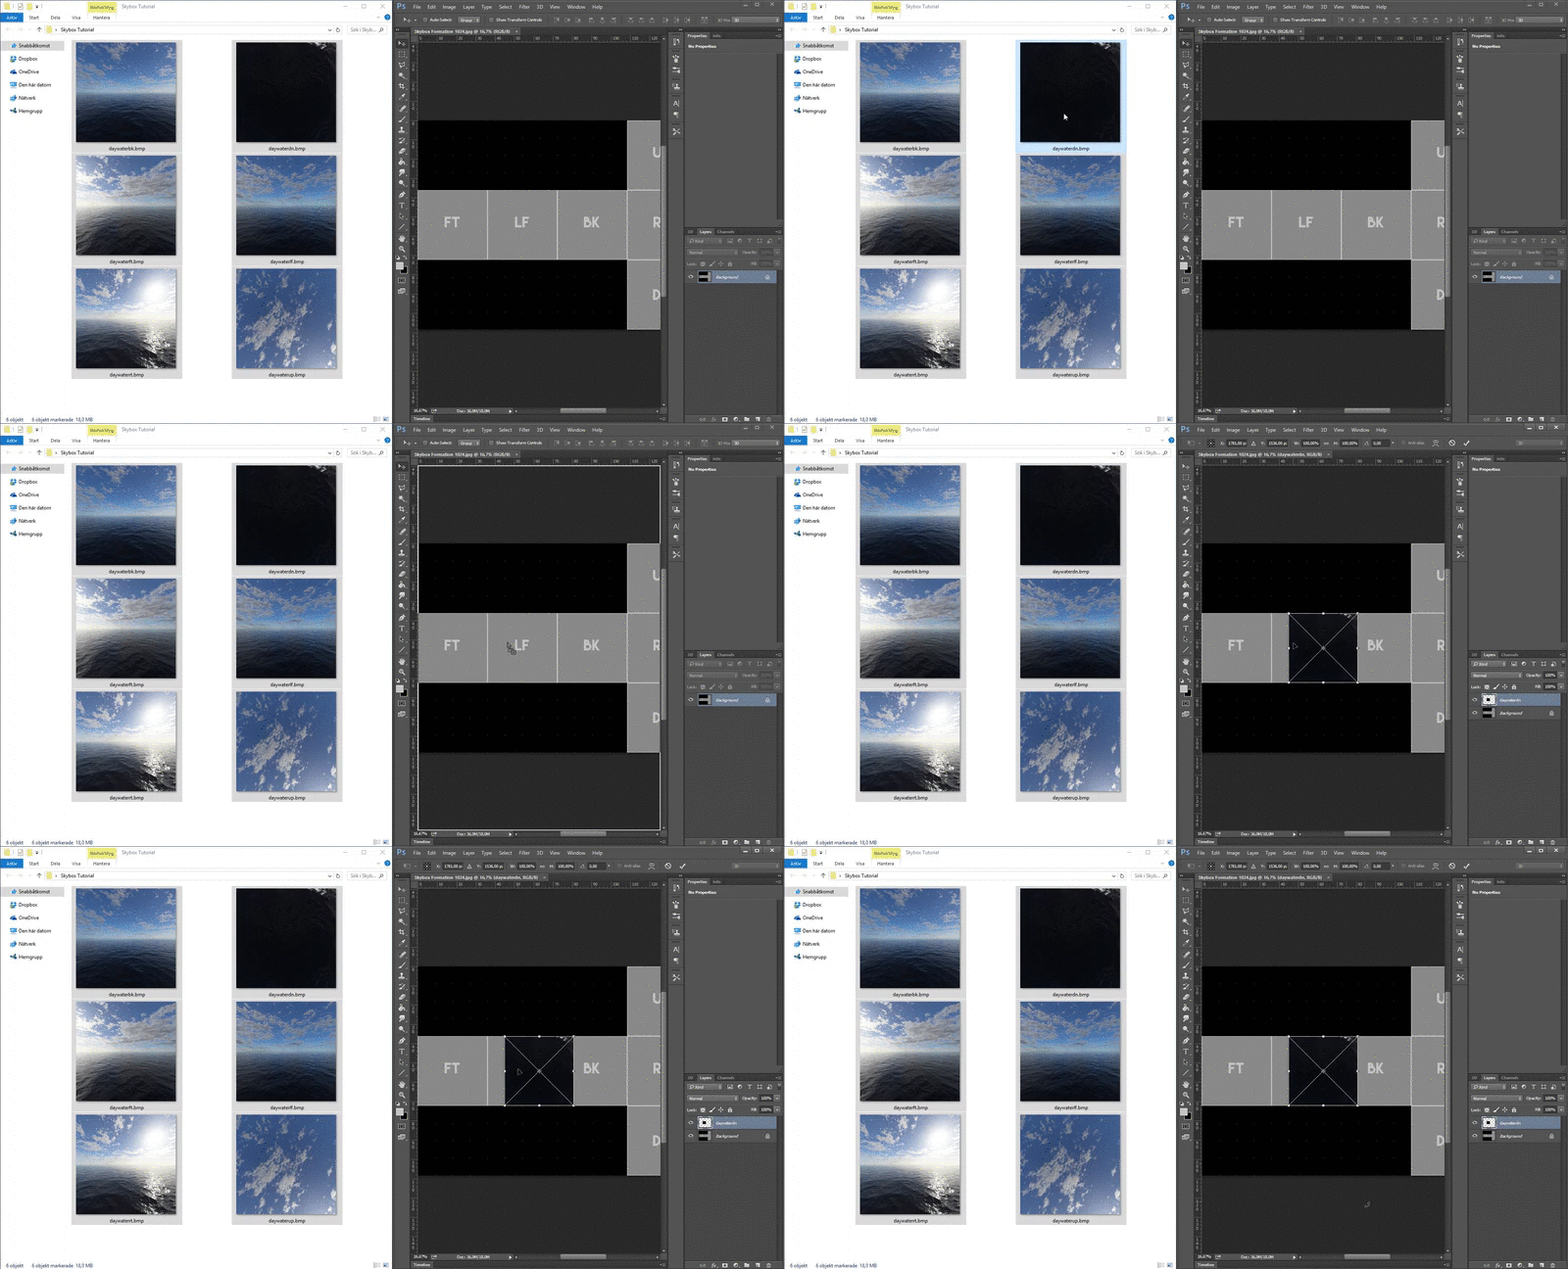
    • Now drag all of your .BMP's to photoshop:


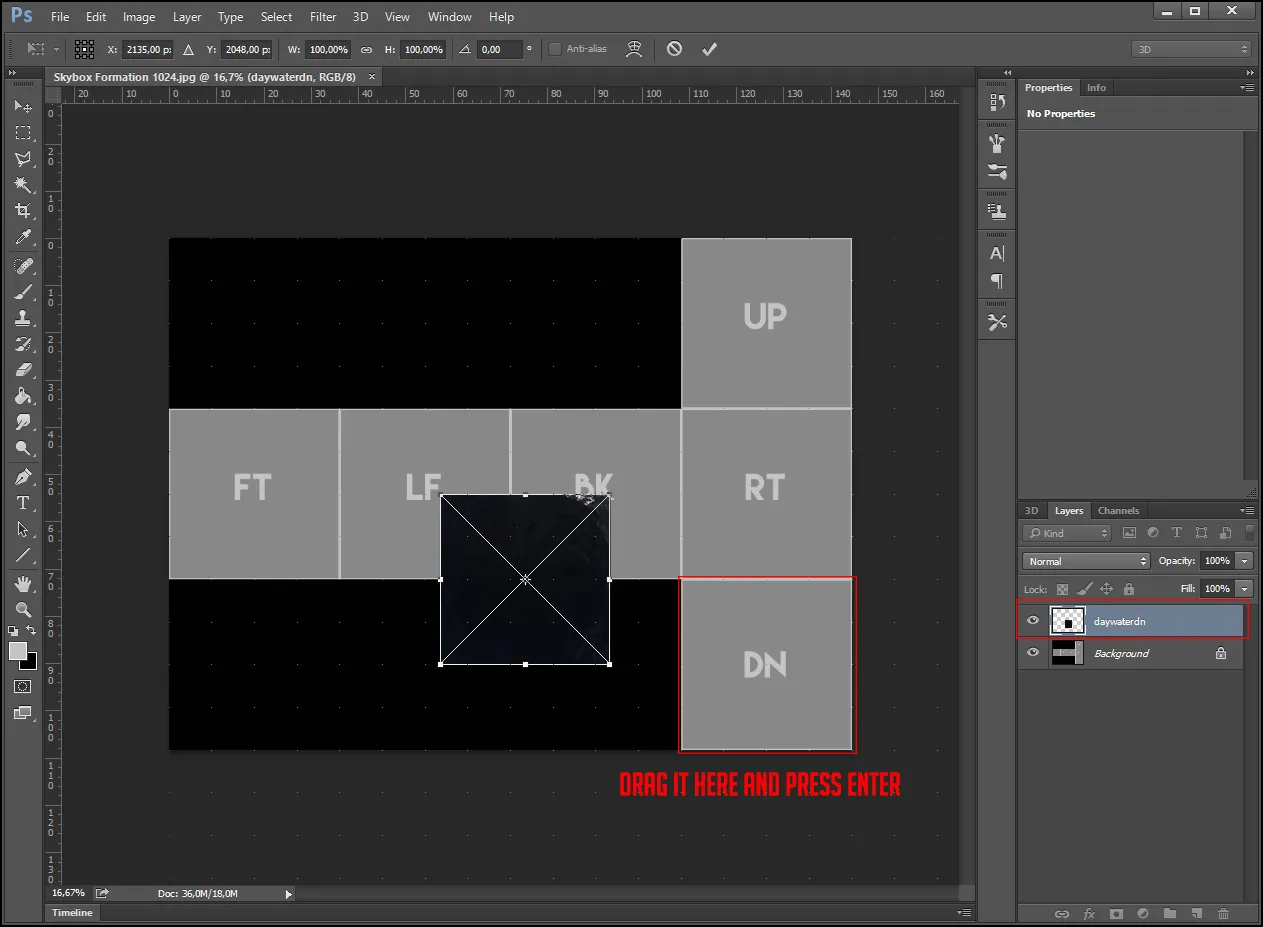
    • Take notice of what the name of the layer is:

    • Drag it to the correct location and press [Enter].

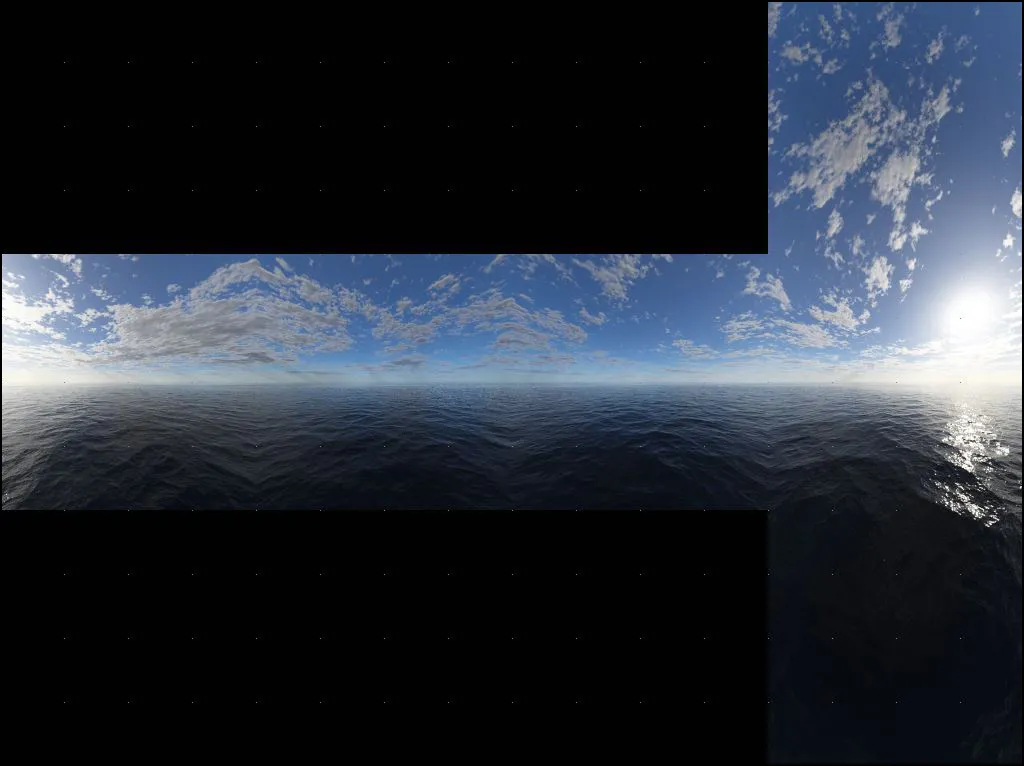
    The next layer will pop up. Repeat this until you've placed them all at their correct locations:

    • If it looks good with no visible seams or weird lighting, you can safely assume this is gonna work in game.
    • It it doesn't look good, you probably have some setting enabled in Terragen which causes problems.

    Since I think mine looks ok, I can now exit out of Photoshop and move on to VTFEdit.

    (Didn't spend any effort on this skybox. Just added a cloud and water layer and didn't tweak any settings).


    VTFEdit[/b]

    • Open up VTFEdit and click "Tools" and choose "Convert Folder"
    • Change the "Input Folder" to where you have your .BMP's (You should have your .BMP's in a map somewhere)
    • Change the "Output Folder" to "Steam\steamapps\common\Counter-Strike Global Offensive\csgo\materials\skybox"
    • Click "To VTF" and type in "*.bmp" in the box beside it
    • Make sure "Create VMT Files" are checked
    • Click "Convert"

    After a little while you should have all your VTF's and VMT files in your "materials\skybox" folder.

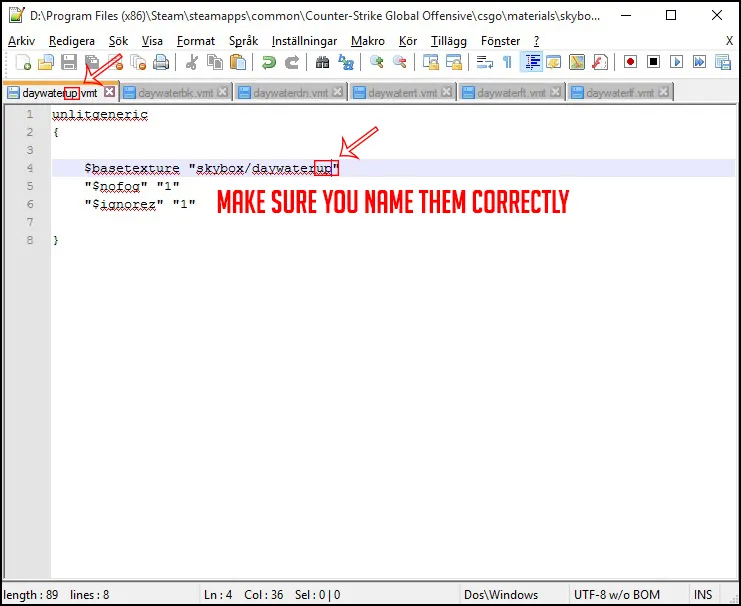
    Go to that folder and open up every .VMT file with Notepad++ or Notepad
    Delete everything and replace it with:


    Where it says xx, you have to type in which side it is. Look at the name of the .VMT you're currently editing.

    When you're done, save them all...

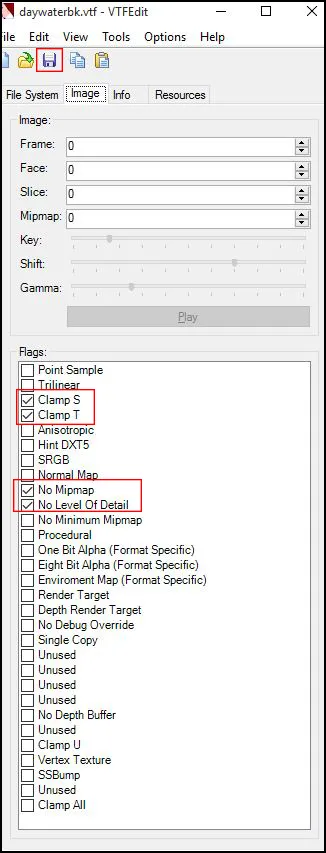
    Now open up one .VTF file at a time and check these boxes:

    • Clamp S
    • Clamp T
    • No Mipmap
    • No Level Of Detail

    When you're done, click the save button...

    • Open up Hammer World Editor
    • Go into "Map -> Map Properties"
    • Change Skybox Texture Name to "yourskyname"

    Compile your map and you're done

    If you want other people to see your skybox in game, you have to pack everything correctly by using e.g. VIDE.

  • Creating a skybox from scratch

    • Psyrius
    • September 10, 2015 at 10:35 AM

    I will make a tutorial soon for all of you here. I've tried to learn how to make a HDR skybox for several hours this morning, but since I've only stepped into trouble and it doesn't seem to work anymore. I'm just gonna make a tutorial on how to make a LDR skybox from the ground and up.

  • Creating a skybox from scratch

    • Psyrius
    • September 10, 2015 at 7:22 AM

    I think I've figured out this on my own now. Will make a guide later if everything works fine so that not everyone has to spend like 3 days or more following guides that doesn't even work.

  • Creating a skybox from scratch

    • Psyrius
    • September 9, 2015 at 1:07 PM

    I've been trying for almost 2 days now, reading tutorials (there's only some old ones) and experimenting with Terragen. My problem is that I really can't get the skybox seamless.

    https://gyazo.com/10a8492be2d75cb727d0ce4a1f40c073

    Maybe something is wrong with camera direction, camera FOV or something. I've done as the tutorials say and I've even experimented on my own for many hours, but I really can't get it to work.

    Do someone have any idea what could be wrong?... and might there be an easier/better solution to create your own skybox than using Terragen?

  • SunSpreadAngle doesn't work?

    • Psyrius
    • September 8, 2015 at 9:20 PM
    Quote from text_fish

    It would be interesting to see side-by-side comparison screenshots from exactly the same angle. At the moment I actually prefer the earlier version, because I think the cascade shadows improve the sense of scale, and greater contrast is always pleasing to the eye.

    Since I'm going for a cloudy overcast setting, I think the sharp shadows look unnatural. So I'll keep it this way And the last picture I posted isn't my final result. More tweaking to make it look better will come soon :) I'm busy making my own skybox at the moment ^^

  • SunSpreadAngle doesn't work?

    • Psyrius
    • September 8, 2015 at 8:40 PM

    Looks much better now. Thanks :)

    [Blocked Image: http://i.imgur.com/FoywDXq.jpg]

  • SunSpreadAngle doesn't work?

    • Psyrius
    • September 8, 2015 at 11:28 AM

    Thanks :) Now I have some reading to do! Posting result later.

  • SunSpreadAngle doesn't work?

    • Psyrius
    • September 8, 2015 at 11:06 AM
    Quote from 3Dnj

    The dynamic shadows will be sharp whatevere you use because you can't make them smooth or what, it's not how they work. But you can try without them, then test your spread angle with lightmapped shadow which are using the spread angle.

    use the env_cascade_lighting entity and put a very low distance (default is 400 I think)

    https://developer.valvesoftware.com/wiki/Env_cascade_lighting

    "then test your spread angle with lightmapped shadow" What do you mean with this and how can I test it?

    Quote from leplubodeslapin

    As 3Dnj said, if i was you i'd also disable the dynamic cascaded shadows.
    You can maybe also kill the entity with a logic_auto that do this output at the beginning of each rounds :

    OnNewGame -> name_of_the_env_cascade_light -> kill

    How do I disable the shadows? Is it "All Shadows Disabled" in the "Shadow_Control" entity?

  • SunSpreadAngle doesn't work?

    • Psyrius
    • September 8, 2015 at 8:17 AM

    The funny thing is that I've gotten it to work a few times. I think I used light_directional also. But I'm not sure. And then I try to tweak it to look better, but the next time I compile, it's gone. And now I can't get it to work again.

    Anyway... does anyone know what settings I should use for this kind of scene? I could put the sun and light_enviroment at a -90 pitch. But then I won't get much shadows at all and since I'm trying to get inspiration from Sweden for this map, the sun is never at the zenith here. As you can see in the following picture, the shadows are sharp.

    [Blocked Image: http://i.imgur.com/dWhOtnI.jpg]

    This is the settings I use:

    [Blocked Image: http://i.imgur.com/dW3qd8l.png]

  • SunSpreadAngle doesn't work?

    • Psyrius
    • September 7, 2015 at 9:40 PM

    In the Light_Enviroment, I've tried all kinds of different numbers for the SunSpreadAngle. And they always looks as sharp as they do on 0 or 1.

    The map I'm building is gonna have a cloudy setting, so this is crucial for me to fix. I've been trying the whole day now :(

    What could it be?

  • Black shimmering lines between func_detail brushes

    • Psyrius
    • September 7, 2015 at 8:02 PM

    I don't really know how I fixed it, but I placed them all in a different way like I did in the fourth picture, applied nodraw to everything and retextured. Now it works fine :P

  • [WIP] de_meat [Looking for gameplay feedback]

    • Psyrius
    • September 7, 2015 at 11:07 AM

    This is so sad, poor animals :( Everytime I spawn as CT, I will just let the T's blow it up :(

    *looks at clock* hmm, lunch time. Beef sounds nice :)

  • [WIP] DE_BOURG

    • Psyrius
    • September 7, 2015 at 11:00 AM

    Would some paintball splatter be a good idea? :)

Discord

The Mapcore Discord is our lively IRC channel of the 2000s reborn. Chat about level design, gaming, and more.

Latest Posts

  1. Building a Huge Library of Free Images for Everyone

    Eric Matyas
    August 10, 2026 at 1:52 PM
  2. Any of the old guard still around? D:

    Chunks
    August 7, 2026 at 11:08 PM
  3. CS:S | cs_manoir | Map creation process by D'artagnan

    Thrik
    August 3, 2026 at 10:42 AM
  4. Custom Gamemodes Contest

    Angel
    July 20, 2026 at 11:46 AM
  5. FAQ

    Angel
    July 20, 2026 at 10:14 AM
  6. Tangerine

    Harry Poster
    July 18, 2026 at 11:10 AM
  7. About our archived forums

    Thrik
    June 30, 2026 at 2:12 PM
  8. Mapcore Discord

    mason_fan123
    June 24, 2026 at 8:52 PM
  9. [CS2] Valley

    Serialmapper
    June 22, 2026 at 11:56 AM
  10. Free Music / SFX Resource - Over 2500 Tracks

    Eric Matyas
    June 18, 2026 at 12:32 PM
  1. Privacy Policy
  2. Contact
Powered by WoltLab Suite™