1. Forums
  2. Discord
  3. About Mapcore
  4. Patreon Supporters
  • Login
  • Register
  • Search
Everywhere
  • Everywhere
  • Articles
  • Pages
  • Forum
  • More Options
  1. Mapcore
  2. Members
  3. Yanzl

Posts by Yanzl

  • Yanzl's Source Emporium

    • Yanzl
    • April 7, 2022 at 1:00 PM
    Quote from will2k

    On 4/1/2022 at 6:37 PM, will2k said: Just a quick question for this release and your previous ones: Is it ok to use these assets in other engines than Source, provided it's for non-profit projects with proper credits? (using some of these assets for example in UE or CryEngine in a free non commercial project/release)

    As always, thank you a bunch for sharing these high quality assets with the community :)

    Yeah, as long as you give proper credit and it's for non-commercial purposes, it's fine. :)

  • Yanzl's Source Emporium

    • Yanzl
    • February 26, 2022 at 10:34 PM

    Two new asset releases!

    First up is Basalt. Sadly I can't release all of the assets as some of the nature stuff is from Megascans and can't be redistributed. Also only includes the assets I've made.

    https://www.dropbox.com/s/e86kdqwpvhhs5x6/Basalt.zip?dl=0

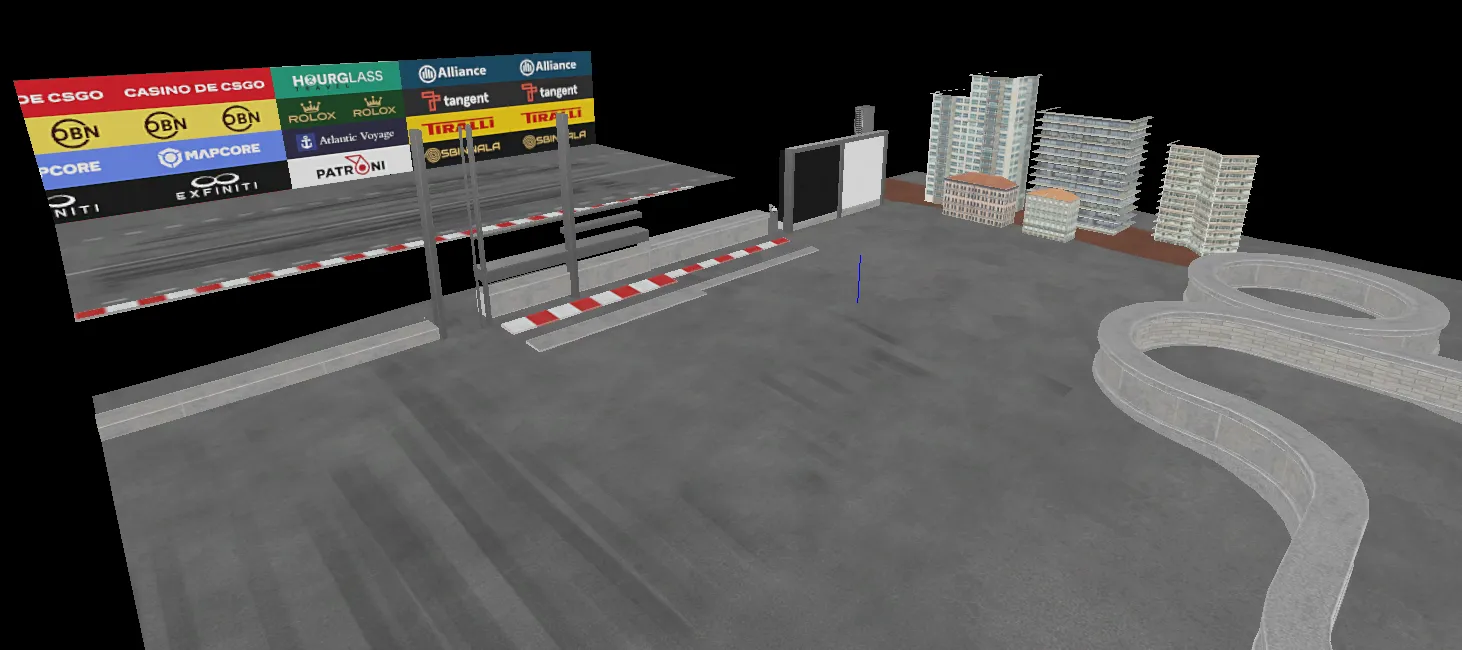
    Second one is assets I've made for Pitstop. A small release that includes some road and concrete trim textures, a bunch of sponsors and some skybox buildings that might be useful.

    https://www.dropbox.com/s/x6tn3b6nfo2u77d/Pitstop.zip?dl=0

    As always, free for non-commercial use with attribution.

  • WIP in WIP, post your level screenshots!

    • Yanzl
    • November 19, 2020 at 6:08 PM

    Hey guys. The Gap, an exploration game I'm working on, now finally has a Steam store page!

    Check it out and wishlist here: https://store.steampowered.com/app/1458300/The_Gap/

    We also have a new trailer:

    External Content www.youtube.com
    Content embedded from external sources will not be displayed without your consent.
    Through the activation of external content, you agree that personal data may be transferred to third party platforms. We have provided more information on this in our privacy policy.

  • Yanzl's Source Emporium

    • Yanzl
    • October 1, 2020 at 10:23 PM

    I have another guide for you, this time it's for custom cubemaps.

    You need:

    Cubemaps.zip !Edit the bat files to reflect your csgo path if it's not in program files!

    Photoshop

    Cmft Studio https://github.com/dariomanesku/cmftStudio

    Step 1 - Get the cubemap

    If you have an HDR panorama ready that you want to use you can skip to part 2. You can also create one with Substance Designer and the various nodes it has for making HDRIs (https://docs.substance3d.com/sddoc/hdri-tools-186974230.html).

    The other option that I'll show here is to take an existing cubemap from a map and edit/blur it.

    You can make a map specifically for the cubemap or take one out from an already compiled map. I suggest you change the cubemap size to at least 128 to get better details.

    1. To get the cubemap run buildcubemaps then navigate to: csgo/materials/maps/<mapname> and find the right cubemap.

    2. Copy the cubemap to a working directory (desktop is easiest for cmft studio), also unzip the contents of the cubemaps.zip here

    3. Drag the cubemap on top of decompile.bat. You should get 6 new files.

    4. Open the file ending in bk in Photoshop. Go to Image > Canvas size... Width should be current width * 4 and Height should becurrent height * 3 (eg. 512 x 384 for 128^2 and 1024 x 768 for 256^2). Set the anchor to middle left square.

    5. Drag in the rest of the faces and align the according to the cubemap_template_cmft.png. There should be no seams and it should look something like this:

    [Blocked Image: https://i.imgur.com/Hbjsvbh.png]

    6. Save the file as .hdr.

    Step 2 - Filter in cmft

    You can use either a panorama (2:1 ratio) or a cubemap (from the previous step) (4:3 ratio).

    1. Open cmft studio.

    2. In the Environment tab, click on Edit, then Browse... and find the panorama/cubemap and then click Load

    [Blocked Image: https://i.imgur.com/GRiUaV4.png]

    3. Under Radiance, click on Filter skybox with cmft. Set the result size to 128 (64 is also fine since blurrier cubemaps don't need a lot of resolution). Set the Num mipmap to filter to 1. Then depending on how blurry you want your cubemap to be, set the Gloss scale. Lower values mean more blur, higher less. I found values around 6 - 9 work best. Use OpenCL crashes on my computer so uncheck that if it also happens for you. Click on Process and wait for results.

    [Blocked Image: https://i.imgur.com/b60whqd.png]

    4. Save the Radiance map as .hdr, HCross. Also mind the directory you save it in.

    [Blocked Image: https://i.imgur.com/bzbGjQ6.png]

    Step 3 - Export to CS:GO

    1. Open the .hdr file you got from cmft in Photoshop.

    2. Go to Filter > Other > Offset and use a Horizontal offset of twice the face size (+128 if 64 or +256 if 128)

    3. Go to Image > Image Rotation > Flip Canvas Vertical. The image should look like cubemap_template_export.png.

    [Blocked Image: https://i.imgur.com/oBQ69P6.png]

    4. Save the image as PFM with the following name template: <cubemap name>_hdr.pfm Make sure you save as .pfm and not .pbm and that it ends with _hdr.pfm.

    5. Copy the saved .pfm file and vtex_params.txt from the included zip to csgo/materialsrc/cubemaps

    6. Rename the .txt file to the same name as the cubemap (ex. cube01_hdr.pfm and cube01_hdr.txt)

    7. Drag the .txt file on top of vtex.bat. Your new compiled cubemap should be in csgo/materials/cubemaps. Copy it to wherever you want. (You can delete the .pwl.vtf file)

    8. Your cubemap is now ready to use in your materials. Just use ex. $envmap "cubemaps/cube01_hdr" instead of $envmap env_cubemap

    [Blocked Image: https://media.discordapp.net/attachments/570727958575054883/760556968271806474/unknown.png?width=800&height=791]

    Files

    Cubemaps.zip 24.2 kB – 446 Downloads
  • [decompiled] dz_blacksite | dz_sirocco

    • Yanzl
    • July 9, 2020 at 6:48 PM

    I haven't found a reliable way to make it, when I last used it I took the radar image with some high visibility markers drawn on top and scaled it in photoshop, exported and tweaked until it lined up.

    It seems that it stretches the texture across all the displacements in the map, including the 3d skybox as if it was in the main part of the map.

  • Basalt

    • Yanzl
    • March 11, 2020 at 5:02 PM

    We've just released a big update, check it out on the workshop! https://steamcommunity.com/sharedfiles/fi…/?id=1984383383

    We've added fresh grass, weathering on buildings and a bunch of other visual and gameplay tweaks.

    Thanks to everyone that provided us feedback and to everyone organizing this contest!

    [Blocked Image: https://i.imgur.com/BWyKEfN.jpg]

    [Blocked Image: https://i.imgur.com/ENMlEoE.jpg]

    [Blocked Image: https://i.imgur.com/mENM3o6.jpg]

    [Blocked Image: https://i.imgur.com/MmNDtSt.jpg]

    [Blocked Image: https://i.imgur.com/qdadb7E.jpg]

    [Blocked Image: https://i.imgur.com/f0sTd0R.jpg]

  • Basalt

    • Yanzl
    • January 31, 2020 at 12:55 PM

    [Blocked Image: https://i.imgur.com/wNcjCJk.png]

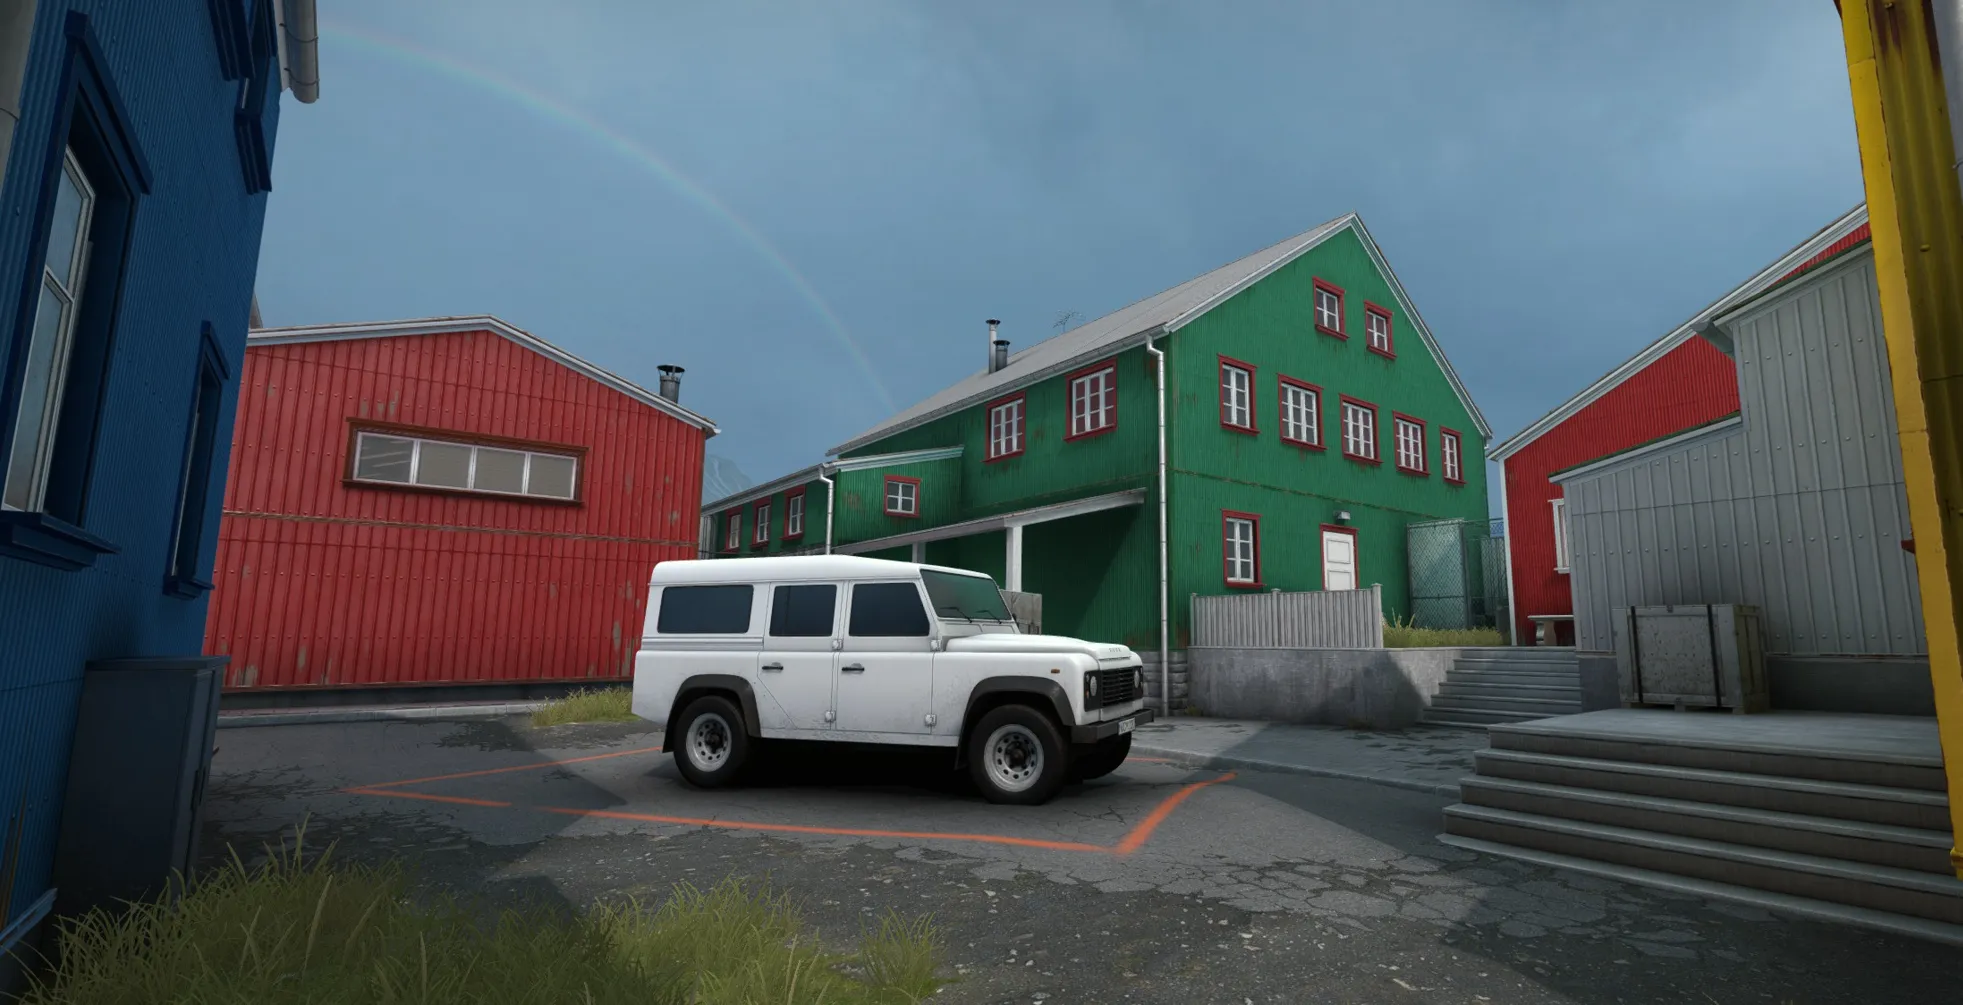
    A bomb defusal map set in an undisclosed location in Iceland. Unsettling evidence discovered by researchers will foil the terrorists plan for world domination. Unless they can blow it all up...

    The level is designed in a way that it is easy to learn but hard to master. It is compact but offers a lot of depth with clever use of effective elevation changes, boost spots, lines of sight and rigorously tested timings -- ultimately allowing players from both teams to look for encounters that suit their playstyle in a balanced and uniquely beautiful environment.

    By @Yanzl, @'RZL and @Oliver aka The Basalty Boys

    DOWNLOAD: https://steamcommunity.com/sharedfiles/fi…/?id=1984383383

    [Blocked Image: https://i.imgur.com/AQJOnLk.jpg]

    [Blocked Image: https://i.imgur.com/VIWfsaC.jpg]

    [Blocked Image: https://i.imgur.com/VpsHRuW.jpg]

    [Blocked Image: https://i.imgur.com/3IWzxw7.jpg]

    [Blocked Image: https://i.imgur.com/XzXmykE.jpg]

    [Blocked Image: https://i.imgur.com/pAbDl3L.png]

  • VMT Editor - fast and simple editor for vmt files

    • Yanzl
    • June 12, 2019 at 3:44 AM

    The Uncompressed template sets the textures to be BGR888 or BGRA8888. Though DXT compressed textures not working in SFM seems weird, since all the default models/maps use DXT compressed textures, sure there's not an issue somewhere else? Also I believe 16 bit textures are not really supported by VTFCmd, utility that we use to convert the textures, so no point in using that.

  • VMT Editor - fast and simple editor for vmt files

    • Yanzl
    • April 22, 2019 at 10:29 PM

    I've created some official documentation for VMT Editor and Substance shaders.

    VMT EDITOR USER GUIDE

    Hopefully you'll find this useful and discover some new features.

  • Yanzl's Source Emporium

    • Yanzl
    • February 24, 2019 at 10:00 PM

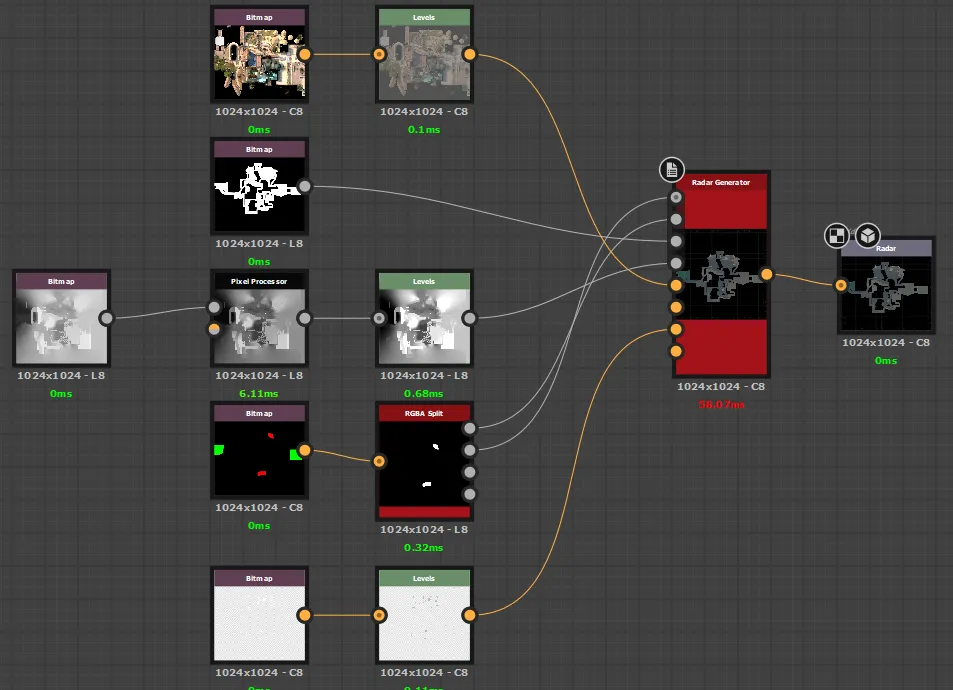
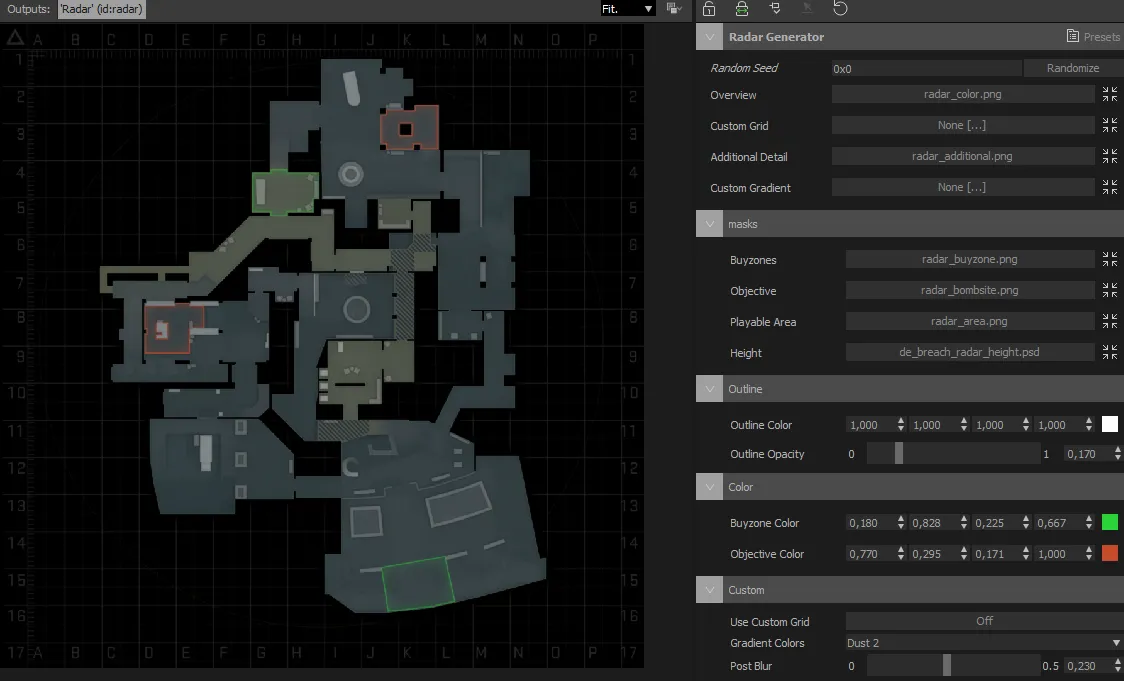
    Alright, here's a quick guide on how to use the radar generator.

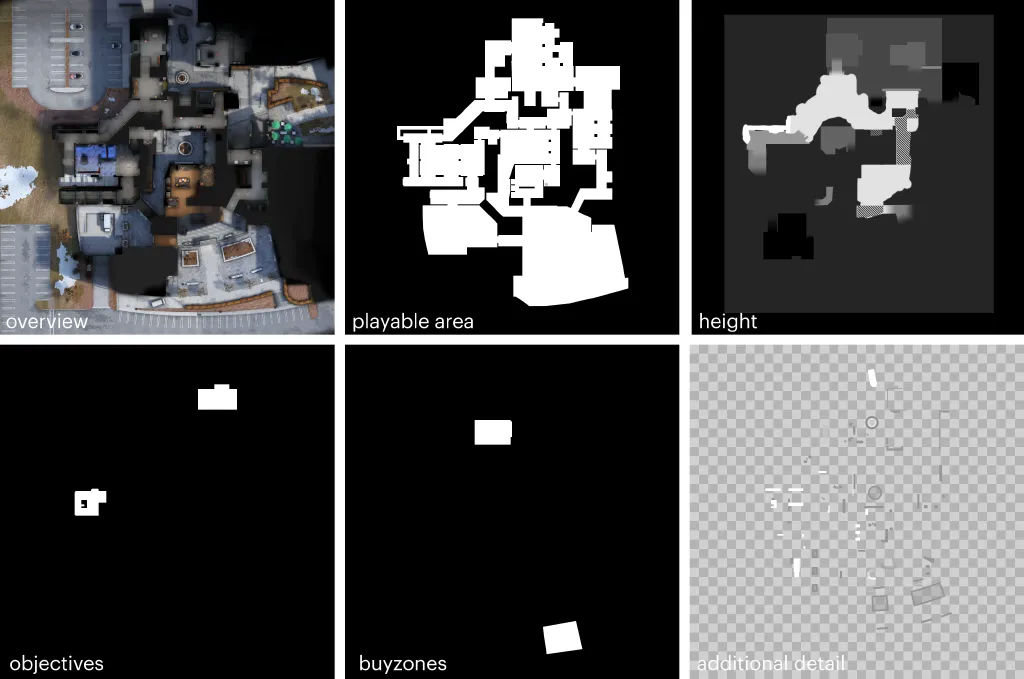
    First up you need to manually create the required masks and images, probably with photoshop or something similar. You also have to manually draw the overlapping stripes in the height map if you have any in your level. Objectives, buyzones and height get automatically clipped to your playable area so you don't have to worry about the outer edges. Additional detail is the only map that should be transparent, with grey or white detail.

    You can also lower the contrast of the overview or just use a grey image for a cleaner look.

    For making height maps you can use @Terri's generator, you'll have to align the height to match your overview in photoshop, do some additional cleanup work and adjust the gamma.

    After you have all those you can use either Substance Designer or Substance Player (free) https://www.allegorithmic.com/products/substance-player

    Substance Designer:

    Drag the file into a new empty graph, also drag all your bitmaps and connect them to appropriate inputs. If you don't have any outputs you can just right click on the radar generator node and select create > output nodes. You can also adjust the files some more to make it look the way you want, like changing the levels of the height to change the final colors. Graph size should be 1024.

    Substance Player:

    Open radargen.sbsar then browse to all the maps on the right side panel. Custom grid and custom gradient are not needed.

    In both cases you can adjust some of the parameters, like buyzone and objective colors.

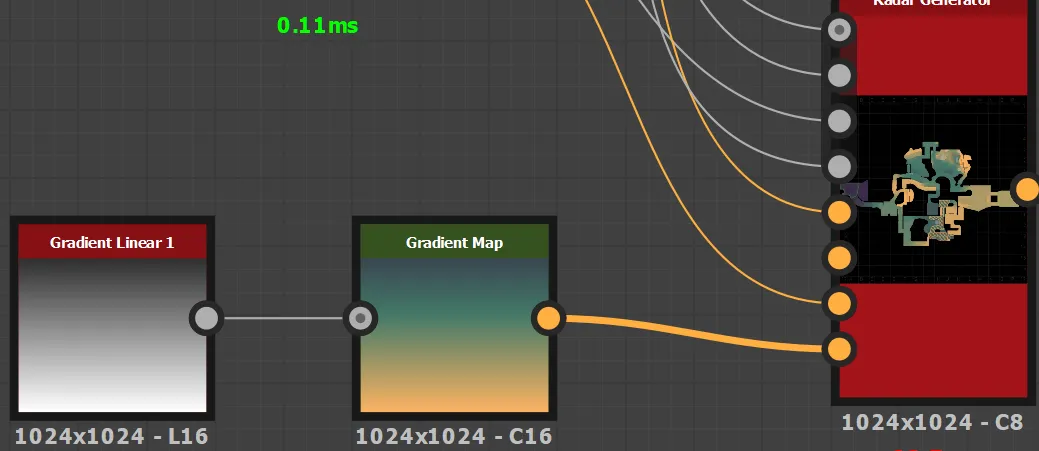
    If you want to use custom height colors select Gradient colors as custom and plug in a vertical gradient in the Custom gradient slot, example:


    Hopefully this covers it, if you have any questions let me know.

  • WIP in WIP, post your level screenshots!

    • Yanzl
    • December 29, 2018 at 12:38 AM

    A trailer for a narrative exploration game I've been working on called The Gap. Hopefully releasing in 2019.

    External Content www.youtube.com
    Content embedded from external sources will not be displayed without your consent.
    Through the activation of external content, you agree that personal data may be transferred to third party platforms. We have provided more information on this in our privacy policy.

  • awp_natural [CS:GO]

    • Yanzl
    • December 28, 2018 at 8:08 PM

    One thing you can also do is to add $flow_debug 1 to both water vmts which will allow you to see the flowmap texture. Then try to align that between 3D skybox and level like you'd do with a regular texture. Delete $flow_debug 1 once you're done and hopefully it'll be seamless.

  • awp_natural [CS:GO]

    • Yanzl
    • December 28, 2018 at 3:39 PM

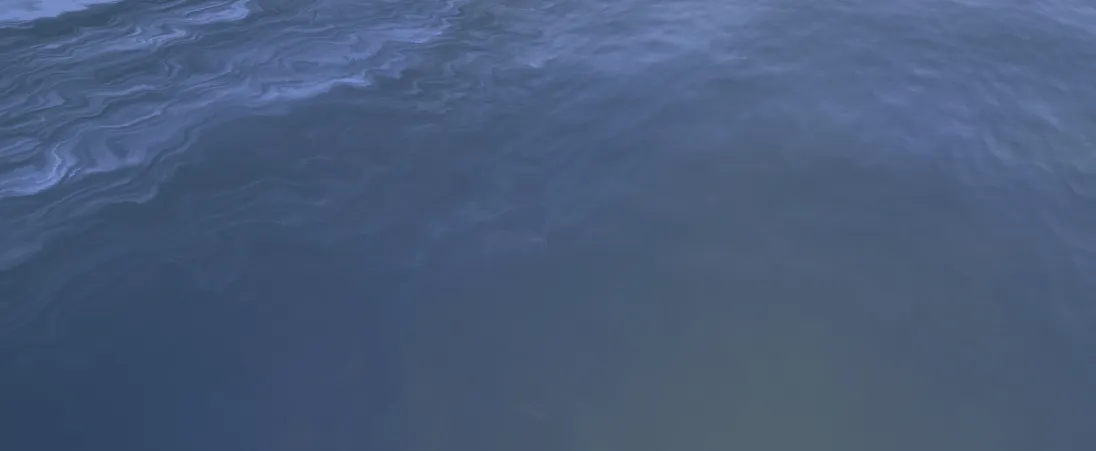
    The water misalignment is because the scale of the water normal map is controlled by the vmt parameter $flow_normaluvscale. Texture scale in hammer controls the scaling of the flowmap texture, which should actually be something big like 20. To fix the issue you have to create a new vmt for the skybox water and adjust $flow_normaluvscale and $flow_noise_scale -- divide both by 16.

    Here's how wrong Hammer texture scale looks like -- left is default .25 and you get these weird distortions while right is 10 and you get a normal looking water texture.

  • [decompiled] dz_blacksite | dz_sirocco

    • Yanzl
    • December 12, 2018 at 7:33 PM

    Alright, I did some testing with the new detail sprites and found out how more specifically how they work. @Mamorex was on the right track but there's a few key things you left out.

    Removing $alphatest from the material or adding $translucent

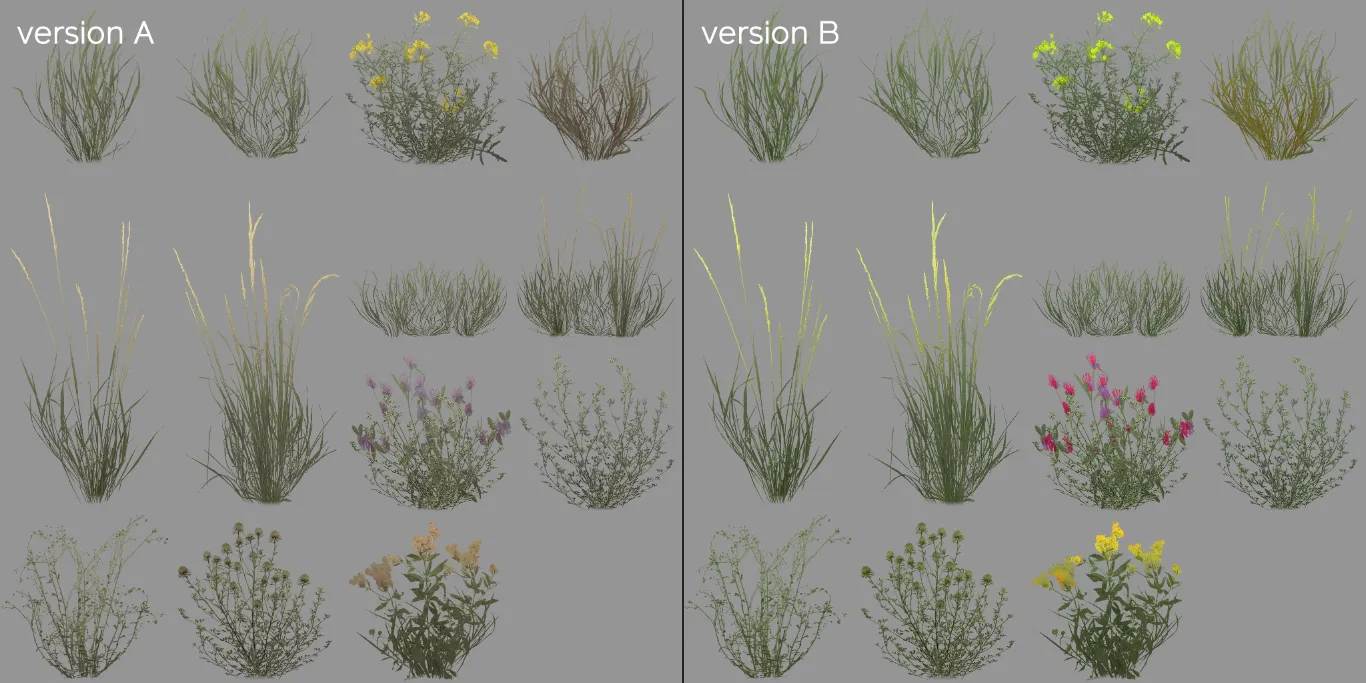
    First, the detail sprites material - it's 2 detail sprite sheets side by side, so version A and version B. The different versions have to have same sprite positions and sizes. You only specify version A coordinates in the .vbsp.

    Next up, the detail sprites masks. Red and blue are for wind offset -- so you can have different parts of the sprites sway in the wind differently, you can see Valve isolated some blades of grass for this effect. The green channel is a tint mask and controls how much the sprites are affected by the $worldspacetint.

    That brings us to the world space textures. They seem to automatically get resized to fit the whole map area, so it you resize the map you'd have to resize the textures too.

    The world space tint texture is pretty self explanatory, controls what color to tint the grass, 127 grey means no tint.

    The world space masks texture uses the red channel to select which version of the sprites to use -- 0 is version A and anything more is version B.

    The green channel of the texture controls the sprite size -- 127 is default, with darker making the sprites smaller and brighter making the sprites larger. The vmt command $minimumspritesize controls the cutoff point for the sprites, so the sprites smaller than the specified value don't get rendered which can act as a placement mask.

    I don't know what the blue channel of this texture does, changing it had no effect on the sprites for me.


    All this means sprites still get placed by vbsp on map compile, so they still use displacement alpha for the placement, but the new masks can manipulate sprites size and color after map compile.

    [Blocked Image: https://media.discordapp.net/attachments/193863930693550080/522458842559152129/unknown.png?width=1347&height=758]

  • Yanzl's Source Emporium

    • Yanzl
    • November 28, 2018 at 2:36 AM
    Quote from blackdog

    10 hours ago, blackdog said: Yeah but not using a screenshot you would be editing blindly, how could you achieve something that looks good?

    I just said you could do that, not that it would produce good results :P

    Hopefully this helps understand it better:

    Also you can have multiple CCs in one map, you can limit them with a radius or with a fog_volume, so only one is active at a time.

  • Yanzl's Source Emporium

    • Yanzl
    • November 26, 2018 at 11:39 PM
    Quote from blackdog

    On 11/25/2018 at 1:14 AM, blackdog said: I’m not sure I understand, is the LUT meant to disappear during editing to give proper colour balance, or is it gonna be modified by the adjustment layers and you save that result?

    Yeah you basically modify the clean LUT with your adjustments that are then applied in game. The screenshot is there so you can better see what adjustments you are making, but you could also just open the LUT file by itself, do some adjustments and save.

  • Yanzl's Source Emporium

    • Yanzl
    • October 31, 2018 at 12:18 AM

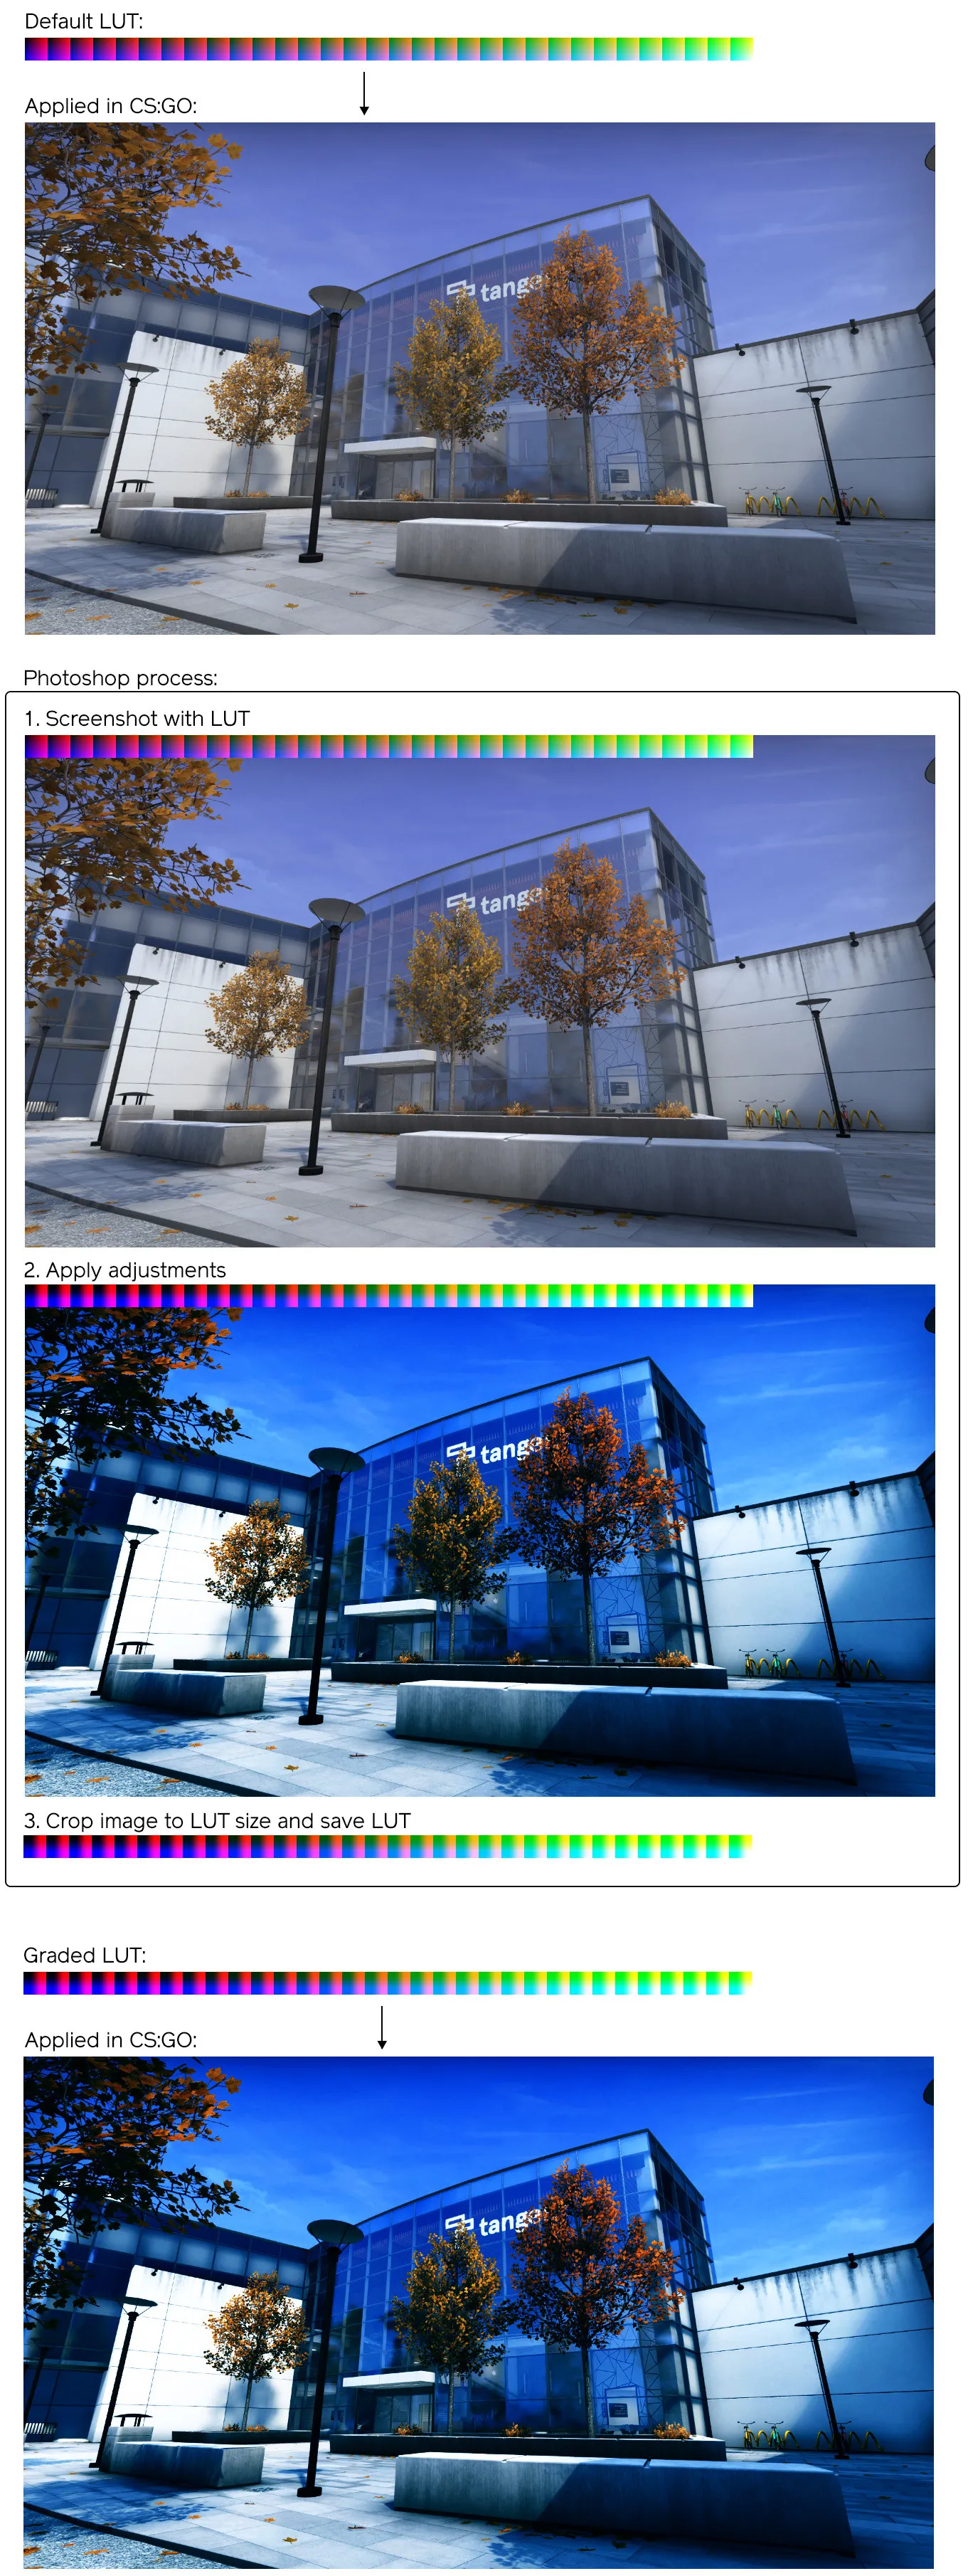
    I didn't make any Photoshop specific things, but here's the process for making a color correction file in Photoshop:

    1. Download this image (this is the off.raw color correction LUT you can find in materials/correction, converted to png)

    2. Open a screenshot of your map in Photoshop.

    3. Drag the above LUT onto the Photoshop file. Don't change the scale. Move it to a corner. It should look something like this:

    [Blocked Image: https://i.imgur.com/ERAEYLe.jpg]

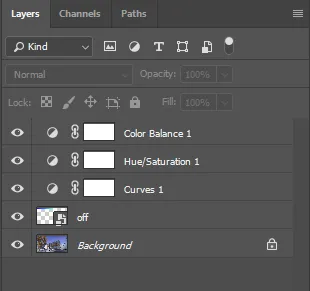
    4. Either apply the color correction adjustments you want using adjustment layers or flatten the image and use the regular color correction tools.

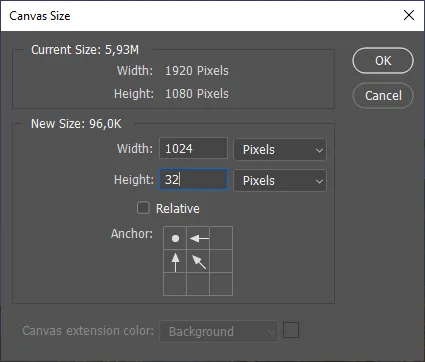
    5. When you're happy with the result, crop the image to the LUT size - 1024 x 32 px.

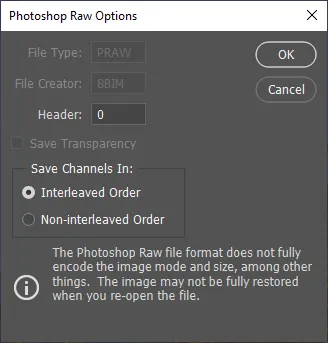
    6. Save the file as .raw with the following settings and move it into materials/correction.

    7. You can now reference that file in Hammer and color correction should work. Don't forget to pack it when uploading to workshop.

  • Yanzl's Source Emporium

    • Yanzl
    • August 7, 2018 at 3:33 AM

    I've updated the Substance Painter shader to support the new 2018.2 update and added panorama radar generator with multiple color presets based on different Valve maps.

    https://www.dropbox.com/s/zegqf63yt1tt…norama.zip?dl=0

  • Yanzl's Source Emporium

    • Yanzl
    • May 16, 2018 at 3:25 PM
    Quote from Overflow

    On 5/13/2018 at 1:42 PM, Overflow said: Wow! These are awesome thanks for sharing these. Pbr to Source link is dead btw.

    Fixed the link, thanks!

  • Yanzl's Source Emporium

    • Yanzl
    • May 10, 2018 at 12:16 AM

    Hey, I've decided to make a topic where I'll put together all the links to different stuff I've released for Source/CS:GO.

    Assets

    Assets from my CS:GO maps. Free for non-commercial use as long as you give appropriate credit.

    Basalt

    Most of the assets from the map Basalt.

    [Blocked Image: https://i.imgur.com/9gUJslh.png]

    https://www.dropbox.com/s/e86kdqwpvhhs5x6/Basalt.zip?dl=0

    Breach

    Assets from Breach. Over 600 models and over 100 materials. Includes a zoo map.

    [Blocked Image: https://i.imgur.com/67oKomW.jpg]

    https://www.dropbox.com/s/xsfp5kobdv22voa/Breach.zip?dl=0

    Thrill

    Assets from Thrill. Includes a zoo map.

    [Blocked Image: https://i.imgur.com/HJLATWa.jpg]

    https://www.dropbox.com/s/tkgw959whnubnla/Thrill.zip?dl=0

    Pitstop

    https://www.dropbox.com/s/x6tn3b6nfo2u77d/Pitstop.zip?dl=0

    Cruise

    https://www.dropbox.com/s/q3ybhzd1p2q522t/Cruise.zip?dl=0

    Resort

    https://www.dropbox.com/s/dwasa7bs5g3wo1a/Resort.zip?dl=0

    Zoo

    https://www.dropbox.com/s/xehbw0k67tximp4/Zoo.zip?dl=0

    Castle

    https://www.dropbox.com/s/e76x6st0nsbpafq/Castle.zip?dl=0

    Water Pack

    Collection of 4 different water textures that work both on high and low shader settings. Free to modify.

    [Blocked Image: https://i.imgur.com/KH1HtiC.jpg]

    https://gortnar.com/vmt/liquids.zip


    Source Engine Tools

    Streamline the Source engine workflow. Mostly substance stuff.

    Substance Shaders (and templates)

    Newly updated shaders for Substance Designer and Substance Painter. Supports Diffuse, Envmap reflection, Specular reflection, Glossiness, Metallic (Diffuse tint), Fresnel ranges and LightmappedGeneric mode. Also includes Painter templates and export presets and a glossiness wizard filter for Painter that can be used to create glossiness and envmap mask maps from specular mask or roughness.

    [Blocked Image: https://i.imgur.com/z32Yo7y.png]

    https://gortnar.com/vmt/sbs_shaders.zip

    https://gortnar.com/vmt/painter_templates.zip

    VMT Editor

    PBR to Source

    A substance file and a VMT template that aim to match the PBR look as close as possible in Source (still a long way off). I don't suggest relying on this to make your materials (learn how Source handles materials instead), but it does an alright job with any PBR materials you might want to use in Source. Note that this converter only works on VertexLitGeneric. There's a brush version included but it requires manual tweaking based on the material.

    [Blocked Image: https://i.imgur.com/RXQpKIF.png]

    https://gortnar.com/vmt/pbr_to_source.zip

    Radar generator

    Generates CS:GO radar images, both regular and spectate versions. For multi level radars you have to use multiple generators and blend them together. Can be used with masks from Terri's auto radar.

    Requires you to make overview image, playable area and spawn/plant zone masks.

    https://www.dropbox.com/s/mij82s8x9q98…rgen.sbsar?dl=0

    Sun color calculator

    A quick test project, calculates the color of your light_environment direct brightness based on the fact that the final color depends on both ambient and direct.

    https://codepen.io/gortnar/full/xYJGLj/


    If you have any questions, ask away!

Discord

The Mapcore Discord is our lively IRC channel of the 2000s reborn. Chat about level design, gaming, and more.

Latest Posts

  1. Custom Gamemodes Contest

    Angel
    July 20, 2026 at 11:46 AM
  2. FAQ

    Angel
    July 20, 2026 at 10:14 AM
  3. Tangerine

    Harry Poster
    July 18, 2026 at 11:10 AM
  4. Any of the old guard still around? D:

    Warby
    July 12, 2026 at 8:23 PM
  5. About our archived forums

    Thrik
    June 30, 2026 at 2:12 PM
  6. Mapcore Discord

    mason_fan123
    June 24, 2026 at 8:52 PM
  7. [CS2] Valley

    Serialmapper
    June 22, 2026 at 11:56 AM
  8. Free Music / SFX Resource - Over 2500 Tracks

    Eric Matyas
    June 18, 2026 at 12:32 PM
  9. Pango [WIP]

    Elowen
    June 11, 2026 at 10:13 AM
  10. [CS2] Dvina

    Jeremy Rivera
    June 11, 2026 at 10:03 AM
  1. Privacy Policy
  2. Contact
Powered by WoltLab Suite™