1. Forums
  2. Discord
  3. About Mapcore
  4. Patreon Supporters
  • Login
  • Register
  • Search
This Thread
  • Everywhere
  • This Thread
  • This Forum
  • Articles
  • Pages
  • Forum
  • More Options
  1. Mapcore
  2. Discussions
  3. Level Design

My Advanced Hammer YouTube Tutorial Series (Episode 8 RELEASED: Packing Textures/Models into the BSP)

  • NihiL
  • June 17, 2015 at 10:59 AM
  • NihiL
    • January 28, 2016 at 8:36 PM
    • #21

    Next episode is up, it explains how to get custom materials/textures working in your CSGO map:

    External Content www.youtube.com
    Content embedded from external sources will not be displayed without your consent.
    Through the activation of external content, you agree that personal data may be transferred to third party platforms. We have provided more information on this in our privacy policy.
    So I've decided to make this a three-parter: custom materials/textures first, then custom models/props and then how to pack it all into the BSP for 'shipping' your map to other people! I think that's a pretty good plan!

  • NihiL
    • February 3, 2016 at 6:46 PM
    • #22

    Alright, the next episode is up.

    External Content www.youtube.com
    Content embedded from external sources will not be displayed without your consent.
    Through the activation of external content, you agree that personal data may be transferred to third party platforms. We have provided more information on this in our privacy policy.
    I explain how to bring your models from ANY 3D modelling tool (through Blender) into your maps!

    Hopefully this is helpful to you (SINCE YOU ASKED FOR IT HEHE), cheers!

  • biXen
    • February 3, 2016 at 7:02 PM
    • #23

    Cool, will be helpful!

  • tomm
    • February 3, 2016 at 7:13 PM
    • #24

    There's a small mistake in your video

    $surfaceprop doesn't refer to the texture file name, the texture file name is already embedded in the smd when you export it, so the compiler only cares about the directory where your materials are.

    $surfaceprop defines the physical properties of your model, you'll get bullet impacts based on that.

    https://developer.valvesoftware.com/wiki/Material_surface_properties

    great video though, wish we had this 10 years ago :v

  • NihiL
    • February 3, 2016 at 7:34 PM
    • #25

    Thank you @biXen!

    @tomm: You are absolutely right of course. Funny enough that I did talk about $surfaceprop and explained it correctly in my previous video on custom textures. Looks like wherever I got that idea from (the guide that was linked? not sure, still looking) had it wrong. Putting in a notification into the video right now. Thank you very much, good catch!

  • clankill3r
    • February 3, 2016 at 9:23 PM
    • #26

    Great tutorial, just when I was about to make props with blender, so perfect timing.

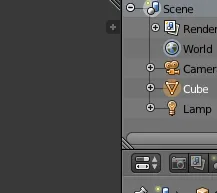
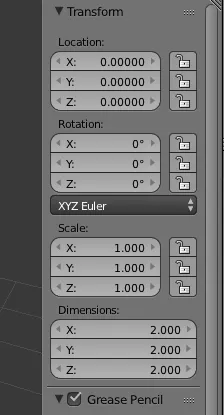
    One thing might wort mentioning:, in your 3d view in the top right there is a small + sign.

    If you click this the properties panel will open (you can also press 'n' on the keyboard).

    Here you can see the dimensions of the object and also type them in (I was to lazy to make a red circle):

    I think that's a bit easier then your add a box and scale it to that box method.

    Btw, if I want a bump map to the crate, can I do that just edit in the qc file and recompile or do I need to do that in Blender as well?

  • NihiL
    • February 3, 2016 at 9:45 PM
    • #27

    Cheers @clankill3r! Nice trick there, I have no idea about using Blender so that's good to know!

    I haven't tried bump/normalmaps on props yet but to my understanding you won't need to do anything in Blender OR in your QC script file. Just make sure that the material name in Blender is the same as the VMT text file in your materials/models/[mapname]/[propname]/ folder. Then use that VMT file to put in your bump/normal filename and parameters (like I did in the first part of the tutorial series where I talked about custom materials). That should work in theory!

  • clankill3r
    • February 3, 2016 at 11:18 PM
    • #28

    It's not really a trick, it's the normal way of doing things :) what you did was a trick :)
    About the bump map, I will try it soon when the time is ready. I need a pc first...

  • Skybex
    • February 4, 2016 at 6:40 AM
    • #29

    Bump maps with models are no different than world textures. All in the vmt and nothing to do with the 3d program.

    Also would like to point out here a program called crowbar. Doesn't seem very well known but is an excellent tool for compiling your .qc files and decompiling models http://steamcommunity.com/groups/CrowbarTool

    Also @NihiL is there a reason you called the file qscript.qc instead of corrosivebarrel.qc?

    Excellent tutorial though, this is probably the hardest part to do with source and there is so little up to date information about it and is good to see it put into a way that everyone can follow.

  • NihiL
    • February 4, 2016 at 12:12 PM
    • #30

    Thank you very much @Skybex, great to have a well-known mapper in this thread haha!

    Crowbar sounds great! I've personally used Wallworm before for 3DS MAX which I also liked. Essentially I based the tutorial on a steam guide that someone linked and requested a video tutorial of.

    The qscript filename doesn't matter of course but you're right, it's a model-specific file so corrosive_crate.qc would've made more sense!

    Thank you for the kind words, it means a lot to me and is very motivating! :)

  • clankill3r
    • February 5, 2016 at 1:12 PM
    • #31

    NihiL

    I just did your HAMMER: Advanced Tutorial #6 Part 1 Custom Textures tutorial and I dont think you have the normal map working, only the speculair map.
    Atleast I hope that is the case, else normal maps look really flat in source :)


    Edit:

    I made a grey texture and used the normal map from your tutorial and disabled speculair in the vmt and the normal map does work. I only expected a bit more from it.

    One note do, you use the normal map texture as a speculiar texture and have set that the alpha channel should be used. But the alpha channel is complete black. I think it looks a bit strange cause now you have a lot of specularity on places where you don't expect it. It would be better to have a specular texture as well. Now it might be a bit misleading. Still thanks do, great tutorials :)

  • clankill3r
    • February 5, 2016 at 2:32 PM
    • #32

    For your tutorial HAMMER: Advanced Tutorial #6 Part 2 Custom Models (Props) your engine path is wrong.

    Check around the 8:42 mark, after you set it it's still red. You have to set it to the bin folder of 'Counter-Strike Global Offensive' so not of 'csgo'.
    For me it is:

    C:\My Programs\Steam\steamapps\common\Counter-Strike Global Offensive\bin

    But I readed that having this right is more important for DMX then SMD.

    ----

    less important: I just figured out that if you do a scene export you end up with the same file. So you could have multiple models in 1 file and do a scene export to create multiple smd files I think. I thought you might like to know.

  • clankill3r
    • February 5, 2016 at 2:58 PM
    • #33

    My first source model :)

  • NihiL
    • February 5, 2016 at 3:33 PM
    • #34

    Congratulations @clankill3r! Good job!

    About the issues:

    #1: The Normal/Specularmap: you're right! I didn't want to go through all the possible parameters you can have in a VMT and left that for the viewer to discover pretty much. Might make a good follow-up video at some point though. Yes, the alpha channel of the normal map is used as the specular map and my normal map is 3-channels so that could be improved hehe. I just didn't have a specular map for the texture and was too lazy to make one.

    #2: The engine path: interesting. The guide I was following said it should be "Counter-Strike Global Offensive/csgo" and I did indeed not notice at the time that the textbox in Blender turned red. Doesn't seem to make a difference when exporting SMDs though, as you said! Phew!


    Thanks for the feedback @clankill3r, that's very useful and good to know - for me and everybody else following along!

  • clankill3r
    • February 5, 2016 at 4:25 PM
    • #35

    If you want I can look at your next tutorial before you release it to spot any errors etc.

  • NihiL
    • February 10, 2016 at 8:41 PM
    • #36

    @clankill3r: That's a very nice offer but for new I'd rather push the videos out as quickly as possible (it's taking me long enough as is without dedicated 'testing') and as long as I don't make serious mistakes anywhere I feel like it's okay with the current process! I might come back to the offer later on though!

    Next episodes is out! This is the third installment in the custom assets series and, after explaining how to make custom textures, then custom props, goes into detail about how to pack all your assets into your BSP file using the free VIDE software:

    External Content www.youtube.com
    Content embedded from external sources will not be displayed without your consent.
    Through the activation of external content, you agree that personal data may be transferred to third party platforms. We have provided more information on this in our privacy policy.
    As always I hope this helps! That's a pretty big 45 minute tutorial series on custom assets done that everybody independent of favorite image editor and 3D modeling suite can use with only fully free software! Yay!


    Hope this helps, I'm already thinking about what topic to cover next! Ideas (in addition to the stuff that's been mentioned already in the thread) are always welcome!

  • FMPONE
    • February 10, 2016 at 11:34 PM
    • #37

    Keep it up dude!

  • NihiL
    • February 10, 2016 at 11:46 PM
    • #38
    Quote from FMPONE

    Keep it up dude!

    Thank you very much, FMPONE, means a lot to me! :)

  • NihiL
    • February 13, 2016 at 3:58 PM
    • #39

    @capslock I'm not sure what you mean with custom config? Can you elaborate?

  • Radiofanat
    • February 16, 2016 at 6:55 AM
    • #40

    Hi, I saw on de_santorini FMPONE made some columns with displacements, can you show how to do that?

Participate now!

Don’t have an account yet? Register yourself now and be a part of our community!

Register Yourself Login
Discord

The Mapcore Discord is our lively IRC channel of the 2000s reborn. Chat about level design, gaming, and more.

Latest Posts

  1. Tangerine

    Harry Poster
    July 18, 2026 at 11:10 AM
  2. Any of the old guard still around? D:

    Warby
    July 12, 2026 at 8:23 PM
  3. About our archived forums

    Thrik
    June 30, 2026 at 2:12 PM
  4. Mapcore Discord

    mason_fan123
    June 24, 2026 at 8:52 PM
  5. [CS2] Valley

    Serialmapper
    June 22, 2026 at 11:56 AM
  6. Free Music / SFX Resource - Over 2500 Tracks

    Eric Matyas
    June 18, 2026 at 12:32 PM
  7. Pango [WIP]

    Elowen
    June 11, 2026 at 10:13 AM
  8. [CS2] Dvina

    Jeremy Rivera
    June 11, 2026 at 10:03 AM
  9. Bridges 2.0 by NEXSIDE, MAP SHOWCASE. ( Steam Workshop )

    MrTrane18
    June 1, 2026 at 7:46 PM
  10. Classic Maps Reborn For CS2

    SillySpaceCat
    May 31, 2026 at 10:33 PM
  1. Privacy Policy
  2. Contact
Powered by WoltLab Suite™