

The .sbsar file has to be opened and used with substance player.
Yanzl's Source Emporium
-
-
Alright, here's a quick guide on how to use the radar generator.
First up you need to manually create the required masks and images, probably with photoshop or something similar. You also have to manually draw the overlapping stripes in the height map if you have any in your level. Objectives, buyzones and height get automatically clipped to your playable area so you don't have to worry about the outer edges. Additional detail is the only map that should be transparent, with grey or white detail.
You can also lower the contrast of the overview or just use a grey image for a cleaner look.
For making height maps you can use @Terri's generator, you'll have to align the height to match your overview in photoshop, do some additional cleanup work and adjust the gamma.
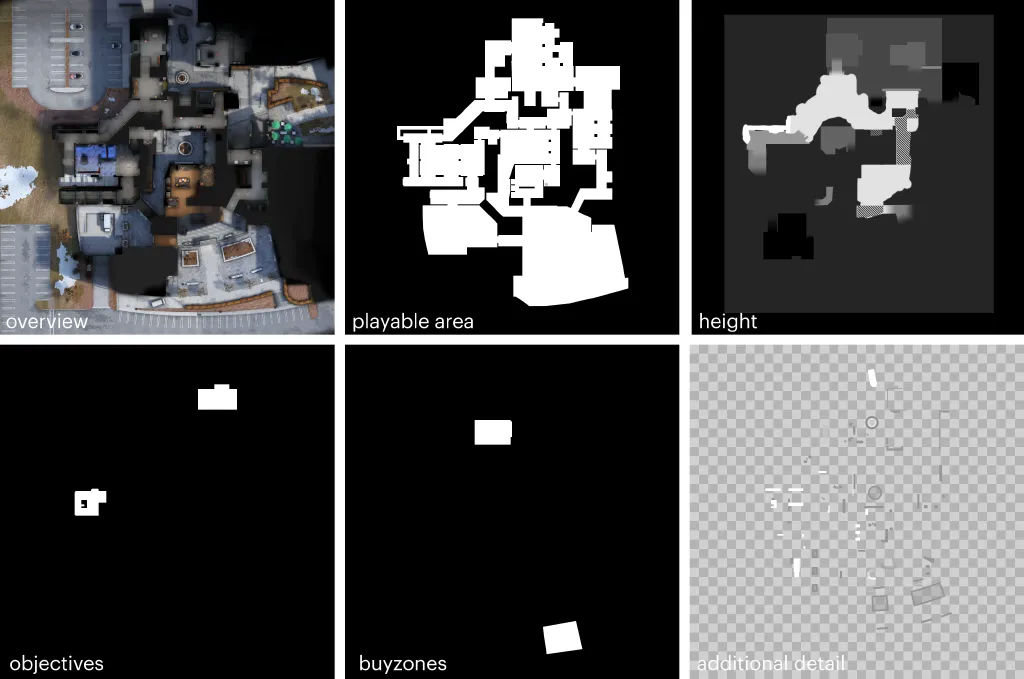
After you have all those you can use either Substance Designer or Substance Player (free) https://www.allegorithmic.com/products/substance-player
Substance Designer:
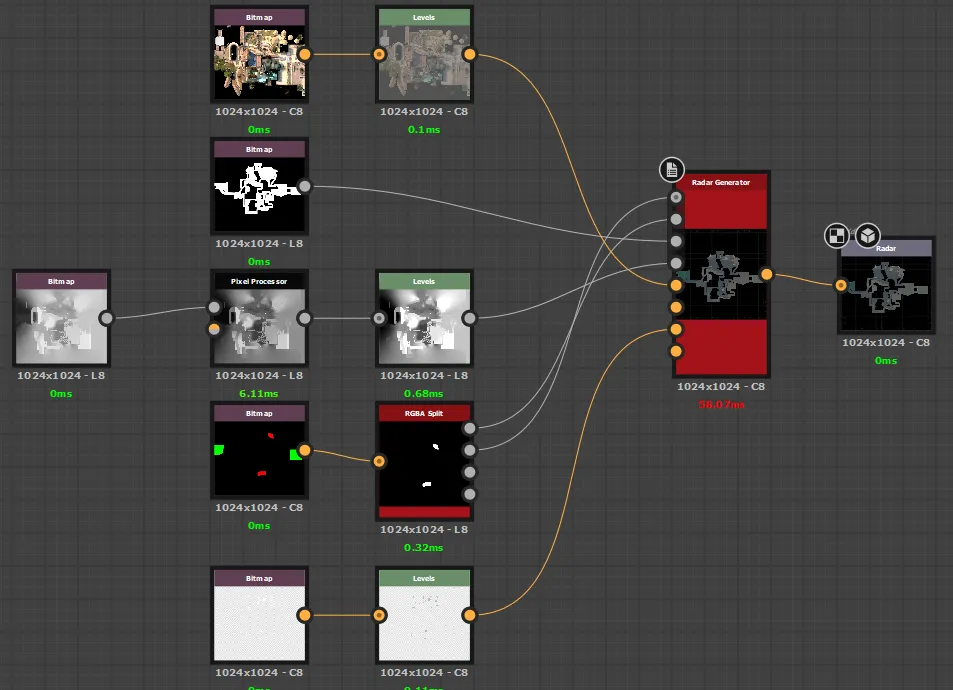
Drag the file into a new empty graph, also drag all your bitmaps and connect them to appropriate inputs. If you don't have any outputs you can just right click on the radar generator node and select create > output nodes. You can also adjust the files some more to make it look the way you want, like changing the levels of the height to change the final colors. Graph size should be 1024.
Substance Player:
Open radargen.sbsar then browse to all the maps on the right side panel. Custom grid and custom gradient are not needed.
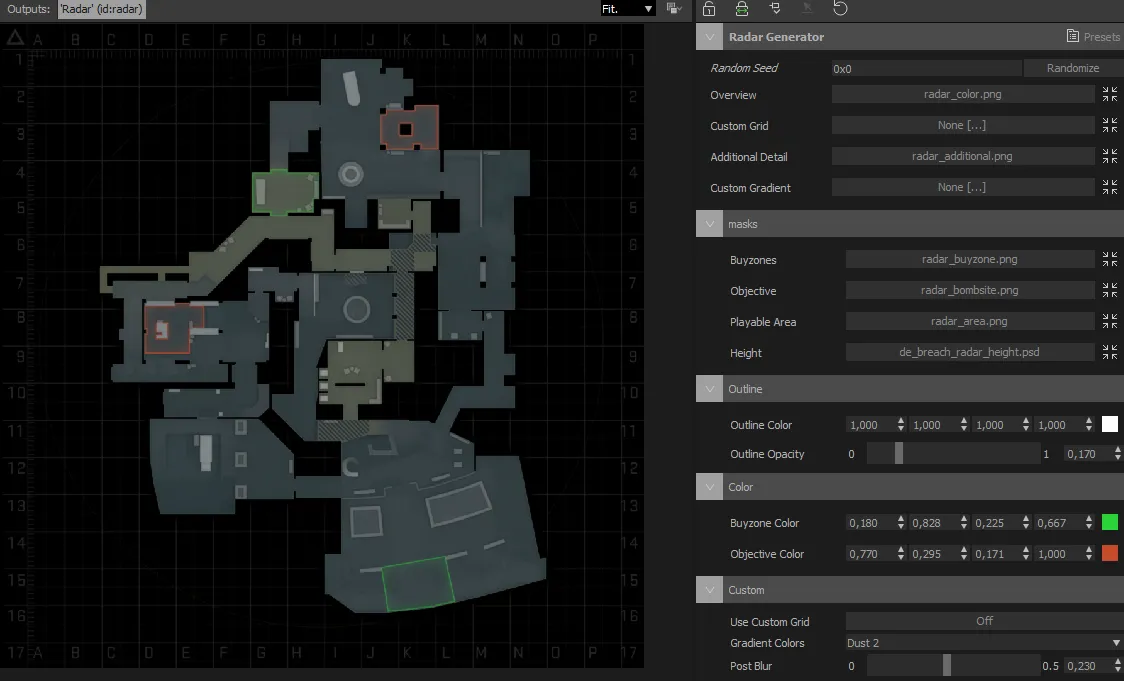
In both cases you can adjust some of the parameters, like buyzone and objective colors.
If you want to use custom height colors select Gradient colors as custom and plug in a vertical gradient in the Custom gradient slot, example:
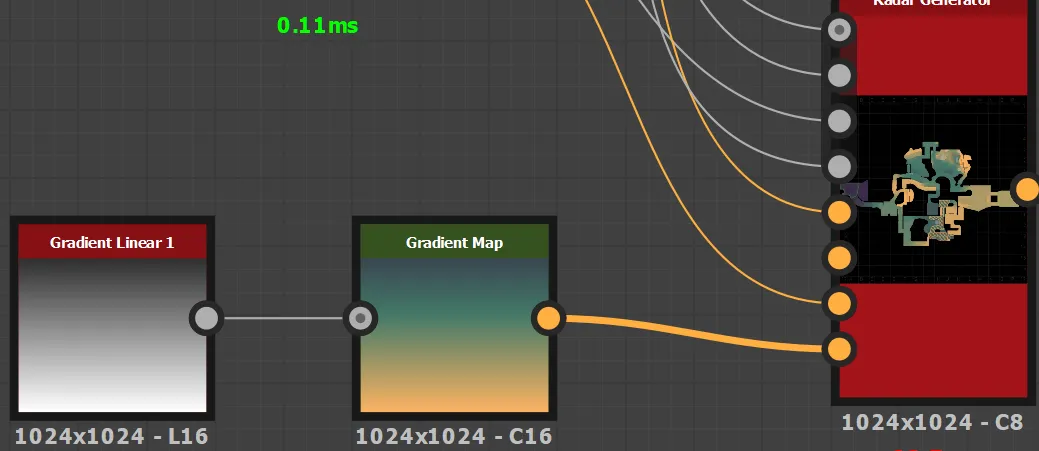
Hopefully this covers it, if you have any questions let me know.
-
Thank you for clearing up how to use it. I've never used Substance Player before but I'll try my best to figure out how to use it and get it working well.
-
Quote from Yanzl
On 8/6/2018 at 10:33 PM, Yanzl said: I've updated the Substance Painter shader to support the new 2018.2 update and added panorama radar generator with multiple color presets based on different Valve maps.
https://www.dropbox.com/s/zegqf63yt1tt…norama.zip?dl=0
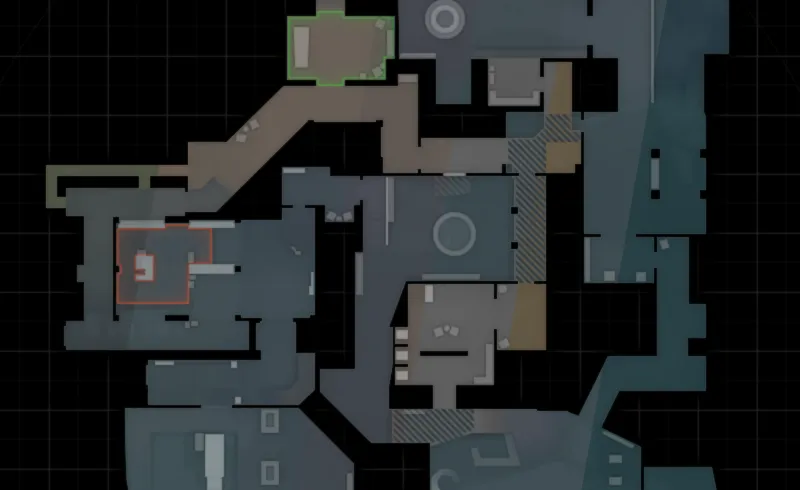
maybe I'm just dumb and missing something? but can someone explain how I use this method of creating a radar? are their any tutorials out there? I couldn't find one. Thanks in advance.
(NEVERMIND) i found your explanation... thanks.
-
how to install ??
-
I have another guide for you, this time it's for custom cubemaps.
You need:
Cubemaps.zip !Edit the bat files to reflect your csgo path if it's not in program files!
Photoshop
Cmft Studio https://github.com/dariomanesku/cmftStudio
Step 1 - Get the cubemap
If you have an HDR panorama ready that you want to use you can skip to part 2. You can also create one with Substance Designer and the various nodes it has for making HDRIs (https://docs.substance3d.com/sddoc/hdri-tools-186974230.html).
The other option that I'll show here is to take an existing cubemap from a map and edit/blur it.
You can make a map specifically for the cubemap or take one out from an already compiled map. I suggest you change the cubemap size to at least 128 to get better details.
1. To get the cubemap run buildcubemaps then navigate to: csgo/materials/maps/<mapname> and find the right cubemap.
2. Copy the cubemap to a working directory (desktop is easiest for cmft studio), also unzip the contents of the cubemaps.zip here
3. Drag the cubemap on top of decompile.bat. You should get 6 new files.
4. Open the file ending in bk in Photoshop. Go to Image > Canvas size... Width should be current width * 4 and Height should becurrent height * 3 (eg. 512 x 384 for 128^2 and 1024 x 768 for 256^2). Set the anchor to middle left square.
5. Drag in the rest of the faces and align the according to the cubemap_template_cmft.png. There should be no seams and it should look something like this:
[Blocked Image: https://i.imgur.com/Hbjsvbh.png]
6. Save the file as .hdr.
Step 2 - Filter in cmft
You can use either a panorama (2:1 ratio) or a cubemap (from the previous step) (4:3 ratio).
1. Open cmft studio.
2. In the Environment tab, click on Edit, then Browse... and find the panorama/cubemap and then click Load
[Blocked Image: https://i.imgur.com/GRiUaV4.png]
3. Under Radiance, click on Filter skybox with cmft. Set the result size to 128 (64 is also fine since blurrier cubemaps don't need a lot of resolution). Set the Num mipmap to filter to 1. Then depending on how blurry you want your cubemap to be, set the Gloss scale. Lower values mean more blur, higher less. I found values around 6 - 9 work best. Use OpenCL crashes on my computer so uncheck that if it also happens for you. Click on Process and wait for results.
[Blocked Image: https://i.imgur.com/b60whqd.png]
4. Save the Radiance map as .hdr, HCross. Also mind the directory you save it in.
[Blocked Image: https://i.imgur.com/bzbGjQ6.png]
Step 3 - Export to CS:GO
1. Open the .hdr file you got from cmft in Photoshop.
2. Go to Filter > Other > Offset and use a Horizontal offset of twice the face size (+128 if 64 or +256 if 128)
3. Go to Image > Image Rotation > Flip Canvas Vertical. The image should look like cubemap_template_export.png.
[Blocked Image: https://i.imgur.com/oBQ69P6.png]
4. Save the image as PFM with the following name template: <cubemap name>_hdr.pfm Make sure you save as .pfm and not .pbm and that it ends with _hdr.pfm.
5. Copy the saved .pfm file and vtex_params.txt from the included zip to csgo/materialsrc/cubemaps
6. Rename the .txt file to the same name as the cubemap (ex. cube01_hdr.pfm and cube01_hdr.txt)
7. Drag the .txt file on top of vtex.bat. Your new compiled cubemap should be in csgo/materials/cubemaps. Copy it to wherever you want. (You can delete the .pwl.vtf file)
8. Your cubemap is now ready to use in your materials. Just use ex. $envmap "cubemaps/cube01_hdr" instead of $envmap env_cubemap
[Blocked Image: https://media.discordapp.net/attachments/570727958575054883/760556968271806474/unknown.png?width=800&height=791]
-
Two new asset releases!
First up is Basalt. Sadly I can't release all of the assets as some of the nature stuff is from Megascans and can't be redistributed. Also only includes the assets I've made.
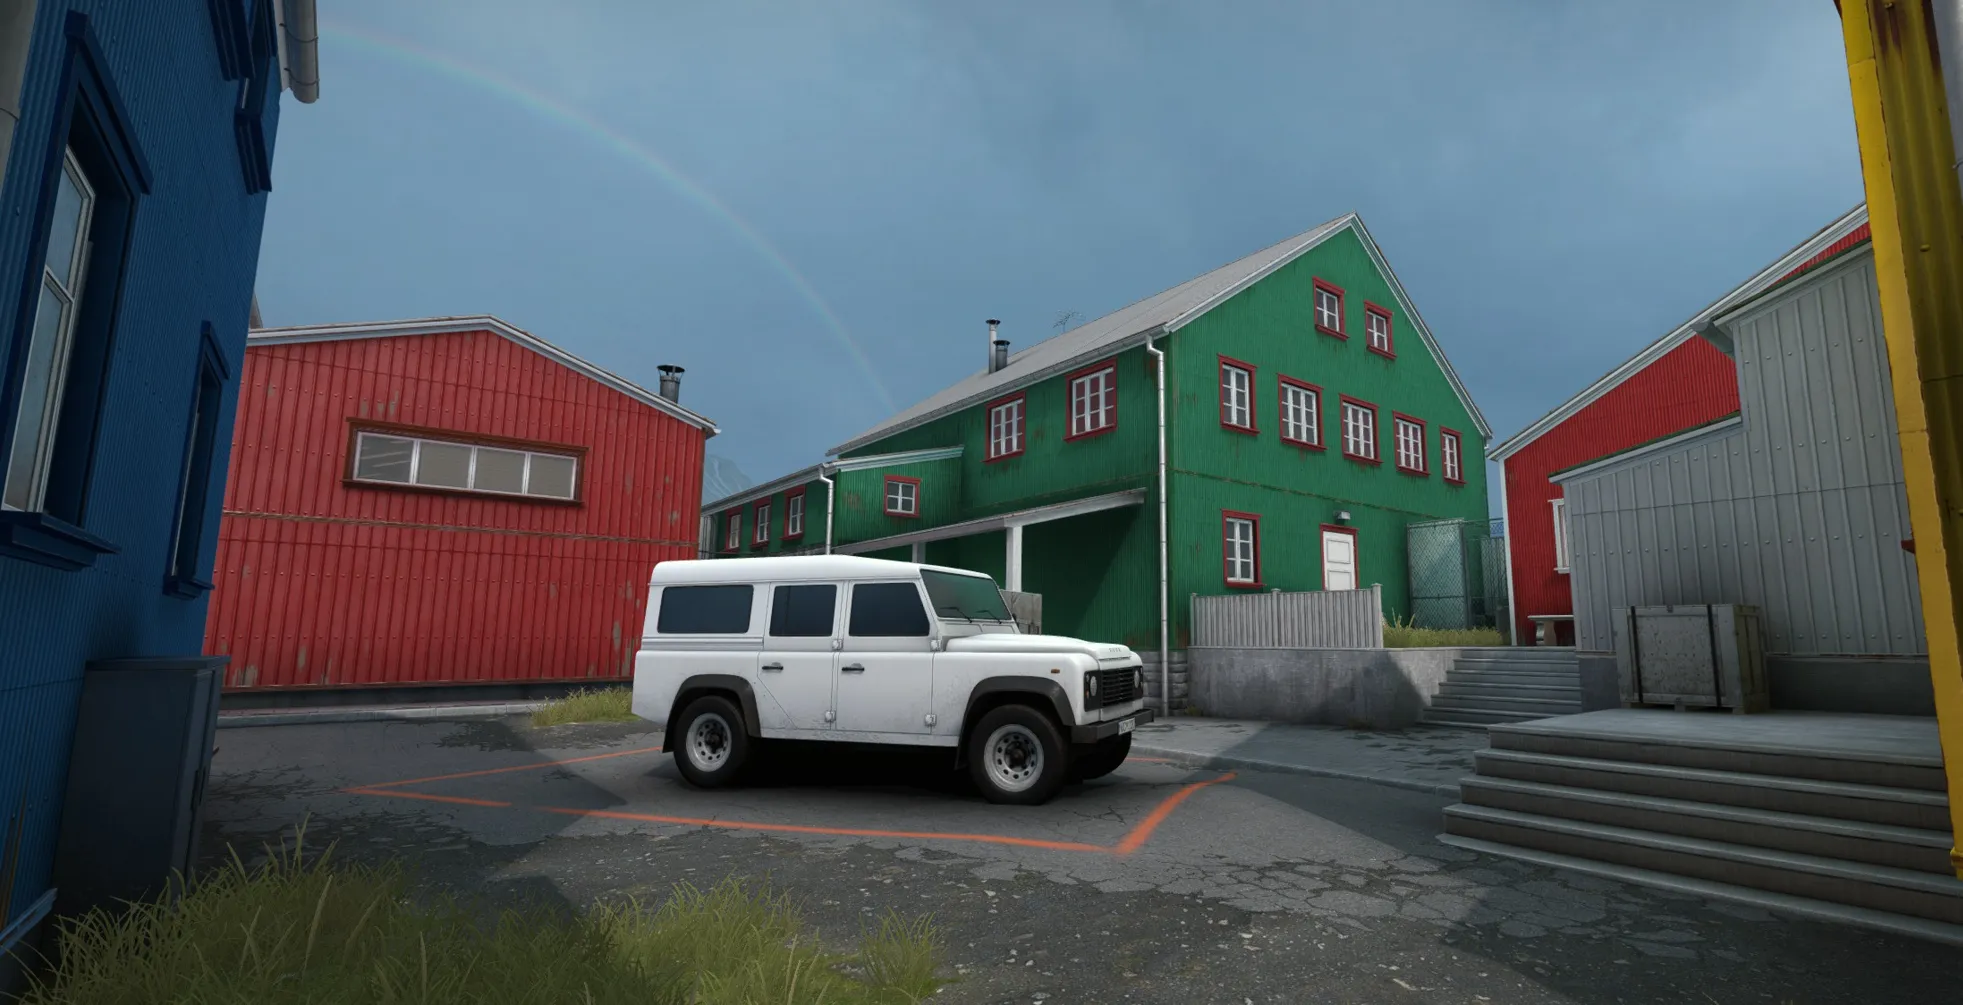
https://www.dropbox.com/s/e86kdqwpvhhs5x6/Basalt.zip?dl=0
Second one is assets I've made for Pitstop. A small release that includes some road and concrete trim textures, a bunch of sponsors and some skybox buildings that might be useful.
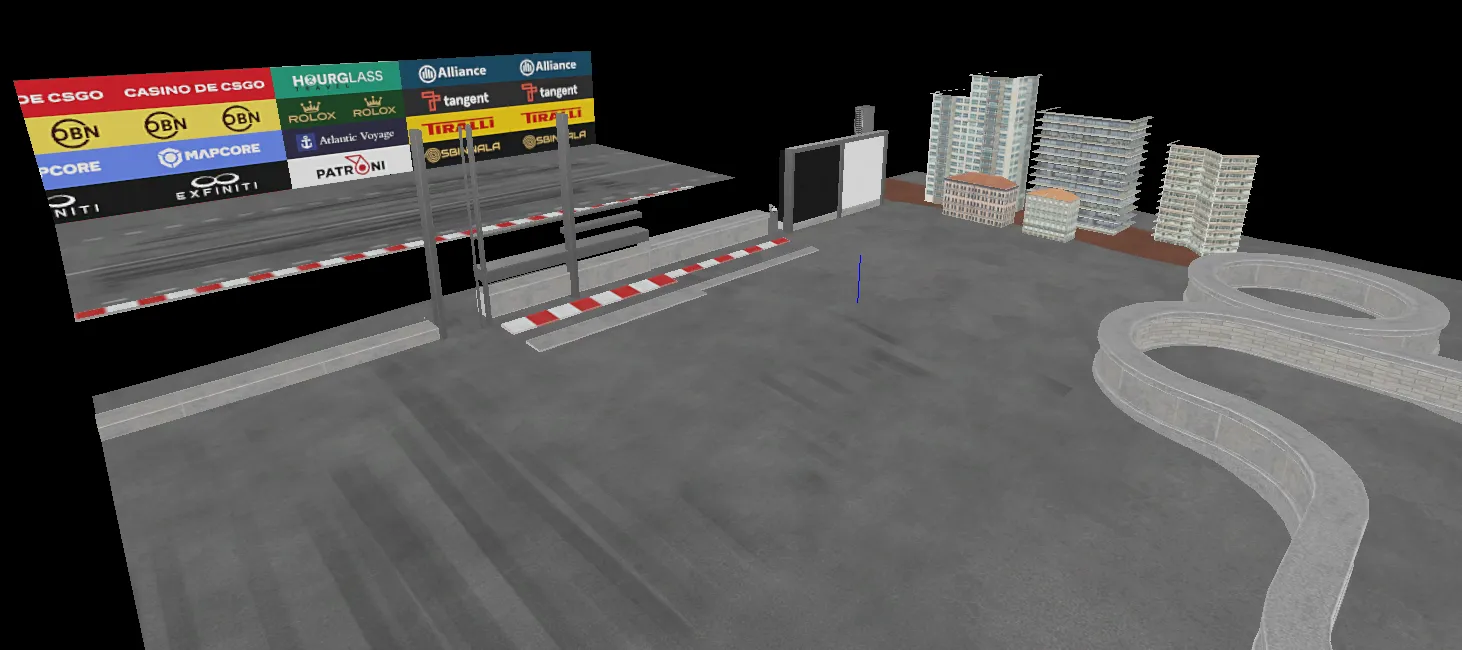
https://www.dropbox.com/s/x6tn3b6nfo2u77d/Pitstop.zip?dl=0
As always, free for non-commercial use with attribution.
-
Holy shit that is amazing, good job on the map!
-
Thank you for your custom cubemaps tutorial, especially your vtex.bat tool! I originally tried to create custom HDR cubemaps by importing TGA files with VTFedit. However, this led to cubemaps looking like this. By creating a PFM file of the cubemap cross and using vtex.bat to generate the VTF, I was finally able to create a proper looking HDR cubemap.
-
The PBR to Source converter looks fantastic! Would it be possible to include a SBSAR file for the brush version so that it can be opened in Substance Player for free?
-
Quote from Yanzl
On 2/27/2022 at 12:34 AM, Yanzl said: Two new asset releases!
As always, free for non-commercial use with attribution.
Just a quick question for this release and your previous ones: Is it ok to use these assets in other engines than Source, provided it's for non-profit projects with proper credits? (using some of these assets for example in UE or CryEngine in a free non commercial project/release)
As always, thank you a bunch for sharing these high quality assets with the community

-
 Quote from will2k
On 4/1/2022 at 6:37 PM, will2k said: Just a quick question for this release and your previous ones: Is it ok to use these assets in other engines than Source, provided it's for non-profit projects with proper credits? (using some of these assets for example in UE or CryEngine in a free non commercial project/release)
As always, thank you a bunch for sharing these high quality assets with the community
Yeah, as long as you give proper credit and it's for non-commercial purposes, it's fine.
-
Quote from Yanzl
7 hours ago, Yanzl said: Yeah, as long as you give proper credit and it's for non-commercial purposes, it's fine.
Thank you
-
Participate now!
Don’t have an account yet? Register yourself now and be a part of our community!