This is the second part of a technical analysis about Source Lighting, if you haven’t read the first part yet, you can find it here.
Last time, we studied the lightmaps, how they are baked and how VRAD handles the light travel through space. We ended the part 1 with an explanation of what the Constant-Linear-Quadratic Falloff system is, with a website that allows you to play with these variables and see how lighting falloff reacts to them. We will now continue with basic examples of things you can do with these variables.
Examples of application
Constant falloff
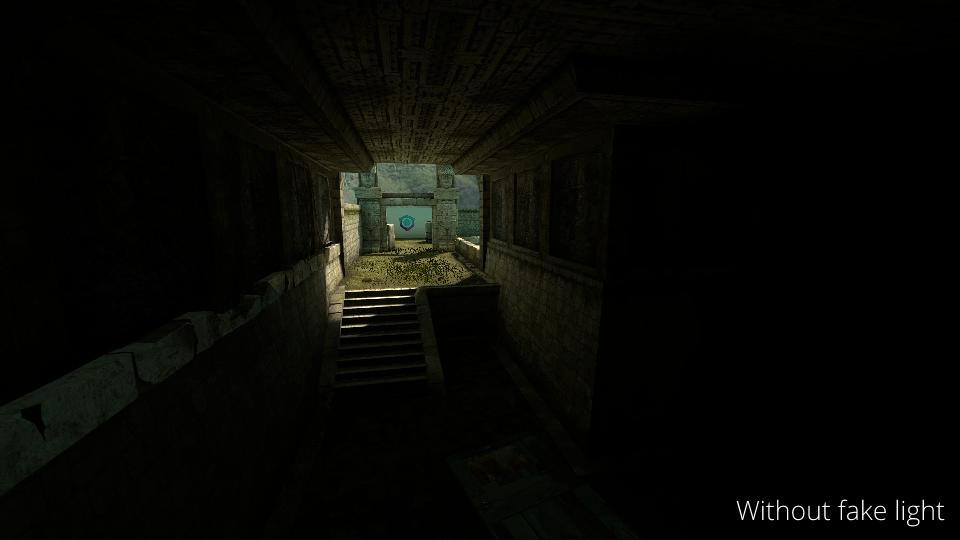
 The simplest type of falloff is the 100% constant one. Whatever the distance is, the lighting has theoretically the same intensity. This is the kind of (non-)falloff used for the sun lighting, it is so far away from the map area, that light rays are supposed to be parallel and light keep its intensity. Constant falloff is also useful for fake lights, lights with a very low brightness but that are here to brighten up the area.

Linear falloff
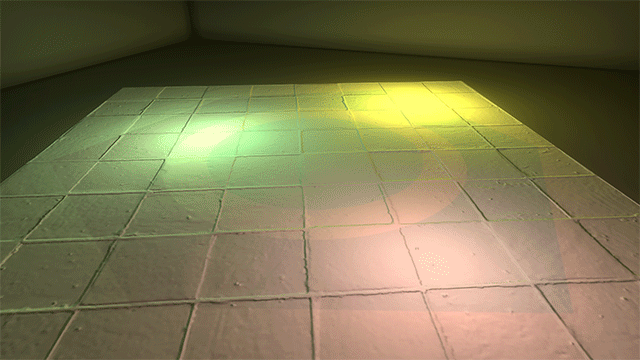
Another type of falloff is the 100% linear one. With this configuration, light seems to be a bit artificial: it loses its intensity but goes way further than the 100% quadratic falloff. It can be very useful on spots, the lighting is smooth and powerful. Here is an example:

Quadratic falloff

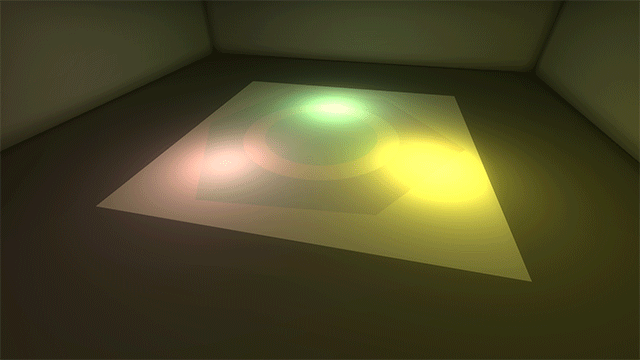
This is the default configuration for any light entity in Hammer, following as we said before the classic Inverse-Square law (100% Quadratic Falloff). It is considered to be the most natural and realistic falloff configuration. The biggest issue is that it boosts the brightness so much on short distances, that you can easily obtain a big white spot. Here is an example, with a light distant of 16 units from a grey wall:

This can also happen with linear falloff but it is worse with quadratic. Simple solutions exist for that, the most common is not to use a light entity but a light_spot entity that is oriented to the opposite direction from the wall/ceiling the light is fixed to. You can make the opening angle of your light_spot wider, with the inner and outer angle parameters (by default the outer one is 45°, increase that to a value of 85° for example). If needed, you can also add a light with low brightness to light the ceiling/wall a bit.

50% & 0% FallOff
A second light falloff system exists, overriding the constant-linear-quadratic system if used. The concept is much simpler, you have to configure only 2 distances:
- 50 percent falloff distance: Distance at which light should fall off to 50% from its original intensity
- 0 percent fall off distance: Distance at which light should end. Well ... almost, it actually fall off to 1/256% from its original intensity, which is negligible.
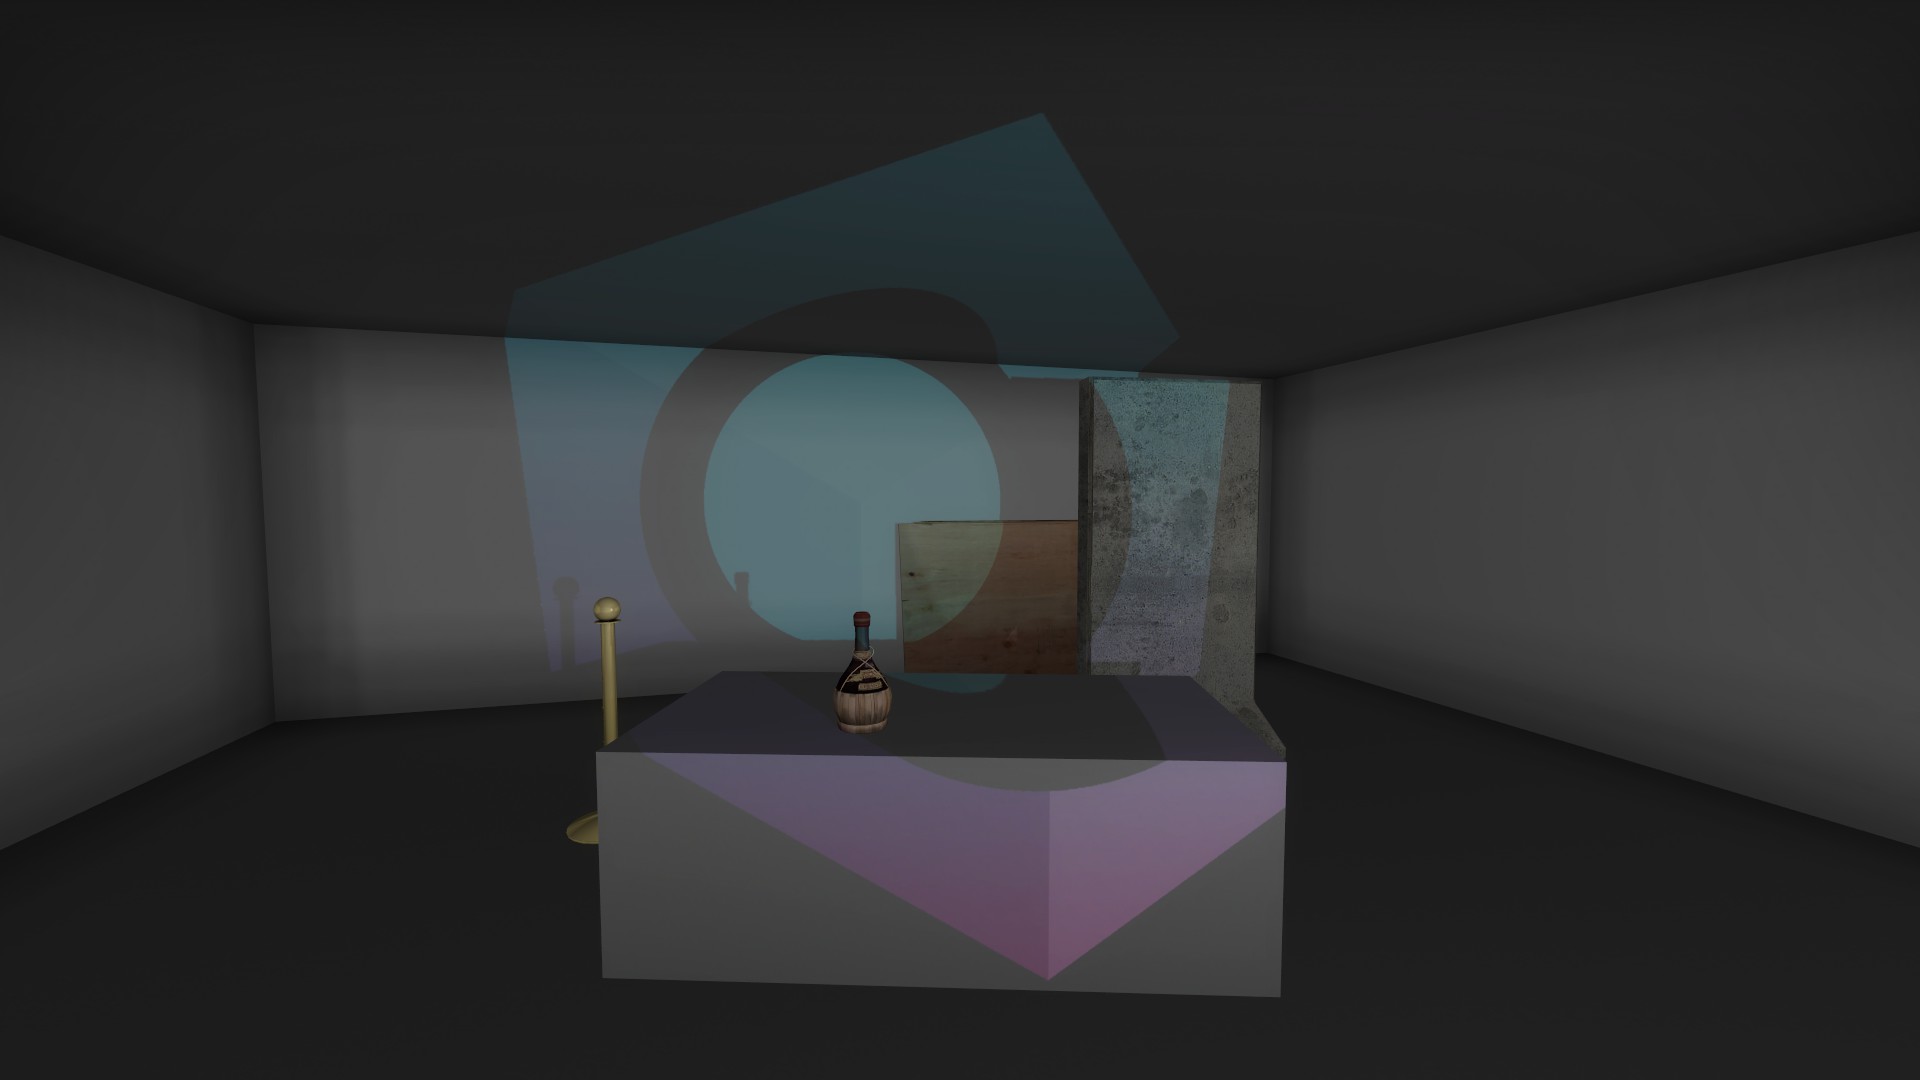
The good thing with this falloff system is that you can see the 2 spheres according to the 2 distances you have configured in Hammer. Just make sure to have this option activated: 

Models lighting
An appropriate section for models lighting is needed, because it differs from brush lighting (but the falloff stays the same). In any current game engine, lightmaps can be used on models, a specific UV unwrap is even made specifically for lightmaps. But on Source Engine 1 (except for Team Fortress 2) you cannot use lightmaps on models.
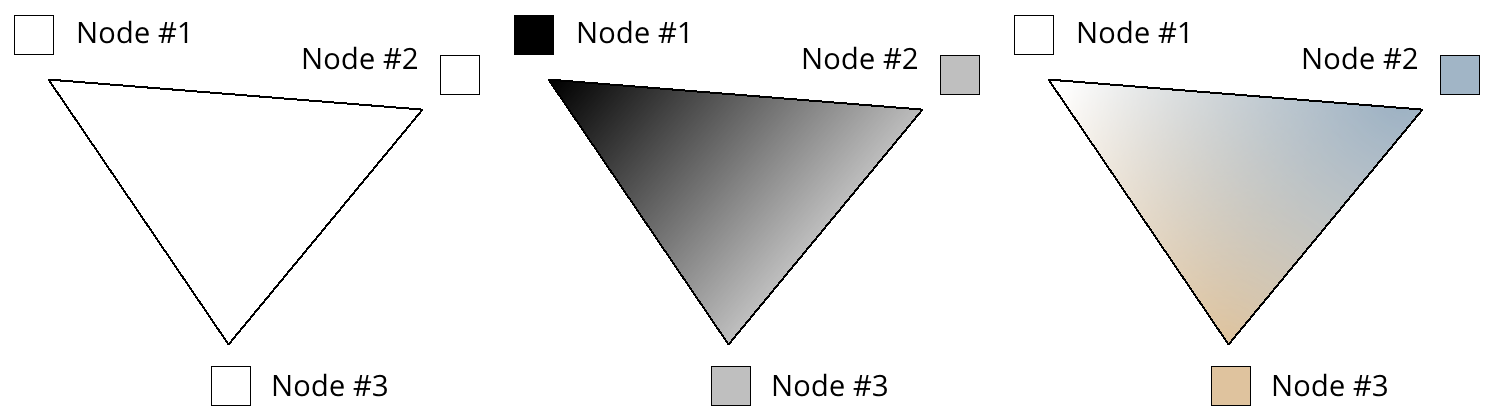
The standard lighting method for models is named Per-Vertex Lighting. This time, light won’t be lighting faces but vertices, all of the model’s vertices. For each one of them, VRAD will compute a color and brightness to apply. Finally, Source Engine will make a gradient between the vertices, for each triangle. For example:
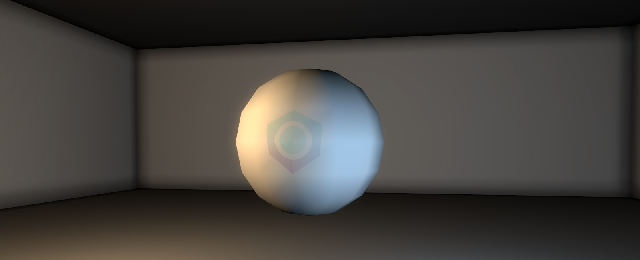
If we take a simple example of a sphere mesh with 2 different light entities next to it, we can see it working.

With this lighting method, models will therefore be integrated in the environment with an appropriate lighting. The good thing is that, if a part of the model is in a dark area, and another part is in a bright area, the situation will be handled properly. The only requirement for this is that the mesh must have a sufficient level of detail in it; if there is a big plane area without additional vertices on it, the lighting details could be insufficient.
Here is an example of a simple square mesh with few triangles on the left and a lot on the right. With the complex mesh, the lighting is better, but more expensive.

If you need a complex mesh for your lighting, you don’t want your model to be too expensive, you have to find a balance.
Two VRAD commands are needed to make the Per-Vertex Lighting work:
- StaticPropLighting
- StaticPropPolys
You have to add them here. You can find more information here.
Another system exists, that is much cheaper and simpler. Instead of focusing on the lighting of all the vertices, the engine will only deal with the model’s origin. The result obtained in-game will be displayed on the whole model, using only what has been computed at the model’s origin location. This can be an issue if the model is big or supposed to be present in an area with lots of contrast in lighting. The best example for that is at the beginning of Half-Life 2 with trains entering and exiting tunnels. We can see the issue: the model is illuminated at the beginning, but when it enters the tunnel it suddenly turns dark. And this moment is when the train’s origin gets in the shadow.
This cheap lighting method will replace the per-vertex lighting for 3 types of models:
- For prop_dynamic or any kind of dynamic models used in the game (NPCs, weapon models in hand, any animated models...)
- For prop_physics
- For ANY MODEL USING A NORMAL MAP (vertex lighting causes issues with normal maps apparently), EVEN IF USED AS A PROP_STATIC

The big problem with these models is their integration in the map, they won’t show any shadow and their lighting will be very flat and boring (because it’s the same used for the whole model). But hopefully there are 2 good things with this cheap lighting method.
First, the orientation from which comes light is taken into account, if blue light comes from one direction, therefore all the faces oriented toward this direction will be colored in blue. And if you have different lighting colorations/intensities coming from different sides of your model, they should appear in game.
Here is an example of a train model using a normal map with 2 lights on both side. If you look closely, you’ll see some blue lighting on the left, on faces that are supposed to be in the shadow of the blue light but are oriented toward the blue light.

The second good thing is that there is still some kind of dynamic per-vertex lighting, but much simpler: it only works with light and light_spot entities (NOT with light_environment), and it just adds some light to the prop, it cannot cast any shadow (it only takes into account dynamically the distance between the light and the vertex). If we use again the high-poly plane mesh we had before as a prop_dynamic, being parented to a func_rotating that ... rotates. Light is dynamically lighting the vertices of the props. There is a limit of 3 dynamic lights per prop, it can’t handle more at the same time.
And if you add a normal-map in your model’s texture, this cheap dynamic lighting works on it:
Projected texture and Cascaded Shadows
Few words to finish the study with dynamic lighting. Projected textures is a technology that appeared with Half-Life 2: Episode Two in 2007, it consists of a point-entity projecting a texture in the chosen direction, with a chosen opening angle (fov). The texture is projected with emissive properties (it can only increase the brightness, not lowering it) and it can generate shadows or not. The great thing with this technology is that it’s fully dynamic, the env_projectedtexture can move and/or aim at moving targets. This technology is used for example on flashlights in Source games. But as usual, there is also a drawback: most of the time you can only use only 1 projected texture at a time, modders can change this value quite easily but on Valve games it is always locked on 1.
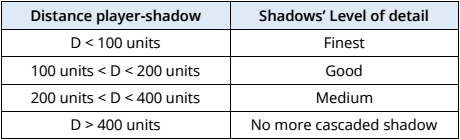
The cascaded shadows system is only used on CS:GO. The concept is quite similar from a projected texture but it doesn’t increase the brightness, it only adds finer shadows. It is used for environment lighting, using much smaller luxels than for the lightmaps and it is fully dynamic. It starts from the tools/toolsskybox textures of the map and cast shadows if it meets any obstacle. Shadows from the lightmap are most of the time low resolution and the transition between a bright and a dark area is blurry and wide. Therefore, the cascaded shadow will be able to draw a clear shadow around the one from the lightmaps.
When an object is too small to get a shadow in the lightmap, it will be visible thanks to the cascaded shadows. There are 3 levels of detail for cascaded shadows on Counter-Strike, you can configure the max distance at which the cascaded shadows will work in the env_cascade_light entity at the parameter Max Shadow Distance (by default it’s 400 units). The levels of detail will be distributed within this range, for example:
Since cascaded shadows and projected textures share some technology, you can’t use them both at the same time.
Conclusion
I really hope you have found this article interesting and learned at least few things from it. I believe most of these informations are not the easiest to find and it’s always good to know how your tools work, to understand their behavior. Source Engine 1 is old and its technologies might not be used anymore in the future, more powerful and credible technologies are released frequently but it’s always good to know your classics, right?
I would like to thank Thrik and ’RZL for supporting me to write this article, and long live the Core!
// Written by Sylvain "Leplubodeslapin" Menguy
Additional commands for fun
- Mat_luxels 1 // Allows you to see the lightmaps grids
- Mat_fullbright 1 // Disables all the lighting (= fullbright). On CS:GO, cascaded shadows stay and you should delete them as well (cf next command)
- Ent_fire env_cascade_light kill // KILL WITH FIRE the cascade shadows entity
- Mat_drawgray 1 // Replace all the textures with a monochrome grey texture, useful to work on your lighting
- Mat_fullbright 2 // Alternative to Mat_drawgray 1
Bonus:
- Mat_showlowresimage 1 // Minecraft mode


![[CS:GO] Shore](https://www.mapcore.org/uploads/monthly_2023_04/2955084102_preview_20230404120655_1.jpg.77b7071d4e9db1625414c7ad26720f8f.jpg)

Recommended Comments
Join the conversation
You can post now and register later. If you have an account, sign in now to post with your account.
Note: Your post will require moderator approval before it will be visible.